Monday, August 30, 2021

Sailing Home Week

Let's CASE the Catty today!

Happy Monday Stamping Friends!


The card today is CASEd (Copy and Share Everything) from the current 2021 - 2022 Annual Stampin' Up! catalog.  I've admired this card since I first saw it in the catalog and have wanted to try to recreate it.  Is uses the Layering Diorama Dies to create the "window" to the view of a beautiful sunrise over the water--which is what I see many mornings when I awake and lay in bed for a few minutes looking out my window.  It is not a bad way to start your day!

As we say goodbye to August this week, it always feels like I am saying goodbye to summer.  I know that technically we have a few more weeks of summer, but since we tend to return to our more "normal" routines in September, it feels like summer is over for another year.

But, before I bid a final adieu to summer 2021 I want to celebrate one of my favorite things of summer one more time.  To do that, this week I am featuring the Sailing Home stamp set and their coordinating Smooth Sailing dies.

While I am not a sail boater, I do love the water!  Whether I am out on my pontoon boat, kayaking, swimming or just watching the lake from the comfort of my deck, I love summer!

So, it is no surprise that I go into my happy place when I am creating a water scene with ink and blending tools.  Scenery of any kind is one of my favorite types of cards to make, but ones with water are the best!  Creating this sunrise was a lot of fun for me.  I mainly used sponge daubers to create today's scene, and you can see a complete list of the colors I used in the product list below.

Even though I have had this Sailing Home stamp set since it was first introduced and have used it many, many times, I had never really played with the rope die cut.  I think that was one of the things that drew me to the card in the catalog.  I really like the texture the "ropes" on the front of the card provide.

I also wasn't really sure how the Stampin' Up! artist created the 3-color lighthouse.  I ended up inking the complete stamp with Sahara Sand and then used the Marker to Stamp technique to add the Real Red and Misty Moonlight.  Once I stamped it, I touched up the red and blue a bit with the fine end of those markers to deepen the colors.  I don't know if that is how the original was created, but I'm happy with how it turned out.

I used a stamp from the retired stamp set, By the Dock, to create the rippled lines in the water, however, you could also use the fine tip on your Stampin' Write marker to make some squiggly lines.  I also use a white glitter gel pen on top of the ripples to add a bit of highlighting, and then add some Wink of Stella to make the sun glimmer where it reflects on the water.

As you know, I can not leave the inside of a card undecorated, but I did keep this one fairly simple.


I cut one more "rope" and another seaweed and used those to decorate the inside.  I often leave the inside of my cards sentiment free.  I can always add an appropriate sentiment at the time I send it, or I can just write a personal note.  I like to have that flexibility once I know who the recipient is going to be.

There is a FREE tutorial available that will give you many more details on how I made this Diorama Lighthouse card.


Product List
Regals Stampin' Write Markers
[131262]

Friday, August 27, 2021

Dreaming of a White Christmas

 It's a White Christmas


The card today is all about texture.  I've learned that when I make a card with mainly a monochromatic color scheme, I really need to focus on texture, so today I have lots of it!

The first layer of this basically all-white card was embossed with the Bark 3D embossing Folder.  If you want texture, this embossing folder does not disappoint!  

The 2nd layer was made with two of the large dies in the Christmas Pinecone Dies which is part of the Christmas to Remember Bundle.  The white branches were die cut from Thick Basic White Cardstock.  I used the Thick cardstock to provide a little more substance and to make the die cut a little more sturdy.  The pinecones behind the Basic White die cut branches were made from the Be Dazzling Sale-A-Bration specialty paper which you can get for free when you place a qualifying order.


The Christmas to Remember stamp set provides several great options for Christmas cards.  I'm one of those stampers who think I can never have too many sentiment stamp sets, so this one was quickly added to my collection when I saw it in the Fall Mini catalog.  I particularly liked this set because it has Christmas sentiments that are a little unique and different from anything I already have.  I heat embossed the sentiment with gold embossing powder and then die cut it with a die from the Seasonal Labels Dies.

I added a double bow made with the gold cord from Simply Elegant Trim and that was all this card needed.  It is a very elegant card with lots of texture! 

I kept the inside elegant and simple as well.  I used a scrap strip of the Be Dazzling Specialty paper to add a little bling and gold embossed another of the sentiments from the Christmas to Remember stamp set.


Now that I have a good tutorial for reference, I can can easily make additional cards. I will probably make a few more of these to add to my Christmas stash!  If you would like the free tutorial, you can find it at this link.

You can also find a complete product list at the bottom of this post. 

Would you like to receive my bi-weekly newsletter, or do you have any questions that I can help you?  If so, please provide your contact information on the Contact Tab.  I would love to have you become part of my Fairless Flair stamping friends.


Product List

Wednesday, August 25, 2021

Can we Celebrate Autumn with a Painted Christmas?

How about an Autumnal Christmas?

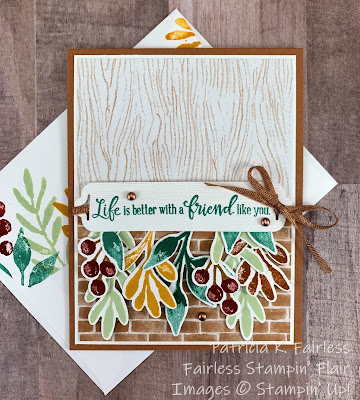
You are probably thinking this title sounds a little strange, right?  I agree, it does.  Sometimes when I choose a stamp set or product suite to feature for a week, I like to challenge myself to use it in an unexpected way.  That wasn't really my plan going into this week, but the day I was making this card was a beautiful, sunny, warm, summer, day and the best I could do was get into an Autumnal mindset.


When I looked at all the different types of leaves and branches in the Christmas Season Stamp set, I thought, "these don't have to be Christmas branches, do they?"  So I decided to stamp them in what I consider the warm colors of autumn -- yellows, reds, greens, copper and rusts.  I just started stamping them in all our different Stampin' Up! shades of those colors with no real plan in mind.  Between you and me, that is not at all like me!  I like to have a plan, and the more etched in stone it is, the happier I am.

After I die cut all the leaves with the coordinating dies, I wondered what I was going to do with all of them so started looking around for inspiration.  When I looked out my door wall, this is what I saw--these vegetables hanging over a brick wall.

Next Door Inspiration!

That put me on a search through my stash of designer series paper to see what I had, and I found this Cinnamon Cider brick design from Bloom Where You are Planted.  The color was perfect with my Autumnal colored leaves and it had a coordinating woodgrain pattern that worked well with the brick.  Sometimes, even when there is no plan, things seem to come together!

After that, it was really just a matter of assembly!

The sentiment is from one of my go-to sentiment sets, Peaceful Moments.  Isn't this sentiment so true?  Life really is better with great friends!  I used another die from the Seasonal Labels Dies for the sentiment.  These dies include small dies to create the slots in the die cuts so it is very easy to thread a pretty ribbon through the die cut.


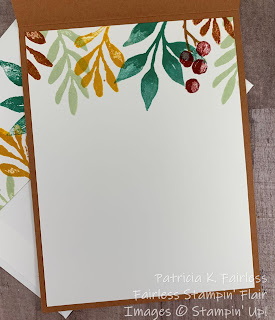
I'd had such fun stamping all the different leaves in different colors for the front of the card, that I decided to do some more stamping on the inside.  I randomly stamped more leaves in the same colors of autumn across the top of the inside leaving plenty of empty space below to write a note to a special friend that I'll send this card to.  I hope when you make cards you send them to someone!


If you would like a free tutorial for this card, please use this link to access it.

I'd love to hear what you think about this non-Christmas card made with the Painted Christmas Suite.  Would you take a minute and leave me a comment?

Below is a complete list of all products used for this card.


Product List
Crushed Curry Classic Stampin' Pad
[131173]