Monday, October 31, 2022

FOREVER FERN AND PUMPKINS

HAPPY HALLOWEEN!

This week I am featuring the Forever Fern stamp set and its coordinating dies.  This set has been around for quite a while, and it is definitely an old favorite.  I like the fact that it is so versatile, and you can use it for many different occasions. 


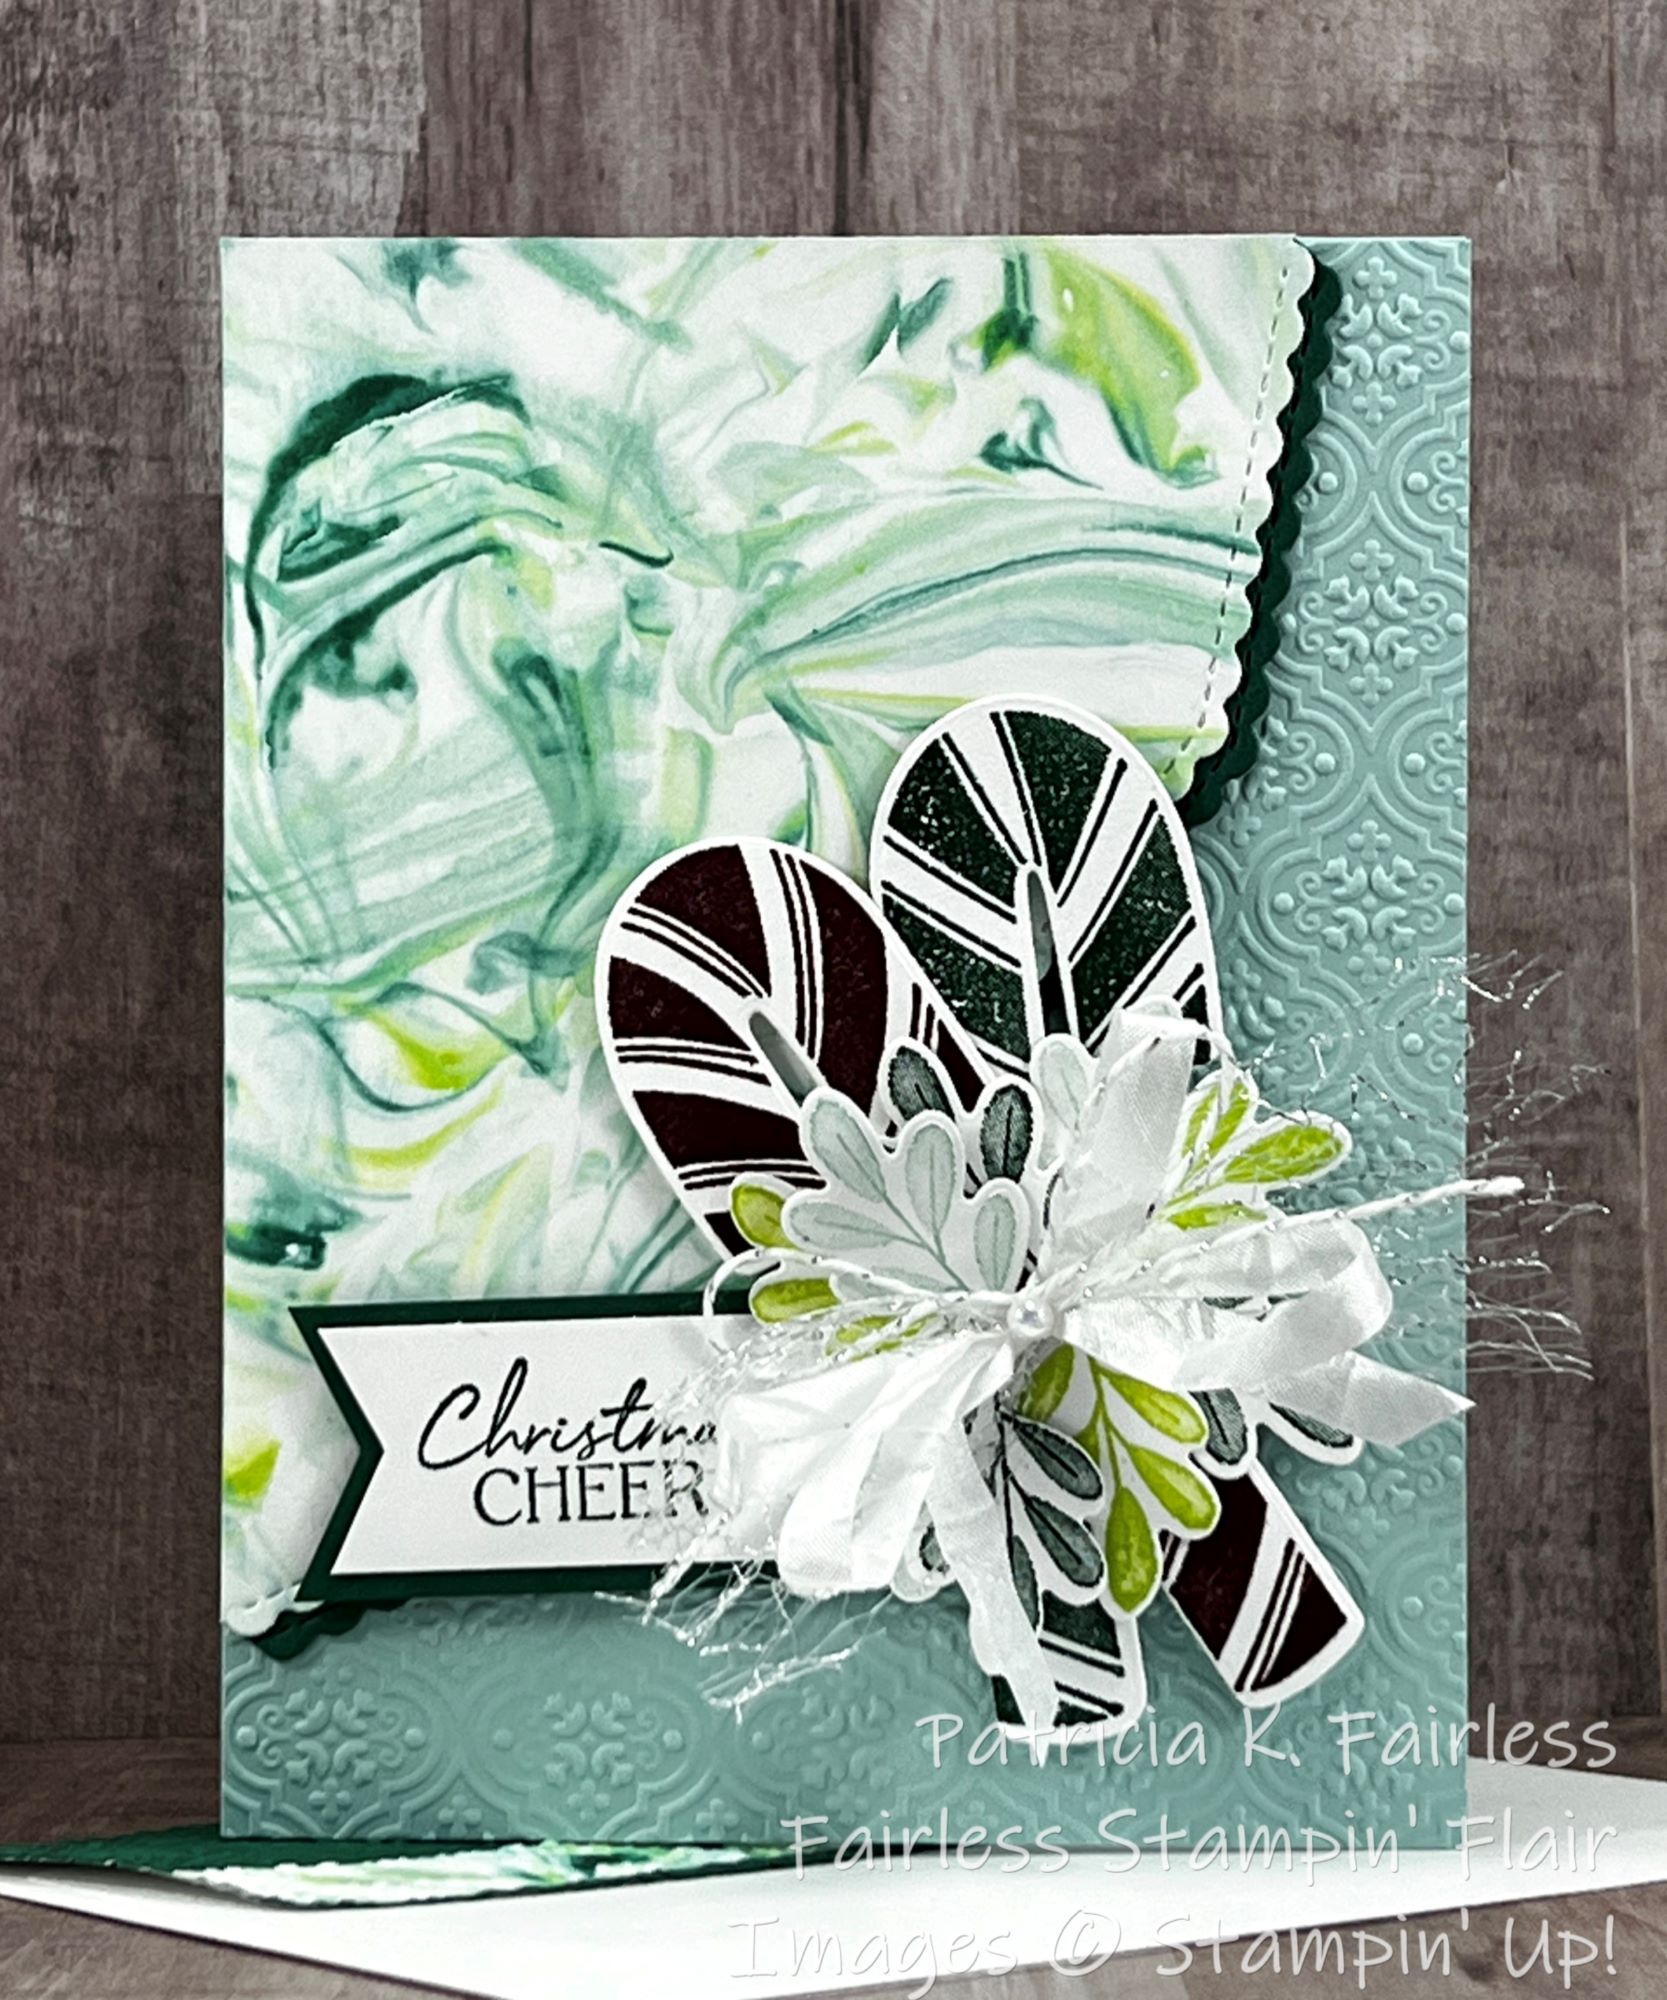
Today, for Halloween, I decided to use my Forever Fern Bundle to make a fall card.  Since pumpkins are often used for fall themed cards, it seemed like a bouquet with a pumpkin as the "flowerpot" was appropriate.  The challenge was, I don't have any current stamps that contain pumpkins.  Yup, weird, and probably surprising that I don't have one, but I don't.  However, I remembered that when I first discovered paper crafting over 15 years ago, one of the ways we made pumpkins was to use our Oval Punch.  Sometimes with all the dies and tools we have today, we forget about those old techniques.  So, I got out my Double Oval Punch and punched out 3 ovals from Pumpkin Pie cardstock.  Each is sponged with Pumpkin Pie ink around the edges and then the center one that straddles the other two is popped up on dimensionals.  Looks like a Pumpkin, right?


The background for this card was made using the Rubber Band Stamping Technique.  This is a super easy and fun technique to create interesting backgrounds. Last week on Connect to Create, I shared a video showing how to do this easy technique.  If you are unfamiliar with it, please take a look!  I hope it inspires you to try it.  The colors I used were Pumpkin Pie, Old Olive, and Merry Merlot.


I also took inspiration from Kathi Ondus, Simply Cards by Kathi, in her recent Connect to Create Video.  She demonstrated the Baby White Technique.  Her cards were so pretty, and it had been a long time since I played with that technique.  So, I decided to use the Baby Wipe Technique to make some colorful fall leaves for my Pumpkin Bouquet.  Below is her video.  Take a look and you can learn two great techniques today!


The large leaves in my pumpkin bouquet were made with the Baby Wipe Technique.


I also used that technique for the leaves on my envelope flap and on the inside of my card.


I made my Baby Wipe "Ink Pad" with the same colors as I used for the Rubber Band background except, I also added a few drops of Daffodil Delight.  Aren't these colors pretty?

If you would like a FREE Tutorial for this Pumpkin Bouquet card, you can download a copy at this link.


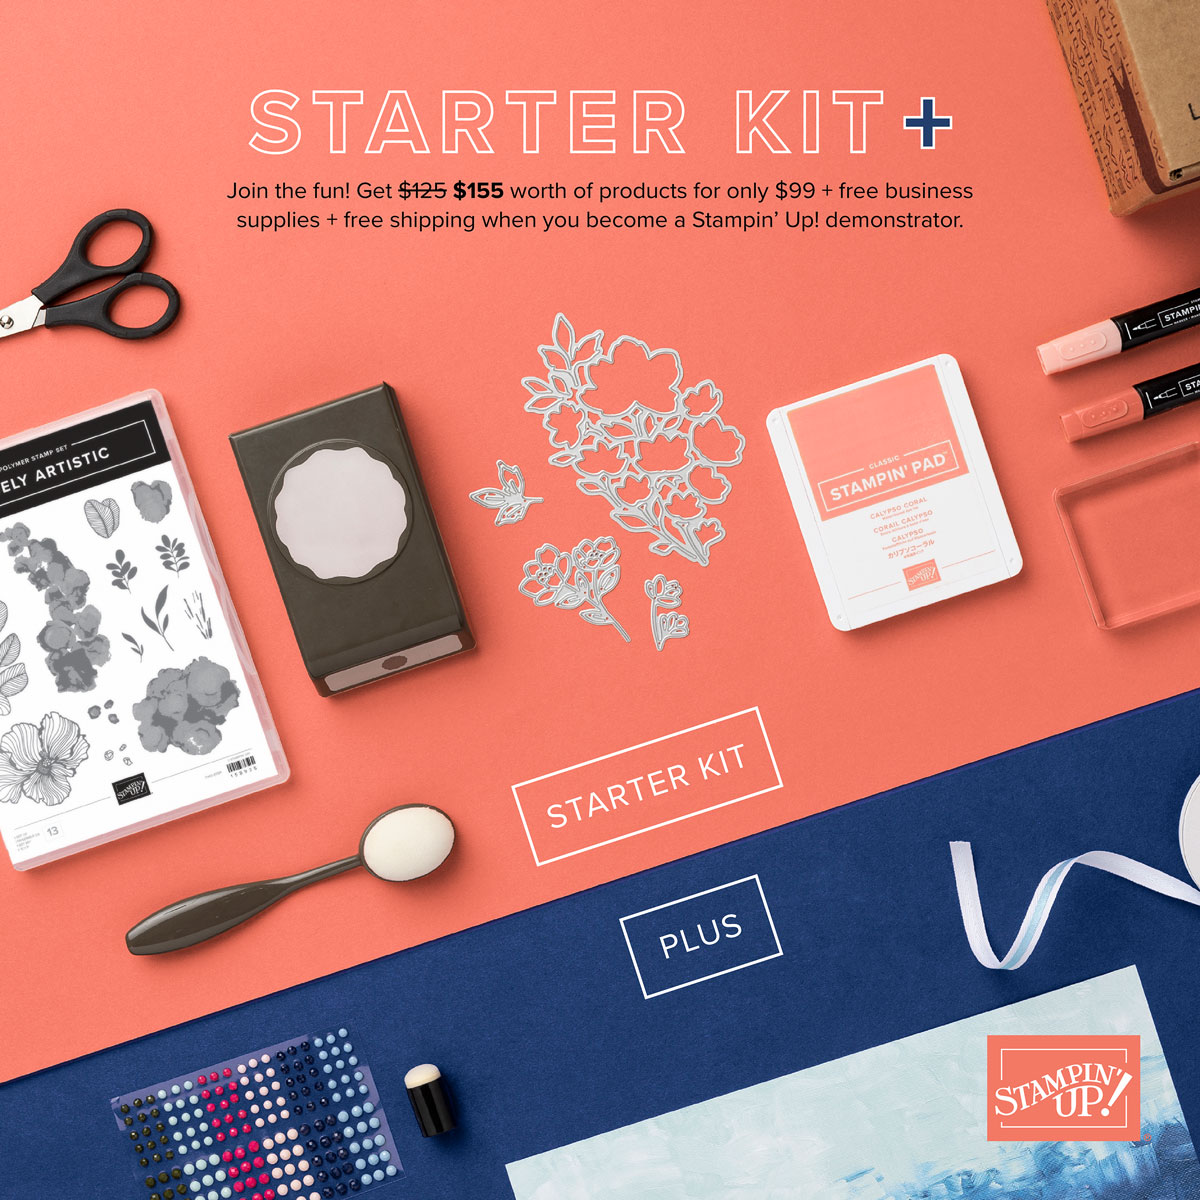
A quick reminder.  Today is the last day of October, so today is the last chance to take advantage of the awesome Starter Kit+ Promotion.  Normally, you can select $125 worth of product for $99, but through today, you can select $155 worth of product for $99.  And SHIPPING IS FREE!  I would love to have you join my Fairless Flair Team!  If you have questions or would like to learn more, please send me an email directly at fairlessflair@gmail.com.  But today is that last day for this terrific opportunity!

The following Product List shows the current Stampin' Up! products I used for today's card.


Product List

Saturday, October 29, 2022

SCRAPBOOK SATURDAY-REMEMBERING IN BAXTER


I REMEMBER BAXTER LIKED TO SPEND TIME OUTSIDE - WHETHER IT WAS LAZY AFTERNOONS SPENT TOGETHER IN A PARK, CHASING THE BAD OLD SQUIRRELS, OR JUST WATCHING ME CUT THE GRASS.  

HE EVEN WANTED TO BE OUTSIDE WITH ME WHEN I WAS SHOVELING SNOW AND HIS LITTLE FEET WERE FREEZING, SO MUCH SO THAT HE TOLERATED THE LITTLE BOOTS I FOUND FOR HIM.


Friday, October 28, 2022

CANDY CANES AND SHAVING CREAM

 Candy Canes and Shaving Cream...  It doesn't sound like a very logical paring, does it?  Well, on today's card, it makes perfect sense!


I used the Shaving Cream Technique to provide a background for the Candy Canes.  If you follow me regularly, you know that this is my favorite Technique.  I love that you never know exactly how it is going to turn out when you start adding ink to a pile of shaving cream.  Every time you dip your paper in the inked and swirled pile of shaving cream and pull it out, it is like a brand-new reveal!  It looks different every time! 

You may have seen my video that demonstrates this technique, but if not, take a look!

It is so much fun and each time I wipe the shaving cream off from the cardstock, I love to see what my new creation looks like!


Today's Shaving Cream Background was made with Pool Party, Parakeet Party and Shaded Spruce Reinker colors.  I used the Basic Border Dies to die cut the corner shape from the completed Technique Sheet and then using the same die to cut a second piece from Shaded Spruce Cardstock for a narrow, scalloped border.  This assembly was adhered to the front of the embossed Pool Party card base.   


The Candy Canes were stamped with Merry Merlot and Shaded Spruce and die cut with the coordinating dies.  Several of the leaf branches were stamped with Pool Party, Parakeet Party and Shaded Spruce and then die cut with the coordinating dies from Candy Cane Dies.  After arranging a bouquet of stems on top of the candy canes, a faux bow made from Metallic Mesh Ribbon and White Crinkled Seam Binding (cinched together with White Bakers Twine) was adhered on top of the branches.  A single Iridescent Pearl is placed at the center of the bow.

The Christmas Cheer sentiment from Sweet Candy Canes is stamped with Shaded Spruce on Basic White and layered with a Shaded Spruce mat.

To decorate the inside of the card, I used some of the leftovers from my Shaving Cream Technique Sheet.


I had a large enough scrap left over to die cut a candy cane and a narrow strip.  I used the candy cane for the inside of my card and placed it to the left of the Shaded Spruce sentiment.
To finish it off I added a few more leaf sprigs and some Merry Merlot Berries (from the Merriest Moments Stamp Set & Coordinating Dies).

The leftover strip was used to trim the embossed Shaded Spruce that I had used to cover the envelope flap.  You can see a little peek of it behind the card.

I hope you have enjoyed the Sweet Candy Cane cards this week.  As I mentioned on Monday, the Striped Die was what initially drew me to this bundle, but once I started playing with it, I liked it so much that I decided to make it the featured bundle for my November Stamp Camp-to-Go.  So, you DEFINITELY have not seen the end of the ideas for this bundle!

If you like the ideas and would like to join our November Stamp-Camp-to-Go, contact me to learn more.  The last day to RSVP for the November kits will be Wednesday, November 2, 2022.  You can email me at fairlessflair@gmail.com.

A detailed tutorial is available for today's card.  Use this link to download a copy.

If you have enjoyed this week's Sweet Candy Canes cards this is the featured bundle for my November Stamp Camp-to-Go class.  If you would like to participate, please sign up for my Newsletter to receive all the details!

The following list shows all the products used to create this card (except the shaving cream).


Product List