Wednesday, July 31, 2024

COLORFUL BUTTERFLIES

Where do you find your inspiration for cards?  I find a lot of mine from projects that other demonstrators share.  Today's card layout was inspired by a card that I saw a few weeks ago on Laura's Creative Pages.  The black doodles around the border are definitely one of her trademarks!

I'm amazed how much of a "pop" her simple doodles add to a card.  Definitely, not something I would have come up with on my own.

This card showcases the five 2024-2026 In-Colors.  I think I say this every year, but these in-colors are some of my favorites ever!


The butterflies were made using dies from the Sketched Butterflies Bundle and the colorful In-Color strips were made with a die from Delicate Forest Dies.  The bodies of the butterflies are made with Rhinestone Basic Jewels colored black with a Stampin' Blend.

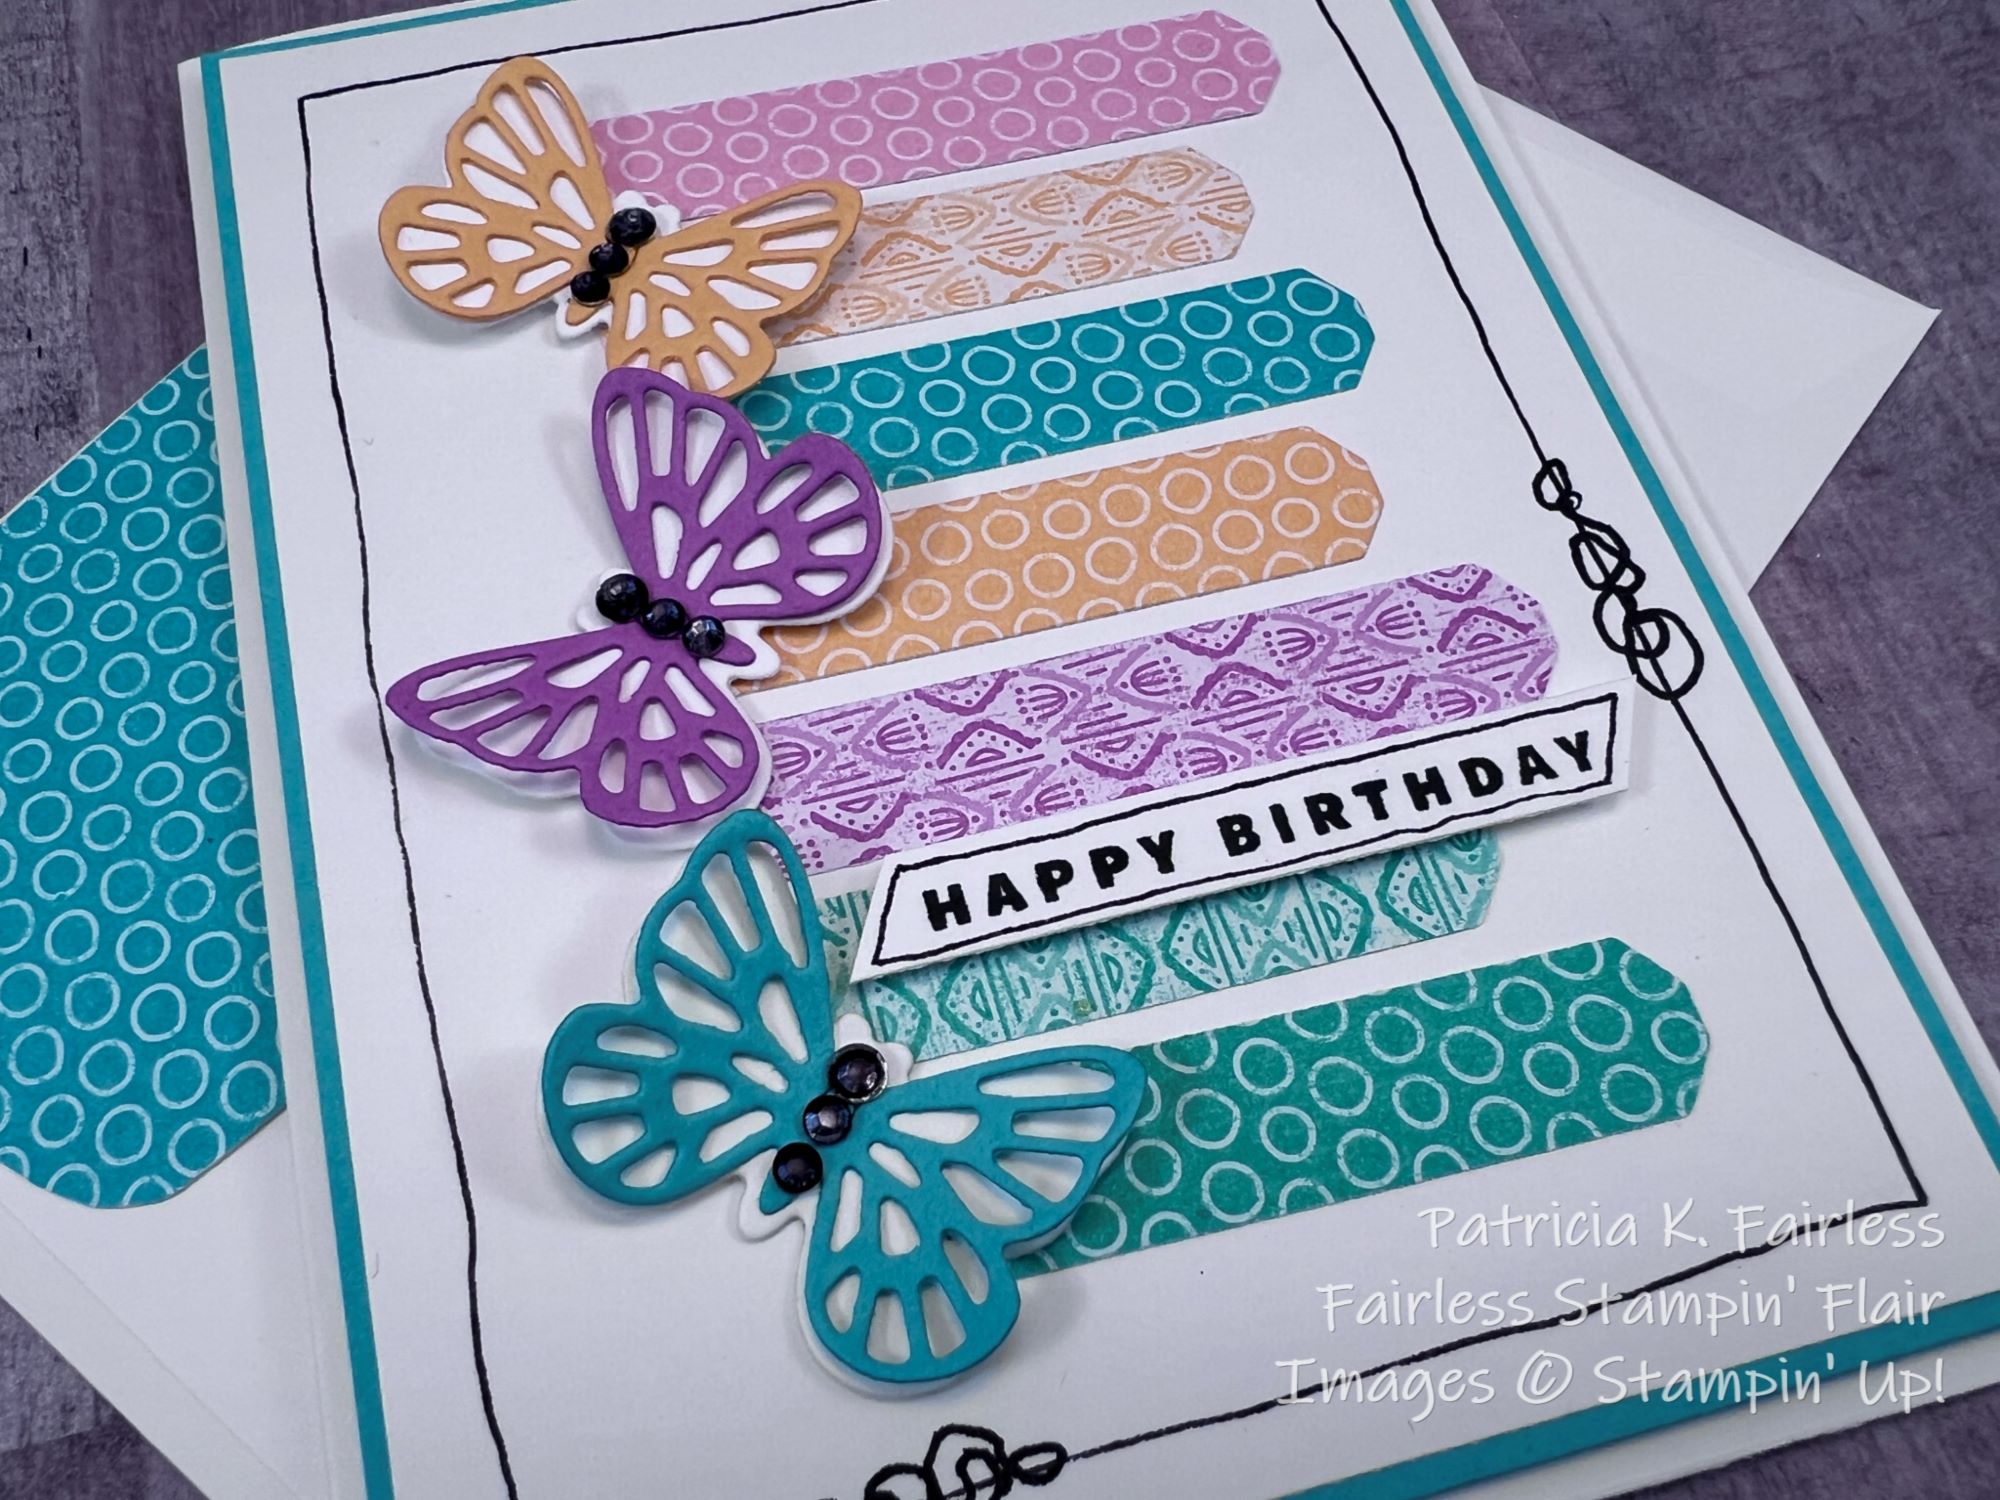
The Delicate Forest die made longer strips than I wanted, but I just snipped them off to create various shorter lengths.  Being someone who can never let a good "scrap" go to waste, I used the snipped off ends to decorate the inside of the card.

The front and the inside sentiments are from the Something Fancy stamp set.

Use this link to download FREE TUTORIAL for today's card.

A list of products used is shown below.  Click on any image and you will be taken to my Stampin' Up! store where you can learn more details or make a purchase.

Product List

Monday, July 29, 2024

FULL OF LIFE SCRAPY STRIPS

I have a really fun card to share today.  It uses a technique that I first saw demonstrated by Bruno & Kylie Bertucci which Bruno called Scrapy Strips.  It is a wonderful way to use up all those narrow little strips of cardstock or designer series paper that tend to collect.

Just cut all those little strips with whatever angles you want and adhere them to a piece of black cardstock -- or any color of your choice.

The Full of Life Designer Series Paper (DSP) is a current collection in our 24-25 Annual Catalog, and it is one of my favorites.  I had been using it a ton and as a result was accumulating quite the collection of "scraps".

This DSP is so bright and cheerful that I couldn't bring myself to throw out any of the bits that had been collecting.  And that is when I remembered Bruno's Scrapy Strips!


So, I cut my scraps into some random angled widths and made this card.  Isn't it a fun card?  I thought the sentiment from Wildflower Designs, Sending happy thoughts, was perfect for this cheery card.

A double bow of Basic Black Bakers Twine and three Basic Rhinestones which I colored with a Basic Black Stampin' Blend completed the card front.  Oh, so simple!


To complete my card and envelope set, a few leftover strips of Full of Life DSP were added to a black strip for the inside of the card, and a black piece of cardstock for the envelope flap.  

If you have not tried the Scrapy Strip Technique, I hope you will.  Remember, it can be done with different solid colors of cardstock as well as designer series paper.  And if you are a paper crafter, I'm pretty sure you have plenty of scraps that you are having trouble throwing away.  Put them to good use and make a fun card for someone special.


Below is a list of products that were used.


Product List

Sunday, July 28, 2024

INSPIRATIONAL COLORS OF NATURE

Welcome to the SHARE IT SUNDAY Blog Hop!  


This Blog Hop is sponsored by Crafty Collaborations the last Sunday of each month.  I like it because I can share just share whatever it is I have been working on.

This week is also Hodgepodge Week at Fairless Stampin' Flair, so rather than sharing projects using the same product all week, I will be sharing cards using a variety of products.


Today's card was made with the Inspirational Sketches stamp set and the Salted Background Technique.

I demonstrated this technique on Learning with Friends several weeks ago.  It's fun and easy while providing very interesting and unique backgrounds.  If you missed the video, you can still watch the replay.


Once the background was created, the rest of this card probably needs no explanation!


The color combination is Pretty Peacock, Pecan Pie and Pumpkin Pie.  The effect of the Salted Background shows up beautifully on these darker colors.


And isn't the little bird from Inspirational Sketches adorable?  He's cute even without any additional coloring -- just stamped.  The detail and the depth that Distinktive Stamp Sets like this provide is amazing.  


When I create "Technique Sheets" like the Salted Background I typically make them larger than the desired finished size.  This allows me to have some extra scrap strips when I trim them to size -- which I can use to add a little pizzaz to the inside.

For all the details of today's card you can use this link to download a FREE TUTORIAL.

A list of products used is shown below.

Now, it is time for you to hop along and see what other members of the Crafty Collaborations group has created to share with you today!  You will be inspired!  Enjoy the HOP!


Product List

Friday, July 26, 2024

AN ICE CREAM SWIRL CHRISTMAS

Sometimes I wonder what it is I'm trying to do to myself when I create my own little challenges! If you have been following my posts this month, you know that I challenged myself to create at least one Christmas Card every week with the Stamp Set and/or Bundle that I'm showcasing for that week.

This week it was definitely a challenge.  Here is a photo of the Ice Cream Swirl Stamp Set and Dies.


This stamp set definitely does not scream MERRY CHRISTMAS!  

Here is what I ultimately came up with.

It definitely required thinking outside of the box.  The snow was made with the Ice Cream Stamp.  The trees were made with the Ice Cream Cone stamp.  The fence posts were made with the "straws" or whatever that little fancy stick is.  And lastly, the wreath was made with the donut die.


I sort of figured it out as I went along, and if I were to do it again, the order that I created the elements certainly would change.  For example, after stamping and coloring the snow, I created the fence.  That made it more difficult to color the sky as I had to now go between fence rails.  So, next time I'd definitely blend the color on the sky before stamping the fence.  That is how I wrote the tutorial.


In fact, I might even stamp the fence first and then mask it and stamp the snow over it.  Why?  Coloring the Posts and rails, which were drawn free hand, over the snow was a little challenging, because the lines of the "drifts" wanted to show through.  But all in all, I was happy with the result of my self-imposed challenge.

What do you think?  Does this Ice Cream Swirl card pass for a Christmas Card?

To see all the details use this link to download the tutorial.  Don't be afraid to change the order of my steps!  Now that you know the end goal, this is probably a better order of doing things.


I purposely kept the inside very simple!  Why?  I'd challenged myself enough for that day!

Merry Christmas in July stamping friends!  I would love to hear your thoughts about this card.