Monday, November 29, 2021

SIMPLY CHRISTMAS

This week I'm going to be making some last minute Christmas Cards.  Each of the cards will be featuring products from the Painted Christmas Suite and they may not look like simple cards, they are intended to be quick and easy cards to make.  After all, Christmas will be here before we know it -- and we should probably mail our cards early this year, right?


Today's card is all about the Painted Christmas Designer Series Paper.  If you are a designer paper hoarder like I am, this card will help you to use it up.  The card is constructed mainly with DSP and is called a Triple Fold Fancy Fold -- however, if I were the one to have named it, I would call it a Quad Fold because it folds four times, not three.  The Evening Evergreen DSP on the front is actually the opposite side of the pinecone pattern and it makes the fourth fold.


For this card I adhered the last narrow flap to the section behind it.  I decided to adhere it to provide a little more rigidity to support the tag I added on the front, however, most cards with this fancy fold leave that flap loose so that it also opens.


Here is a close-up of the tag.  The tag is cut from Soft Succulent with a Tailor Made Tag Die, and the sentiment was made using the Layering Circle Dies.

I added a couple of pine bough sprigs and berries to highlight the sentiment.  These were all cut very quickly with the coordinating Seasonal Labels dies.  But don't let the name of these dies fool you.  They include layering label dies that you will use all year long!

If you would like a complete tutorial with detailed cutting and scoring dimensions as well as step-by-step assembly instructions you can access one using this link.

If you still need to make some more Christmas Cards, this is a great design that comes together quickly -- but the recipient will never know that you didn't slave-away on it for hours!

A complete list of the products I used is shown below.

If you don't already have a Stampin' Up Demonstrator, I'd love to be yours!  I'm here to help.


Product List

Friday, November 26, 2021

LET'S GATHER TOGETHER

Were you able to gather together on Thanksgiving with family & friends?  Is today a shopping day for you, or a recovery day because you ate too much turkey and need a nap?  Maybe the day after Thanksgiving is your Christmas decorating day, or maybe you are still celebrating with family and friends.  

Whatever you are doing today, thank you for stopping by to gather together with me, even if it is virtually.  I'm glad you are here!


Today I practiced my speckling!  I finally figured out how to make all those little speckles that you see on cards.  I've tried many "tools" over the year -- some with more success than others.  There was one tool I purchased several years ago that...  well, I'm not going to go there.  It is not a pleasant memory!

The latest method I was told about was to use the cap of your Stampin' Write Marker and flick it against the brush end of the marker.  With a bit of practice, it actually works pretty well.  But, I don't seem to have much control over the aiming of where the splatters go, so my advice -- don't wear white and cover a large area on your workspace!  But I do like the organic appearance of my specs.  What do you think?

The card today uses some nice bright fall colors, Daffodil Delight, Granny Apple Green, Mango Melody and Pumpkin Pie.

I used the Watercolor Shapes Stamps to make my background for the small bundle of leaves.  I love this stamp set!  It is so much more versatile than it looks at first glance.  I posted some cards that used these Watercolor Shapes on my Facebook Business Page the week of July 4, 2021 -- shortly before I started this blog.  They are still there, so if you'd like to check them out, you can use this link to visit my Fairless Stampin' Flair Facebook Business Page.  You'll need to scroll a bit to get to July, but they are still there.  There is even a Christmas Card that I made using the Watercolor Shapes Stamp Set.


Back to today's card...

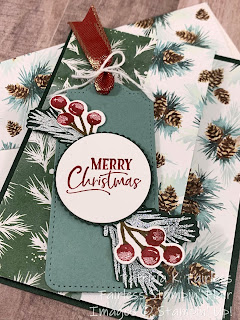
The Love of Leaves Stamp Set is a DisINKtive style of stamp.  These DisINKtive stamps provide a lot of color gradation and shading that makes it very easy to stamp realistic looking images.  Since colored leaves in nature are rarely solid in color, after inking the stamp, I used a sponge dauber to add a little Granny Apple Green ink on the edges.  Can you see it in the photograph?  

This would be a quick card to duplicate.  Once the 3 leaves are stamped and assembled, I added a double bow of Linen Thread to tie the stems together and then popped three Genial Gems to the card front.  This package of gems includes two colors, Pale Papaya and Mint Macaron, and either would have worked with the card colors.  I chose the Mint Macaron as I thought it brought out the Granny Apple Green in the narrow mat.  These gems really add the right touch of sparkle.


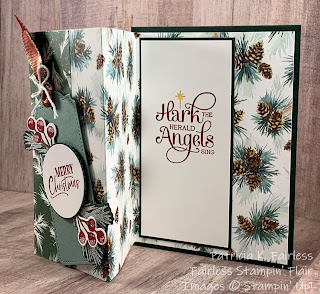
In keeping with the simplicity of the card front, I also kept the inside simple -- but never naked!


I stamped a Pumpkin Pie leaf with just a touch of Granny Apple Green, added a sentiment from Pretty Pumpkins and did a little more practicing on making speckles.

As with all my posts, a free tutorial is available for you to download.  Enjoy!

Next week we'll be back to Christmas Cards.  However, time is running out, to get those cards made!  So hopefully I will be able to give you some inspiration for those last-minute cards.  See you next week!

Product List

Wednesday, November 24, 2021

MORE LOVE OF LEAVES

Today I have another colorful card made with the Love of Leaves Stamp Set.


I'm always drawn to cards (yes, I peruse Pinterest just like the rest of you) that have a colorful border on the card.  That border can be on the top of the card, the bottom of the card, around a corner or down a side.  It doesn't matter if it is made with flowers, leaves, or some other cute objects.  There is something about a border that just attracts my eye.  But I'll be honest, I struggle with creating them.  I struggle with getting the colors distributed evenly.  I struggle with getting the "right amount" of images.  I always feel like I need to add more, but then it often seems like I should have stopped before I stamped that last image.  Does anyone else have these issues?


The reality is, once you finish the rest of your card, the distribution of colors and shapes on the border doesn't really seem to matter as much.  I wasn't very happy with how my border turned out on this card, but once I added the focal point, it seemed to look so much better.  I guess the message to myself (and you) is “don’t fret so much.”


The leaf on the circular focal point was created by stamping the bunch of daisies from Nature's Harvest twice and then coloring them with Stampin' Blends.  Once the coloring was finished I die cut the leaf with the 5-petal leaf dies from the Stitched Leaves Dies.  I love the stitching in the center of the leaf.

I added the Thank You sentiment from Nature's Harvest, but I could just as easily have used the Thank You from Love of Leaves.  They both have beautiful fonts.  The sentiment was cut with a die from Tailor-Made Tags Dies.  This set is a recent addition to my supply closet, and I now wish I had purchased it sooner.  It's a great die set!

One of my favorite dies in the Stitched Leaves set is the die that has all the stitched lines in varying lengths.  If you look closely you will see that after the border was stamped I "die-cut" it with this die.  I also used it on the inside of the card.  Doesn't that die add a nice little bit of detail?  As Mom would have said, "It just does something to it"!


I practiced my border-making a little more on the inside of the card, and then also continued to practice on the flap of the envelope.  You can see sneak peaks of the envelope in some of the photos.  I purposely did not add a sentiment so I would have plenty of room to write my thank you note.  But it will also be easy to add a sentiment later if I change my mind.

There is a FREE TUTORIAL available for today's card.  Click on this link to download a PDF.

A complete list of the products used for this card is shown below.

I hope you liked today's card.  Thank you for stopping by.  I would love to hear your comments.


Product List