Showing posts with label Watercolor Shapes. Show all posts

Monday, August 15, 2022

A SPLENDID BOUQUET OF STEMS

It's Monday, so I'm featuring a new Suite of products this week.  Yesterday, I shared with you the cards that we made for the August Stamp Camp to Go, and the rest of this week I will share some additional cards made with the Splendid Thoughts Bundle.


Today's card is a colorful card created using the Stamp and Spritz Technique.  If you would like to watch a short video that shows you some different ways to use this technique, click on the following Connect to Create link.

Kathi Ondus from Simply Kards by Kathi and I have teamed up as Connect to Create to provide short technique videos each week.  This Stamp & Spritz video was our first.  Check it out and you will see how quick and easy it was to create this colorful background using each of the 22-24 In-Colors and the Watercolor Shapes Stamp Set.


The front of my Thick Basic White card base was covered with the beautiful Pearlescent Paper which I embossed with the Timeworn Type 3D embossing folder.  Only a minimal amount of the Pearlescent specialty paper is visible on the front, but before embossing I cut out the open leaf stem from the center.  

When I use any of the beautiful, but more expensive specialty papers, like foils, glimmer, etc., and a substantial portion is going to be covered by another layer, I always try to die cut something from the center of the specialty paper.  I may not need it for the current project, but I can always save it for another project.  In this case I was able to get a pretty Pearlescent leaf to use on the front of the card.

The half circle flower bowl was die cut from a scrap of the gold foil in Splendid Day Design Series Paper and then embossed with the stripes embossing folder from Stripes & Splatters.  Just that little bit of embossing brings out the shine of the foil even more, and it gives the "bowl" some great texture.


I used various stems, die cut from the colors in the background, to create my stem bouquet.  Whenever I make paper bouquets, I always wish I had some training in flower arranging.

If you would like more detailed information on how to make this card, there is a tutorial available for downloading at this link.

This is a simple layout that can be used with many flower stamps that you most likely already own.  The fun is in the background, and I hope you will give it a try.

I kept the inside simple.


The line stem was stamped with Starry Sky ink and then the dots were stamped with stamped-off Sweet Sorbet.    If you are thinking that I did a terrible job of lining up the dots with the line stamp, you would be right.  But I quickly figured out that they are not designed to line up.  No matter how much twisting and turning I did, they would not align.  That was a little difficult for me and my engineering brain to deal with, but once I figured out that they weren't meant to line up, I just had to let it go.  

I think the misaligned "Artsy" look pairs well with the Spritz & Stamp background because there is nothing you can really control about how that turns out either.  The ink is just going to go wherever the water takes it.  I think there is a lesson in there that I could learn from.  

The inside sentiment is one of my favorites from the Inspired Thoughts Stamp Set.

If you would like details on any of the products I use, click on any of the images in the Product List below.

I hope you check out the Spritz & Stamp video and give the technique a try.


Product List

Friday, February 18, 2022

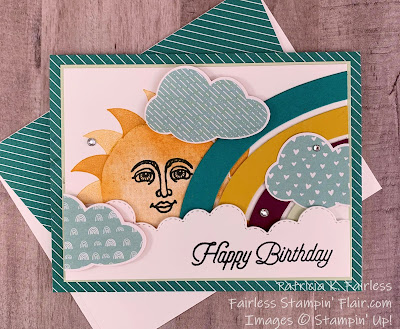
SUNSHINE & RAINBOWS BIRTHDAY WISHES

I have another cute, fun card today made with the Rainbow of Happiness bundle.  This card uses a few additional products, but the rainbow was made with the largest die in the Brilliant Rainbow Dies.


Since this Rainbow die cuts all four of the rainbow pieces at the same time, I used it four times to cut all four colors.  The colors are not the "normal" colors you would think of for a rainbow, but sometimes it's fun to change things up a bit, so I chose Bermuda Bay, Crushed Curry, Rich Razzleberry and Soft Seafoam for my rainbow.

Once again, I pulled out the Basic Borders dies to make the lower clouds.  The patterned clouds are from a different design in the Sunshine and Rainbows designer series paper.  The clouds in this sheet are sized so that they punch out perfectly with the cloud punch.  I love how all these products coordinate together.  

The coordination of products is one of my favorite things about Stampin' Up!  Even though these products are not part of the same suite, they still all work together so well, and they make designing a little easier.


I wanted to have a sun peeking out from behind my rainbow and clouds.  This would have been easier if I owned the Sharing Sunshine Stamp Set, but since I don't, I had to search my stash to see what I could use.  I found my Watercolor Shapes stamp set and used that to create the sun.  I like how the coloring varies on the Watercolor Shapes stamps and thought the larger circle one would make a good sun.  But just the plain circle was a little boring.  It needed something to give a little more interest.  I was about ready to try to draw a face on the sun when I found this very old stamp set called Ray of Sunshine. I breathed a sigh of relief because I am definitely not an artist, and even trying to draw a smiley face can be a challenge for me.  The set has been long retired, but it had this cute face and the little pointy things in it, so I decided to use it.  Sometimes I guess it is OK to hang on to some things. 

For the inside of the card, I used leftover pieces from the rainbows that I had die cut for the front to make another rainbow on the inside.


I used my cloud punch to punch out another Pool Party cloud from the Sunshine & Rainbows Designer Series Paper, and also to punch out a sentiment from my Google search that I had printed on Basic White Cardstock.

Now, all that is left is to decide who will get some Sunshine and Rainbows for their birthday!


Obviously, the Ray of Sunshine stamp set is no longer available, but for more information on the current products I used for this card you can click on the links below.


Product List

Friday, November 26, 2021

LET'S GATHER TOGETHER

Were you able to gather together on Thanksgiving with family & friends?  Is today a shopping day for you, or a recovery day because you ate too much turkey and need a nap?  Maybe the day after Thanksgiving is your Christmas decorating day, or maybe you are still celebrating with family and friends.  

Whatever you are doing today, thank you for stopping by to gather together with me, even if it is virtually.  I'm glad you are here!


Today I practiced my speckling!  I finally figured out how to make all those little speckles that you see on cards.  I've tried many "tools" over the year -- some with more success than others.  There was one tool I purchased several years ago that...  well, I'm not going to go there.  It is not a pleasant memory!

The latest method I was told about was to use the cap of your Stampin' Write Marker and flick it against the brush end of the marker.  With a bit of practice, it actually works pretty well.  But, I don't seem to have much control over the aiming of where the splatters go, so my advice -- don't wear white and cover a large area on your workspace!  But I do like the organic appearance of my specs.  What do you think?

The card today uses some nice bright fall colors, Daffodil Delight, Granny Apple Green, Mango Melody and Pumpkin Pie.

I used the Watercolor Shapes Stamps to make my background for the small bundle of leaves.  I love this stamp set!  It is so much more versatile than it looks at first glance.  I posted some cards that used these Watercolor Shapes on my Facebook Business Page the week of July 4, 2021 -- shortly before I started this blog.  They are still there, so if you'd like to check them out, you can use this link to visit my Fairless Stampin' Flair Facebook Business Page.  You'll need to scroll a bit to get to July, but they are still there.  There is even a Christmas Card that I made using the Watercolor Shapes Stamp Set.


Back to today's card...

The Love of Leaves Stamp Set is a DisINKtive style of stamp.  These DisINKtive stamps provide a lot of color gradation and shading that makes it very easy to stamp realistic looking images.  Since colored leaves in nature are rarely solid in color, after inking the stamp, I used a sponge dauber to add a little Granny Apple Green ink on the edges.  Can you see it in the photograph?  

This would be a quick card to duplicate.  Once the 3 leaves are stamped and assembled, I added a double bow of Linen Thread to tie the stems together and then popped three Genial Gems to the card front.  This package of gems includes two colors, Pale Papaya and Mint Macaron, and either would have worked with the card colors.  I chose the Mint Macaron as I thought it brought out the Granny Apple Green in the narrow mat.  These gems really add the right touch of sparkle.


In keeping with the simplicity of the card front, I also kept the inside simple -- but never naked!


I stamped a Pumpkin Pie leaf with just a touch of Granny Apple Green, added a sentiment from Pretty Pumpkins and did a little more practicing on making speckles.

As with all my posts, a free tutorial is available for you to download.  Enjoy!

Next week we'll be back to Christmas Cards.  However, time is running out, to get those cards made!  So hopefully I will be able to give you some inspiration for those last-minute cards.  See you next week!

Product List