Friday, April 29, 2022

PICNIC UNIQUELY

There is something about gingham checks that reminds me of picnics.  Maybe it's because my mom and aunts often used checked tablecloths to cover the picnic tables.  Anyway, that is why I decided to call this post PICNIC UNIQUELY.


Rarely do I start making a card without having some idea or plan in mind, but today's card was one of those that just sort of evolved as I went.

Obviously, I knew I was going to use the Uniquely Artistic stamp set, but beyond that I was drawing lots of mental blanks.  I hadn't used this particular flower from the stamp set yet, so I figured I better use it, but what to do with it -- that was the question.

On Monday's card I used one of the five new 2022-2024 In-colors called Starry Sky.  I used it first because I'm fairly sure it is my favorite.  But that left me with four new colors I had not played with yet.  So, I decided to see if I could use all four of them on today's card.

I succeeded!

I started with the Tahitian Tide cardstock for my card base, and then used the remaining 3 colors, Sweet Sorbet, Orchid Oasis, and Parakeet Party, for flowers and leaves.

These colors are all very bright and cheery with a high intensity of color.  The Tahitian Tide and Sweet Sorbet flowers are stamped full-strength, but I stamped-off first on the Orchid Oasis flower.  

Since there are not coordinating dies for the Uniquely Artistic Stamp Set I fussy cut the flowers and leaves.  The images in this stamp set are actually quite easy to fussy cut because the coordinating stamp for the background colors of the images are slightly larger than the line images.  This makes cutting around the image outline very forgiving.  You don't have to worry about keeping an equal width white space around the image.

The black and white gingham check is from the Pattern Party Designer Series Paper Collection which is a Hostess Gift choice.  That colorful and versatile paper will soon be gone forever, so if you haven't got it yet, don't miss out!


The circle that was die cut in the Basic Black cardstock was created using the largest circle die from the new Stylish Shapes Dies.  I also used another flag die from this same die set for the sentiment.  I love how these dies add stitching on both the inside of the die cut and also outside the die cut.

To finish the card front, I added a double bow made with Tahitian Tide Metallic Woven Ribbon and silver embellishments from Silver & Clear Epoxy Essentials.


To decorate the inside of the card, I stamped a single flower in Orchid Oasis.  As I mentioned above, the colored background images for this set are slightly larger than the line images, and this photo shows that more clearly.  That is why they are so easy to fussy cut.

If you would like a tutorial with cutting dimensions and step-by-step directions, please use this link to download a copy.

The Sneak Peek Products I used on this card are the following:

  • Uniquely Artistic Stamp Set - Item 158935
  • Stylish Shapes Dies - Item 159183
  • Tahitian Tide 8-1/2" x 11" Cardstock - Item 159261
  • Tahitian Tide Classic Ink Pad - Item 159220
  • Sweet Sorbet Classic Ink Pad - Item 159216
  • Parakeet Party Classic Ink Pad - Item 159208
  • Orchid Oasis Classic Ink Pad - Item 159214
  • Tahitian Tide Metallic Woven Ribbon - Item 159197
The Sneak Peek Products will be available beginning May 3, 2022.

The Current Products used on this card are listed below.
Product List

Wednesday, April 27, 2022

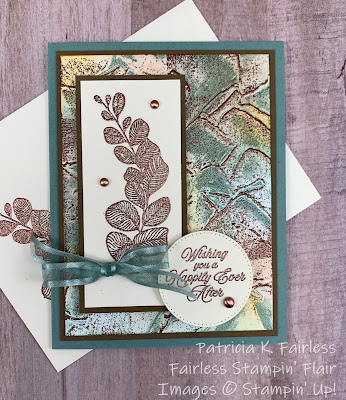
ARTISTIC FAUX EMBOSSED PATINA

I have another card made for you today using the Uniquely Artistic Stamp Set.  But I think the real star of today's card is the Faux Embossed Patina Technique used to create the background for the card.

Have you ever tried this technique?  I taught it in my April Technique Class, and it was a hit so I thought I would share it with you!  

A quick summary of the steps for this technique are as follows:

1.  Ink the debossed side of an embossing folder using a hard rubber brayer and an ink color of your choice.  (Soft Succulent Ink Used here)

2.  Use the inked folder to emboss Basic White Cardstock. (Painted Texture EF used here)

3. Using ink colors of your choice, and working from the lightest color to the darkest, randomly add colors to the embossed cardstock using blending tool of your choice. (Petal Pink, Pool Party, Mango Melody, and Soft Suede ink used here)

4. After ensuring the ink is dry, rub the surface with an anti-static item like an embossing buddy or dryer sheet.  

5. Lightly rub random areas with a Versa Mark Ink Pad.  Coverage should be splotchy.  Do not cover completely!

6. Heat Emboss with metallic embossing powder of your choice. (Copper used here)


After completing the Faux Embossed Patina background, I stamped the long leaf branch from the Uniquely Artistic Stamp Set with Versa Mark Ink on Very Vanilla cardstock and then heat embossed with copper embossing powder.


The sentiment was also heat embossed with copper embossing powder and die cut with a circle die from the new Stylish Shapes dies that will be available May 3, 2022.  I'm going to sound like a broken record, but I LOVE these new dies!

I added some Soft Succulent Ribbon and Brushed Metallic Copper Dots to embellish the card front.


To complete the inside of the card I stamped a sentiment and the leaf stem and embossed both with copper embossing powder.  

What do you think of this card?  I'm pretty happy with how it turned out.  I got my color inspiration from a new Designer Series Paper (DSP) Collection that is coming May 3.   If you like the color combination on this card, you will definitely want to check out this DSP.  It's called Texture Chic and is beautiful!  Well, at least it looks beautiful in the picture.  I can't wait to get my hands on it and see it in real life!


Sneak Peek Products used on this card are the following:
  • Uniquely Artistic Stamp Set - Item 158935
  • Stylish Shapes Dies - Item 159183

A list of all the current products that I used is shown below:


Product List

Monday, April 25, 2022

UNIQUELY ARTISTIC SNEAK PEEK & MORE!

This week I am going to give you a SNEAK PEEK of a new stamp set from the 2022 - 2023 Annual Catalog and also peeks at a couple of other new products.  The stamp set is called UNIQUELY ARTISTIC, and it is the gift I received from Stampin' Up! for participating in OnTour this month.  Stampin' Up! is so good to their demonstrators and one of the fun ways they reward us is with FREE stuff.  And who doesn't love FREE stamping items?


In the current 2021-2022 catalog, there is a technique used on one of the sample cards for the Enjoy the Moment stamp set, that I have been wanting to try ever since Sarah, our CEO, demonstrated it several months ago during one of her weekly Facebook LIVES.  

To be honest, I never even saw it in the catalog until she demonstrated it, but I've been wanting to try it ever since I saw her LIVE.  She made the technique look easy, and for the most part it was.  I had the most difficulty with tearing my masking tape.  Tearing paper is not one of my best skills. LOL

To make the curve design in the center I tore a wide piece of Post-It Tape and then just pulled the two pieces apart and masked the top and the bottom portions of a piece of Basic White cardstock.

Once the masking tape was in place, I used Blending Brushes to color the area with Highland Heather and Old Olive ink.  The card base is made from Starry Sky cardstock which is my favorite new 2022-2024 In-Color, so the images from Uniquely Artistic within the masked area were stamped with Stary Sky ink.


It is difficult to see in the photo, but the paper bordering the Basic White is the new 2022 - 2024 Glimmer Paper.  If you like sparkle and glimmer, you are going to want to add this paper to your wish list.  There are four 6" x 6" pieces of each of the five new in-colors, and not only does it glimmer, but it is also an ombre of sparkle!


The leaf was made by stamping the large leaf from the Uniquely Artistic stamp set with Versa Mark on Basic White cardstock and then heat embossing with silver embossing powder.  After fussy cutting I applied it to the card front with dimensionals.

is

Another sneak peek product in this card is the die that was used to cut the sentiment.  It is from the new Stylish Shapes Dies.  This set includes circles, squares and four of these flag dies.  They all create stitches on both the inside and outside of the die cut.  LOVE these new dies!

The metallic mesh ribbon is also another new in-color product.  It is very easy to tie and if you want you can pull the mesh apart a bit and/or fray the edges to provide a different appearance.  It also provides lots of sparkle and shine!


The inside of the card provides a better view of the Ombre effect on the Starry Sky Glimmer Paper.  

I hope you have enjoyed today's sneak peeks!  The new 2022 - 2023 catalog goes live to customers on May 3, so you don't have long to wait to get your hands on these new products.  But I promise, they are worth the wait!

If you would like a tutorial for today's card, you can download one at this link.

The Product List below lists all the current products that I used on this card.  You can click on any of those items to find out more information.

The Sneak Peek Products which I used are the following:

  • Uniquely Artistic Stamp Set - Item 158935
  • Stylish Shapes Dies - Item 159183
  • Starry Sky 8-1/2" x 11" Cardstock - Item 159263
  • Starry Sky Classic Ink Pad - Item 159212
  • 2022-2024 In-Color 6" x 6" Glimmer Paper - Item 159246
  • Starry Sky Metallic Woven Ribbon - Item 159198

Would you like to be able to get your hands on early products also?  I'd love to have you join my team and you can share the early fun and excitement!  Have questions?  Use the contact me area on the sidebar to contact me.

Product List

Friday, April 22, 2022

ANY OCCASION TULIP FUN Z-FOLD

I have an ANY OCCASSION card to share with you today that was made with the Flowering Tulips Bundle and the Flowering Fields Designer Series Paper.


This card has a Z-Fold left flap.  The flap is decorated with designer paper from the Flowering Fields Collection.  When you use this paper, you need almost nothing else to create a beautiful card.

For my card I chose colors from the designer paper -- Rich Razzleberry, Evening Evergreen and Mango Melody.  There are obviously many other colors I could have chosen, but I liked the combination of Rich Razzleberry and Mango Melody, so decided to go with those.


From this angle you can see the Z-Fold.  The front overlapping focal point was made with the 2nd largest die from Scalloped Contours Dies.  I'm happy to say that these dies are returning in the 2022 - 2023 Annual Catalog!

Rather than making 3D tulips today, I double stamped the two tulips and then die cut them with a coordinating die from Tulips Dies.  To get the shading variation, with the more solid stamp, I stamped off before stamping, and then used the 2nd more detailed stamp full-strength.  

What do you think of the ribbon?  It's called Windowpane Check Ribbon and WOW does it tie nicely!  I was able to make the bow with only a minimum of adjustments, but NO TOTAL RE-DOs!  That is very unusual for me.

I left the card sentiment free so that it could be an Any Occasion card.  I can always easily add a sentiment on the inside or even add a small one later on the front.


The decorative strip on the inside was a "scrap" that I cut off from the front piece when I cut it down to size.  Do you see how the design continues?

What do you think of this card?  I'd love to hear your comments and feedback.

If you would like a tutorial with all the cutting and scoring dimensions for this fun fold you can download it by using this link.

A complete Product List is shown below:


Product List