Wednesday, November 30, 2022

CLIMB THE MOUNTAIN OF THANKSGIVING

My thank you card today again uses this week's featured bundle -- Grassy Grove.  I had played with this bundle a little prior to this week, but this week I spent more time exploring the possibilities of what can be done with this set.  I really wanted to try to make a card without using the large grove die that seems to be the star of the show in this bundle.

Today's card is relatively simple.  Sometimes (if I'm honest - most times) I have trouble with "simple" cards.  I always want to add more and more, but today I purposely did my best to keep it simple.  For today's card I created a mountainside scene featuring Momma Deer and her baby.   Creating nature scenes is one of my favorite things to do, and I really like how this turned out.

I first die cut Basic White cardstock with the largest circle die from Layering Circles Dies.  Next, I stamped the large Bushy Knoll Stamp on the circle twice with Evening Evergreen Ink to create a mountain side.  Then I stamped the double Pine Trees twice with Evening Evergreen ink leaving enough space for the two deer between them.


I created a mask for the knoll using the coordinating knoll border die from Grove Dies.  With the knoll masked I used my Blending Brushes to add some So Saffron, Daffodil Delight, Flirty Flamingo and Pool Party ink to color the sky.

The two deer were not stamped, but rather were die cut using two of the dies from Grove Dies.  The Momma deer was die cut from Soft Suede and her baby from Sahara Sand cardstock.  I used sponge daubers to add a little Soft Suede shading on both deer.  I used a White Gel Pen (non Stampin' Up!) to create some highlights in their ears, under their tails and to add some spots on the baby's back.  (Hint: If you don't have a white gel pen, you can also use White Craft ink and a Blender Pen.)  Momma was adhered directly to the circle and her baby was adhered with dimensionals.

The completed circle was backed with a die cut scalloped circle from Evening Evergreen.  Before adhering it to the card front, I stamped some pine trees on the Sahara Sand card front mat and then embossed it with the Timber 3D embossing Folder.

The Thank You sentiment is from the Grassy Grove Stamp set, and after stamping it with Evening Evergreen on Basic White, I die cut it with a die from my favorite Stylish Shapes Dies.  I trimmed the right edge and adhered the sentiment to the card front with dimensionals.

All images decorating the inside of the card were stamped with Evening Evergreen ink.

If you would like a tutorial with cutting dimensions and detailed step-by-step directions to create this card you can download a copy by using this link.

A Product List is shown below.


Product List

Monday, November 28, 2022

WINTER GROVE

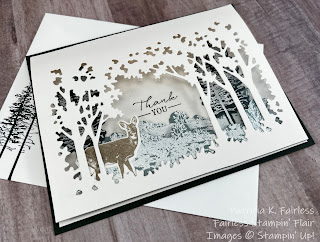
It is Monday and thus it's time for a new bundle of the week.  This week I will share cards featuring the Grassy Grove Bundle.  Today's card is a Window Sheet card which I shared last week on my Fairless Stampin' Flair YouTube Channel.


This may be the first card I have made that does not include any dimensionals!  I am admittedly a bit of a dimensionalaholic.  (Is there such a word?  I made it up, but if you are a stamper, I bet you know what I mean.)  I love using dimensionals as I think they add so much depth and interest to an otherwise flat card.

However, this card achieves its dimensional appearance from the window sheet that was used to create the front panel of the card.

The Winter White (aka Shimmery White) Snowy grove die cut was applied to a window sheet and then the cute deer and the bushy knoll were adhered on the back side of the Window Sheet.  This adds some dimension, but if you look closely, you can see that the winter scene continues on the inside of the card which provides an additional appearance of depth to the scene.


The inside layer includes another bushy knoll layer and a set of pine trees on each side of the sentiment.


Hopefully these two images help you see the depth that is achieved by using a window sheet as the front panel of the cardstock.


To see how this card was assembled, please watch my YouTube video below.


The inside of the card looks like this.


This layer of bushy, snow covered ground is positioned so that it is slightly above the layer on the card front so it looks like there are different heights of knolls.  The pine trees on each side of the sentiment are also visible through the card front to provide additional dimension to the snowy scene.

The snowy ground knolls were created by stamping with Versa Mark on Soft Succulent cardstock and embossing with White Embossing Powder.  The pine trees were also heat embossed with white embossing powder, but on Evening Evergreen Cardstock rather than Soft Succulent cardstock.  All die cuts were cut with coordinating dies from Grove Dies.

After watching the video, if you still have questions about how to make this card, please refer to the tutorial which is available to download at this link.  It includes all cutting dimensions and the written step-by-step directions for assembly.

A complete Product List is shown below.  By clicking on any of the items listed, you can see more information on that product.

What do you think of my Winter Grove Window card?  I'd love to hear your comments!

Product List

Friday, November 25, 2022

NATURE'S HOLIDAY

Happy Black Friday stamping friends!  Are you a shopper?  I am not, and I typically avoid the stores on Black Friday!  I think it is the perfect day to stay home and stamp!

Today I will share my last card for this week with the Nature's Prints Bundle.  I am still working on my Christmas Cards, so today I have used this bundle to create a Christmas Card.  


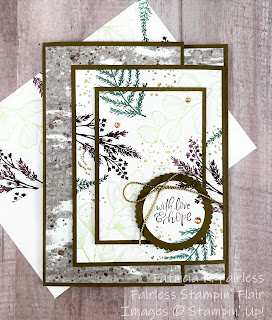
This is a Fun Fold card that is combined with the Triple Time Stamping Technique.  

Here is a photo that doesn't show the card all that well, but it shows how the cards two flaps open.


The flap on the right side opens to the right and is slightly shorter than the left flap.  The right flap is also made using the Triple Time Stamping Technique.  

Have you been watching any of the Connect to Create videos?  I am getting so much inspiration from the videos that Kathi, my Connect to Create partner, has been sharing!  She shared this Triple Time Stamping Technique several weeks ago and it reminded me that I haven't used this simple technique in a long time.  

Would you agree that sometimes we get inspired by something we see, and sometimes we get reminded of something we are familiar with but have forgotten all about?  I hope our Connect to Create videos are giving you a bit of both -- inspiration & reminders.  If you missed it, here is Kathi's Triple Time Stamping video.

This Nature's Prints Stamp Set seemed like the perfect set to use for Triple Time Stamping.

After cutting my Basic White cardstock layers for the right card front flap, I used some temporary adhesive to hold them in place and then started stamping.  Since my card base is made with Soft Suede cardstock to coordinate with the Boughs of Holly Designer Series paper I chose, I was a little uncertain about what colors to use for my stamping.  So, I got out my color coach, and it told me that Shaded Spruce, Rich Razzleberry and Soft Seafoam coordinates with Soft Suede.  Hmmm... OK, those are probably not the colors I would have selected on my own, but I love how it turned out.  That Color Coach is pretty smart!  

I thought it still needed a bit of pizzaz, so I used the speckled stamp from Forever Fern to add some gold embossed speckles.  As mom would have said, " it just did something to it"!  The gold embossing provided that bit of shimmer & shine that the card needed.

After I finished my stamping, I separated all the pieces and matted them to their Soft Suede mats and then reassembled them to the right Soft Suede card front flap.  

I have one hint for you when you do Triple Time Stamping.  If your sentiment is on one of the layers, stamp your sentiment on that layer before you start stamping the images (my sentiment is on the circle layer).  That way you can easily avoid it when you are stamping your images on the Triple Time layers.

On the inside of the card, I added a 1" strip of designer series paper to the right edge.  I used the same designer series paper as was used on the left flap.  That way, when the card is closed you have a continuous design behind the Triple Time Stamped right flap.

Both sentiments for this card are from the Hope & Peace Stamp Set.  If you love Christmas sentiments that reflect the true meaning of what we celebrate at Christmas, this stamp set is one you will want to add to your Christmas collection.  

For a free tutorial with all cutting and scoring dimensions, as well as step-by-step directions for this Fun Fold card, you can download a copy at this link.

A list of all products used is shown below.  

Product List