Showing posts with label Rainbow of Happiness Bundle. Show all posts

Friday, February 18, 2022

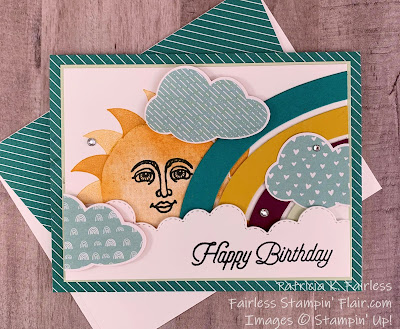
SUNSHINE & RAINBOWS BIRTHDAY WISHES

I have another cute, fun card today made with the Rainbow of Happiness bundle.  This card uses a few additional products, but the rainbow was made with the largest die in the Brilliant Rainbow Dies.


Since this Rainbow die cuts all four of the rainbow pieces at the same time, I used it four times to cut all four colors.  The colors are not the "normal" colors you would think of for a rainbow, but sometimes it's fun to change things up a bit, so I chose Bermuda Bay, Crushed Curry, Rich Razzleberry and Soft Seafoam for my rainbow.

Once again, I pulled out the Basic Borders dies to make the lower clouds.  The patterned clouds are from a different design in the Sunshine and Rainbows designer series paper.  The clouds in this sheet are sized so that they punch out perfectly with the cloud punch.  I love how all these products coordinate together.  

The coordination of products is one of my favorite things about Stampin' Up!  Even though these products are not part of the same suite, they still all work together so well, and they make designing a little easier.


I wanted to have a sun peeking out from behind my rainbow and clouds.  This would have been easier if I owned the Sharing Sunshine Stamp Set, but since I don't, I had to search my stash to see what I could use.  I found my Watercolor Shapes stamp set and used that to create the sun.  I like how the coloring varies on the Watercolor Shapes stamps and thought the larger circle one would make a good sun.  But just the plain circle was a little boring.  It needed something to give a little more interest.  I was about ready to try to draw a face on the sun when I found this very old stamp set called Ray of Sunshine. I breathed a sigh of relief because I am definitely not an artist, and even trying to draw a smiley face can be a challenge for me.  The set has been long retired, but it had this cute face and the little pointy things in it, so I decided to use it.  Sometimes I guess it is OK to hang on to some things. 

For the inside of the card, I used leftover pieces from the rainbows that I had die cut for the front to make another rainbow on the inside.


I used my cloud punch to punch out another Pool Party cloud from the Sunshine & Rainbows Designer Series Paper, and also to punch out a sentiment from my Google search that I had printed on Basic White Cardstock.

Now, all that is left is to decide who will get some Sunshine and Rainbows for their birthday!


Obviously, the Ray of Sunshine stamp set is no longer available, but for more information on the current products I used for this card you can click on the links below.


Product List

Wednesday, February 16, 2022

A SUPER SIMPLE RAINBOW "S"

Today's Rainbow of Happiness card is a SUPPER SIMPLE "S" card.  I've seen cards like this made with multiple circles that are cut in half, but to make this card, all I needed to do was fussy cut two of the Rainbows from the Sunshine & Rainbows Designer Series Paper?  Have you seen this paper?  It is one of the Sale-a-Bration choices that you can get for FREE with a $50 order.  This paper is probably one of the happiest papers I have seen.  It has a lot of different patterns in bright and cheery colors.  When I look at it, I can't help but smile.  Check it out in the Product List below.  If you click on the item, you will be able to see all the happy designs.


This card uses two of the patterns from the Sunshine & Rainbows designer series paper.  The Pool Party background looks like clouds, and the Rainbows are from a sheet that has multiple rows of these colorful rainbows.  All I needed to do was snip them out.


I used the Basic Border Die to die cut both sides of a Basic White strip to make the row of clouds that covers the edge of the rainbows.

The sentiment was another Google Find.  I simply printed it on Basic White cardstock and then punched it out with the Cloud punch.  Next, I used a Sponge Dauber and Pool Party ink to add a little color to the edge of the cloud.   As a result, there is no stamping at all on the front of the card.

To give the card a little bling I added some Iridescent Rhinestones.  I love these jewels.  They take on whatever color is on the card, so they are beautiful when used on any color.

The only stamping on this card is the sentiment on the inside.  This is one of the sentiments in the Rainbow of Happiness stamp set.


The partial rainbow on the inside was rescued from the edge of the same sheet of designer series paper that the Rainbows came from for the front of the card.  

It doesn't get much easier than this to make a cute card.  What do you think?  Since it is so easy, you probably don't even need a tutorial, but if you would like one, there is one available at this link.

If you would like more information on any of the products I used, you can click on the links below to learn more.


Product List

Tuesday, February 15, 2022

RAINBOW IN THE CLOUDS

 Today we have a colorful rainbow peeking through the clouds.


I used one of the dies from the Basic Borders Dies to create the Basic White layer of clouds below the rainbow, but I also used this die to make a mask to create the clouds in the sky.  The clouds were made with my Blending Brush and Pacific Point ink.  Just blend the ink along the curvy edge and then move the mask a bit and blend some more ink.  Repeat the process until the clouds cover the Basic White cardstock panel.


You may be wondering where I got the sentiment for this card because it isn't a sentiment in the Rainbow of Happiness stamp set.  As I mentioned in my post on Sunday, the Rainbow of Happiness Bundle was the featured Bundle for my February Stamp Camp-to-Go.  I wanted to offer my customers some additional sentiments that work well with Rainbows, so I Googled "Rainbow Phrases" and was pleasantly surprised at how many different sayings there are that relate to rainbows.   I took some of my favorites and created a page full of sentiments that they could print out on Basic White cardstock and then use the Cloud Punch to punch them out.  So now you know where I got this sentiment.  I thought it was perfect for this card.  What do you think?

To decorate the inside of the card, I made some more clouds with my mask, blending brush, and ink.  


The sentiment is from the Special Moments Sale-a-Bration stamp set which is one of the free choices with a $100 purchase.  This is a great sentiment stamp set.  It has 21 different sentiments with a wide variety for almost any occasion.  Sale-a-Bration ends on February 28, so if you haven't yet taken advantage of it, don't miss out!

I was having so much fun making clouds that I decided I would make some additional clouds on a 6" x 3" piece of Basic White cardstock.  I then adhered it to the flap of my envelope and die cut the bottom edge with the same die from Border Dies.  Can you see it peeking out from behind the card?  What do you think?  Did I get too carried away with all the clouds?

A free tutorial for today's card is available at this link.

Below is the list of products that I used.

Product List