Showing posts with label Christmas. Show all posts

Monday, December 13, 2021

SANTA & HIS ELVES

I’m going to try something a little different this week.  Last week I used a layout that I indicated was one of my go-to layouts because of its versatility.  If you need a reminder, you can see that card at this link.

Layouts and color combinations often challenge me, and I’ve heard from many of you that these same things challenge you.  So, this week I’m going to see how creative I can get by using similar layout elements in each of the cards that I will make with the featured bundle of the week, Turtle Friends.

You are probably wondering why I’m not featuring a Christmas Stamp Set this week, but I thought it might be fun to use a stamp set in unexpected way, so this week I’m going to use the Turtle Friends bundle to make a Christmas Card, a New Year's Card, and a Valentine Card.

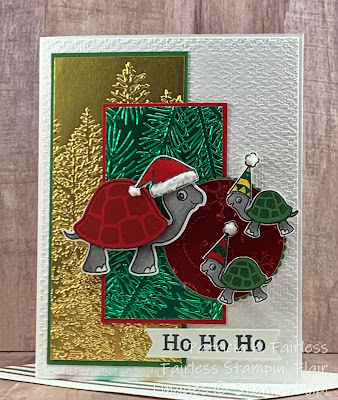
Today Santa and his Elves told me that they are very busy getting all the last minute gifts for the good girls and boys, but they agreed to take time out to stop and say hi to you!


The elves asked that I make sure they have lots of shimmer and shine on their card, so I used Gold, Green and Red Foil for each of the panels.  Foil is so beautiful when it is embossed so for the largest gold panel I used one of my very favorite embossing folders, the Evergreen Forest 3D folder.  For the Green and Red Foil, I used each of the folders from the Wintry 3D pack.  The red and green foil from the Fall Mini is 20% off on the Last Chance List, so if you like it, don't snooze.  It's available only while supplies last.


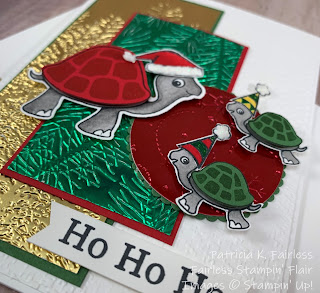
Above you can get a little closer view of Santa and his elf helpers.  They are sporting their Christmas duds with their Real Red and Garden Green Shells, and don't forget their "fur"-trimmed hats.  The white trim on their hats was made with Shimmery Embossing Paste, so when the elves said that they wanted to shine, I wasn't going to disappoint them.


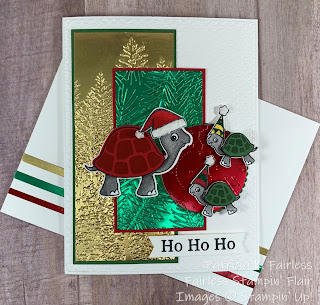
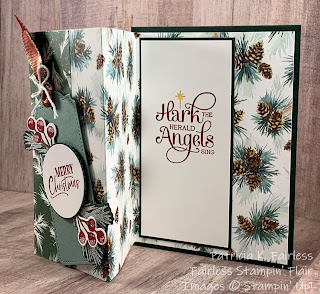
As I indicated, the layout for all my cards this week will use the same basic 3 elements -- the two rectangle pieces and a circle.  Today I laid them side by side.  You can compare this layout to last week's layout and see that even though the elements are the same, the end result is very different.  I hope you will come back on Wednesday and Friday to see the other ways I used these same basic 3 elements of the layout. 

As you know, I never want to forget the inside of my card (or the envelope either for that matter). 


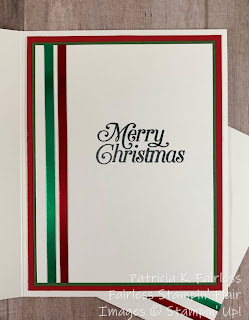
Today, I kept the inside very simple.  The Basic White sentiment panel is double matted with Real Red and Garden Green.  I added the touch of shine that was needed to coordinate with the front of the card by adding two narrow strips of green and red foil.  

You can also see in a couple of peaks that the envelope continues that theme of narrow bands of foil in green, red & gold.

If you would like a tutorial of today's card, you can obtain it by using this link.  A complete list of all the products used is also shown below.

I hope you enjoyed the visit by Santa and his Elves today.  They told me to wish you all an early Very Merry Christmas!  

Product List

Monday, November 29, 2021

SIMPLY CHRISTMAS

This week I'm going to be making some last minute Christmas Cards.  Each of the cards will be featuring products from the Painted Christmas Suite and they may not look like simple cards, they are intended to be quick and easy cards to make.  After all, Christmas will be here before we know it -- and we should probably mail our cards early this year, right?


Today's card is all about the Painted Christmas Designer Series Paper.  If you are a designer paper hoarder like I am, this card will help you to use it up.  The card is constructed mainly with DSP and is called a Triple Fold Fancy Fold -- however, if I were the one to have named it, I would call it a Quad Fold because it folds four times, not three.  The Evening Evergreen DSP on the front is actually the opposite side of the pinecone pattern and it makes the fourth fold.


For this card I adhered the last narrow flap to the section behind it.  I decided to adhere it to provide a little more rigidity to support the tag I added on the front, however, most cards with this fancy fold leave that flap loose so that it also opens.


Here is a close-up of the tag.  The tag is cut from Soft Succulent with a Tailor Made Tag Die, and the sentiment was made using the Layering Circle Dies.

I added a couple of pine bough sprigs and berries to highlight the sentiment.  These were all cut very quickly with the coordinating Seasonal Labels dies.  But don't let the name of these dies fool you.  They include layering label dies that you will use all year long!

If you would like a complete tutorial with detailed cutting and scoring dimensions as well as step-by-step assembly instructions you can access one using this link.

If you still need to make some more Christmas Cards, this is a great design that comes together quickly -- but the recipient will never know that you didn't slave-away on it for hours!

A complete list of the products I used is shown below.

If you don't already have a Stampin' Up Demonstrator, I'd love to be yours!  I'm here to help.


Product List

Friday, August 13, 2021

Daddy Buck Watching over his Fawn

Peaceful Deer in the Woods

As you learn more about me, you will find that one of my favorite kinds of cards to make are cards that have an outdoor scene of some sort.  


Today's card uses some other elements from the Peaceful Deer Stamp Set that you haven’t seen on the previous cards this week.  I think the little fawn is just adorable, but I didn’t want to leave him out in the snowy woods all alone, so I made sure his dad was watching over him and keeping him safe.  I dressed his dad up with a Christmas wreath over his shoulders, but I could just have easily removed that and then this could be a card for any purpose and not specifically just Christmas.  I think it would make a great masculine card for a special dad don't you?

Every element of this card uses a stamp from the Peaceful Deer stamp set, so you can see just how versatile this set is.  There are a total of 20 stamps!  They include four different trees in various sizes and configurations, four different deer, a cute little bunny, and other elements like antlers, snowflakes, snowdrifts, the wreath around dad’s neck as well as six sentiments.

There were a fair number of steps required to create this card.  None of them are particularly difficult, just a little more time-consuming than the previous two cards I shared this week.  I started with two Basic White panels of the exact same size, 5-1/8" x 3-7/8".  I used one to create the night sky with Night of Navy Ink and a Blending Brush.  Next, I heat embossed the snowflakes using white embossing powder.  That completed the first panel.

On the 2nd basic white panel I stamped the largest tree three times with Shaded Spruce--the outer two trees were stamped at full strength and the tree in the center was stamped off first.  The large deer was then stamped with VersaMark Ink and heat embossed with black embossing powder.  I colored him with Blender Pens and Cinnamon Cider Classic Ink.  Next I lightly marked where I wanted my snowline to be, and fussy cut on that snowline and around the trees and deer.  The top portion of that cardstock was disposed, retaining only the lower portion with the snow, trees and the larger deer.  That lower portion was then adhered directly to the snowy sky along the bottom edge.  The trees were popped up a bit by adding dimensionals behind them.  The upper portion of Daddy deer was adhered directly to the sky after his antlers were stamped behind his head.

The cute little fawn was stamped with VersaMark Ink and Heat embossed with black embossing powder on a scrap of basic white.  He was colored with Bronze and Ivory Stampin' Blends, fussy cut and then popped up on dimensionals in front of his dad.   

I used Shimmery White Embossing Paste to create some sparkly snow along the top edge of the snowline and for some random snow drifts.

Since we never want to ignore the inside of our cards or the envelopes, I decorated then with a couple of the same large trees that were used on the card front.  


I have a free tutorial available that includes all the dimensions and step by step directions to recreate this card.  If you have any questions, please feel free to leave a comment and I will do my best to answer them.  All Products used for this card are in the Product List below.

I would love to hear from you and know what you think of my Winter Woods.

If you would like to receive my regular Fairless Flair Happenings Newsletter, please complete the "Contact Me" tab and provide your email address.


Product List