Happy Monday stamping friends. It's a new week and time for a new featured bundle. This week I am going to showcase the Blessings of Home bundle. If you love floral stamps and dies, you are going to love this bundle.
Before I get into the
details of today’s card, I’ll let you in a bit on how I decide each week which
bundle I am going to feature. Near the end
of each quarter, I take some time and make a tentative plan for the next 3
months. During the last week of 2021 I made my 2022 Q1 plan. For no particular conscious reason, I scheduled this Blessings of Home bundle for the week
of March 6. Who would have known back at
that time that this bundle would be so appropriate for what is going on in the
world today?
Was it a coincidence
that I scheduled a bundle called Blessings of Home for the week
of March 6? Maybe, or maybe there was a
greater Planner at work that wanted to remind us how blessed we are to call the
United States home. While it is not perfect, I do feel blessed and
thankful to call it home, and my heart and prayers go out to the people that
call Ukraine their home.
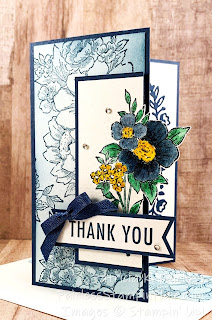
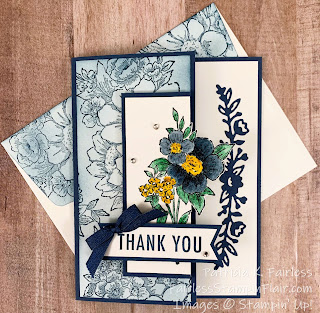
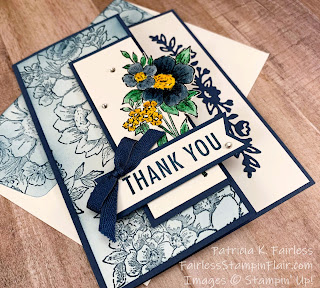
Today's card could be called a Fun Fold, but in reality, it is just a normal fold with a partial front flap. The "fun" part of the card is that the flower on the front hangs off that narrow flap.
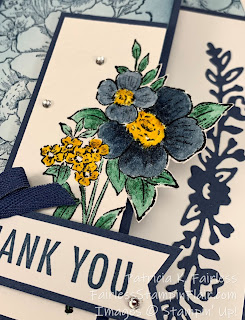
I used my Stamparatus to stamp the flower with Black Stazon Ink on Watercolor Paper. Since watercolor paper has some texture, it can sometimes be difficult to get a good clear image the first time you stamp, so the Stamparatus makes it easy to reink and stamp a second (or even third) time if needed. After stamping the image, I water colored it with my Water Painters and Classis Ink Pads. You can either squeeze the ink pad to get some ink on the inside of the cover, use a re-inker to add a drop of ink in the cover, or use a clear block to pick up ink from the pad. Then use our Stampin' Up! Water Painters to color the flower. I have gotten so into the habit of using my Stampin' Blends lately, that I had forgotten how much I love to watercolor. You can use regular Basic White card stock, Shimmery White card stock or my preferred cardstock for water coloring, Watercolor paper. Since watercolor paper is made to handle water, it gives more time for blending the colors. You also don't need to worry about damaging the paper by getting it too wet.
Once I finished water coloring, I adhered the left side of the watercolor paper to the Misty Moonlight mat and then fussy cut the part of the flower that extended past the edge of the Misty Moonlight.
When you aren't finding what you want in your stash of Designer Series Paper, make your own! The background for the card front was created by stamping the larger flower image a few times with Misty Moonlight ink and then using the blending blush to blend a light amount of Misty Moonlight ink over the Basic White cardstock. You can also see a little peek of how I decorated the envelope flap using the same technique.
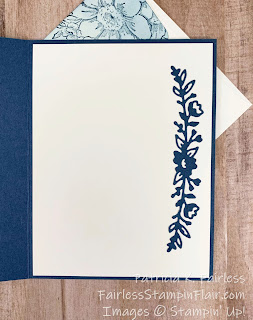
For the inside of the card, I used one of the many dies from the coordinating Flowers of Home Dies to create a die-cut from Misty Moonlight cardstock. I adhered it to the right edge of the inside Basic White, so it shows when the card is closed.
If you would like a tutorial to recreate this card -- or make your own version,
you can download a copy using this link.
A list of the products I used is shown below.

")


 2020–2022 In Color Ribbon")


No comments:
Post a Comment