It's July and that means it is time for me to get busy making Christmas cards. If I don't start now, I'll be scrambling to get them done at the last minute, and I've learned the hard way that that is not fun! So, you will start seeing more Christmas Cards from me on a regular basis for the next few months.
I like to try to challenge myself once and a while to use a "non-Christmas" set to make a Christmas card. But I didn't have to do that today because the Ringed with Nature Bundle includes a couple of stamps that are Christmas stamps.
The Mint Macaron leaves and twigs tucked behind the poinsettias were also die cut with dies included in the Hybrid Embossing Folder. This set includes a total of sixteen dies, -- six of which work inside the embossing folder! If you have never tried a Hybrid Embossing folder this may be one to consider. For more details on what is included in the Ringed with Nature Bundle, click on the link in the Product list below and you will be able to see all the items that are included.
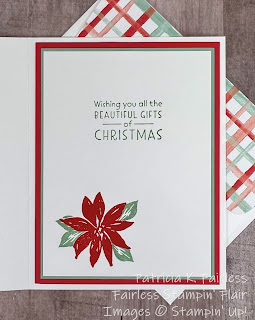
For the inside of the card, I double matted the Basic White panel with a Poppy Parade and Mint Macaron cardstock.
The Poinsettia was stamped in the lower corner and then masked. With the mask in place, I stamped a few leaves with Mint Macaron. The sentiment from Inspired Thoughts was stamped with Mint Macaron. If you don't have the Inspired Thought set, check it out in the product list below. It is a versatile set and has sentiments for many occasions, including Christmas.
If you have never used a mask, here are a couple of helpful hints:
1. Use masking paper, Post-it notes, or lightweight paper (like copy paper) to make your mask. The latter will require a temporary adhesive.
2. The image that you want to be in front is the image you mask.
3. After you stamp the image on the paper, fussy cut it along the edge of the image (or even slightly inside). This ensures there is not a white gap between the "front" and "rear" images.
I hope you find these hints helpful. If you have any questions, please ask. I'm here to help!
If you would like a tutorial for today's card, please use this link to download a free copy.
All products used on today's card are shown in the Product List below.
Product List


No comments:
Post a Comment