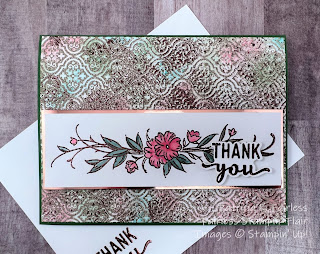
The background for today's card was created with the Faux Patina Embossing Technique, I shared this Technique recently on my YouTube Channel. If you are not familiar with this technique, I hope you will take a few minutes to watch the video.
This is a relatively simple technique that makes beautiful backgrounds, so I hope you will give it a try. If you do, please come back and leave me a comment and let me know what you think of it.
When I make cards with a special technique background, I usually make the background first and then choose the colors for the rest of the card based on my background.
The Faux Patina Embossed background was made with Crumb Cake, Blushing Bride, Coastal Cabana and Garden Green. The metallic embossing is Copper, and the embossing folder I used is the Quatrefoil Tile EF.
This combination of colors is not something I would have come up with on my own. I used my Color Coach for Guidance and when I saw the Garden Green added with the Crumb Cake, Blushing Bride & Coastal Cabana, I was really doubting the results. But I have to admit, the Color Coach knows what it is talking about. The small addition of Garden Green was the last color I added, and it just seemed to add exactly the right amount of contrast to make the rest of it pop.
Since I had used Copper Embossing Powder for the Technique, it was a no-brainer to emboss my Decorative Border with copper after stamping it with VersaMark. Since Blushing Bride and Garden Green Stampin' Blends are not available, I used Flirty Flamingo and Soft Succulent, and I liked the result. They seem to work well with the colors in the background. What do you think?
The last step was to mat the Decorative Border Focal Point, and I decided to use Rose Gold Foil. I liked how it played off the pinks on the card. The Thank You sentiment from Charming Sentiments was heat embossed with Copper Embossing Powder and die cut with a coordinating Sentiment Silhouettes Dies. (Love this Bundle). This greeting bundle is great when you want to minimize the sentiment and have it "blend in" more with the design rather than stand out on its own separate tag.
For the inside, I kept it very simple -- but never naked!
I hope you enjoyed today's card. I will be highlighting the Decorative Borders stamp set all this week, so come back and see some additional ideas on how to use it.
If you would like a tutorial for today's card, please use this link to download a copy, and also be sure to watch the video to learn how to do the Faux Patina Embossing Technique. You will love it!
A list of the products I used for today's card is shown below. You can click on any image to find information on the items.
As we are nearing the end of January, remember that Sale-A-Bration ends at the end of February. Don't wait too long and miss out. You can view the Sale-A-Bration Brochure and see all the great products to choose from when you place a $50 minimum order. For every $50 you spend you can select a free product. Spend $100 on merchandise and there are a couple of additional products you can choose from. This will be the ONLY Sale-A-Bration Promotion for 2023, so don't miss out!
Do you have a long wish-list? For $99 you can choose $175 worth of products when you join as a demonstrator. Or spend $129 and you will also be able to get a Mini Stampin' Cut & Emboss Machine, so you are basically getting the Mini for $30! You will still be able to choose the $175 of merchandise with this option.
Have any questions? I'm here to help! I would love to have you join my Fairless Flair Friends. We value Friendships, Fun & Creativity.


.JPG)


No comments:
Post a Comment