Friday, February 4, 2022

BE GOOD TO YOURSELF!

Are you good to yourself?  I hope so.  It seems that the person we are often the hardest on, is ourselves.  I hope that today, you will take a few minutes to do something just for you!


Looking at this woman standing on her deck with a glass of her favorite wine makes me wish I were doing just that.  Unfortunately, as I write this post, if I were to go stand on my deck with any sort of beverage it would probably freeze, and I would definitely need to be wearing something much warmer.  

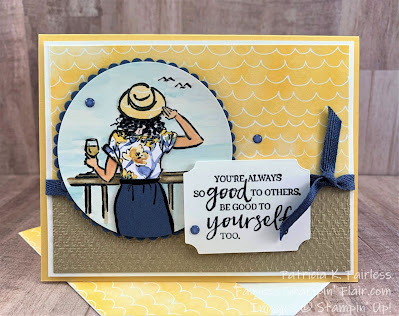
What do you think about this gal's outfit?  Are you wondering how I made it?  It was so easy!  Just choose your favorite designer series paper, stamp her image on the paper and fussy cut the part that you want.  For her hat I stamped her on the same Hand Penned Petals designer series paper (DSP) as I used for the background.   For the blouse, I stamped her on another pattern in the Hand Penned Petals DSP.  For her skirt I used Misty Moonlight cardstock because I thought it looked like the color of a dark denim skirt.  Once the images were stamped, I got out my Paper Snips and started fussy cutting.  Then just adhered each piece to the full image that I had already stamped on Shimmery White cardstock.


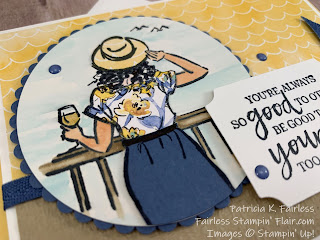
This technique is called Paper Piecing.  Before I "dressed" her, I did a little coloring on the base image with some Stampin' Blends.  The railing was colored with Crumb Cake, her skin was colored with one of the new Neutral Tone Stampin' Blends (S1000), and I gave her a glass of white wine with my So Saffron Stampin' Write Marker and a touch of Wink of Stella.  The sky was created with my Water Painters and some Balmy Blue ink - which is why I used Shimmery White cardstock rather than Basic White cardstock.  The finish on the Shimmery White cardstock handles the water a little better.


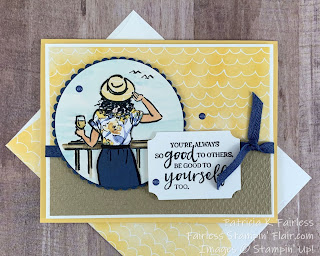
After completing the image, I die cut it with the largest circle die from Layering Circles and then die cut a coordinating scalloped circle from Misty Moonlight -- to tie in with her "denim" skirt.

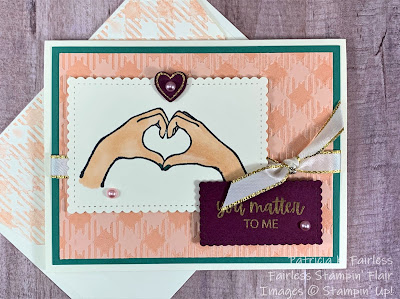
I purposely kept the inside of the card very simple -- but not naked.


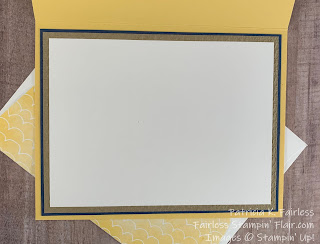
Using multiple layers in the colors of the card front are a great way to dress-up the inside of the card.  For this card I used Misty Moonlight and Crumb Cake layers.  I also like to slightly vary the width of the revealed layers as I think this is more interesting than if each layer has the same width.  This is very easy to do.  The Misty Moonlight has a 1/16" reveal and the Crumb Cake has a 1/8" reveal.  You would not think that just 1/16" would make a difference, but it does provide a bit more visual interest.  So don't forget the "little" things when you make your cards.

If you would like a tutorial with all the cutting dimensions and step-by-step directions, you can download a FREE Tutorial using this link.

For more information on the products used, please refer to the list below.


I would also like to take a minute to remind you that Sale-a-Bration ends at the end of this month.  Don't miss out on your opportunity to choose from some awesome FREEBIEs!  There are several choices at the $50 merchandise amount, and a couple at the $100 level.  If you spend $100, you can also choose two $50 items.  Obviously, the more you spend, the more FREEBIEs you get!

But, if your wish list is over $100, you should seriously consider signing up to become a demonstrator.  When you join during Sale-a-Bration, not only will you get $125 worth of merchandise for $99 (includes shipping), but you will also be able to select any two additional stamp sets for FREE!  And don't forget, once you join, you will enjoy at least a 20% discount on any additional purchases you make.  I would love to have you join my team.  If you have interest and have questions, please reach out to me at fairlessflair@gmail.com


Product List

Wednesday, February 2, 2022

LOST IN THOUGHTS OF YOU

Today I have a new technique to share with you.  I was reminded of this technique at a retreat I participated in a couple of weeks ago.

It is called the Chalkboard Technique.  It has been a long time since I used it, and honestly, I had forgotten all about it.  Are you like that?  Occasionally, do you need to be reminded of a technique that you first learned many years ago?


So, before getting into the details of today's card, let me briefly and simply explain the Chalkboard Technique.  If you think of a chalkboard, what do you see?  Well, first you probably picture a blackboard.  Next, maybe you think of erasers and the chalk dust they would leave behind.  Were you ever "assigned" to clean the chalk board?

Well, it is that dusty chalk that you are trying to mimic when you use the chalkboard technique.  The 1st step in the technique is to heat emboss your image with white embossing powder on black cardstock.  Then, all that is left is to add some "chalk dust".  To do that, use White Craft Ink and a blending tool of your choice to add a little white "dust" on and around the image.  


My chalkboard is actually quite clean, or at least it looks clean in the photo.  In person you can see a light coating of "chalk dust" all over the image.  I used another image from the In the Moment Stamp Set.  I love how this stamp set has three different images and three different sentiments -- one sentiment that seems to coordinate perfectly with each image.  Doesn't this girl in the window look like she is deep in thought?

This technique is fun and simple, so I challenge you to try it. 

I call the fun-fold for today's card a double-flap fun fold.  I've used this basic fold before, just in a little different size.  The section on the left folds to the right, like a normal card, but the smaller section on the right with the girl in the window folds to the left.  


This is a perfect fun fold to use your designer series paper.  The wood grain paper I used is from the Heart & Home Designer Series Paper (DSP) Collection.  This collection definitely deserves a second look.  There are colorful floral images on one side and different woodgrain patterns in Basic Gray and White on the reverse side of each sheet.  See more details by checking it out in the Product List below.


The right flap is held in place by a one-inch flap that is secured under the white panel on the inside of the card.  The sentiment on the inside is from the Special Moments Sale-a-Bration Stamp set that you can select for FREE with a $100 purchase.  If you are in need of a great, versatile sentiment stamp set, this is a perfect choice.  You can check it out in the Product List below to see all the diverse types of sentiments that are in it.  I really like this "hang in there" sentiment.  Some days that is about all we can do, isn't it.

If you would like the cutting dimensions and directions to make this fun fold, you can download a FREE Tutorial here.

Below is the Product List with links to see me information on each item.


Product List

Tuesday, February 1, 2022

YOU MATTER!

Today I am sharing a card that I made with the new Here Together Bundle and the new Natural Tones Stampin' Blends Collection.

These are available to be ordered starting today.


The background on today's card was made with the Gingham Embossing Folder.  This is the technique that I also used on last Friday's card.  I inked one side one side of the folder with Petal Pink in with a brayer and then placed Petal Pink cardstock in the folder and ran it through the Stampin' Cut & Emboss Machine.  If you look at the envelope in the background, you can see that I also used this same technique on the flap of the envelope.

The hands that are making the heart sign are one of the stamps in the Here Together stamp set.  They were colored with the SU800 Stampin' Blends Marker which is part of the Medium Light Combo.

This All Together Collection will be available while supplies last, however the Neutral Tones Stampin' Blends Collection will be available in Combo's of 2 in the New 2022 - 2023 Annual catalog when it launches in May.

The stamp set includes several encouraging sentiments.  I embossed the "you atter to me" sentiment in gold for today's card.  


The Stitched so Sweetly dies were used for the sentiment and for the Very Vanilla mat for the focal point.  The little heart was also stamped and then heat embossed with gold embossing powder.  The Here for You dies include a small heart die which was used to die cut the heart.  Check out the supply list below for more details on the stamps and dies that are included in this collection.

There are two sentiment dies included in the die set, and I used one of them for the inside of the card.


If you would like more details on today's card, you can download a tutorial with this link.

More details on the products used are shown in the list below.

Items in the All Together Collection can be purchased as a complete Collection, a bundle or individually.


Item numbers for the products I used are:

Here Together Bundle (stamp set & dies):     Item # 160263   $48.50 (US)

Natural Tones Blends (all 10 Blends):            Item # 160940 $45.00 (US)


Additional products used are listed below:


Product List