
Happy Friday stamping friends! Today's card is fun, jolly and colorful -- just like Fridays should be!
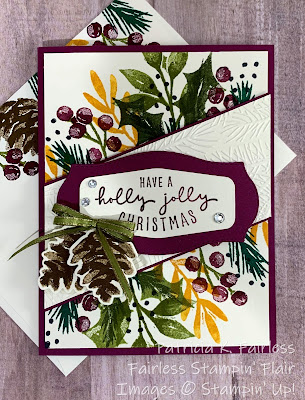
Sometimes I've heard people say, "I'm sliding into the weekend." Well, today, we are sliding into the weekend on a bit of a diagonal slide.
If you have been following my blog or my Facebook Business page these last few months, you know that I often fall back on this basic simple diagonal layout. Today I masked the diagonal with a piece of lightweight scrap paper and then started randomly stamping foliage from the Christmas Season stamp set.
You could easily change this to fall colors and have a Thanksgiving card, or try some cool blues and have a winter card, or maybe some pretty pastels and have an Easter card. Change out the pinecones for a couple of pumpkins, a couple of glittery snowflakes or a couple of flowers and you are quickly transitioned into a totally different season. Can you see the options? They are only limited by your imagination. Foliage works for any season. Just change the colors and the focal elements.

Once I finished my random stamping along the diagonal, I removed the mask and covered it with a 2" strip of Very Vanilla embossed with the pine branch embossing folder from the Winter 3D Embossing Folder Pack. I bordered the embossed strip with Rich Razzleberry, and then popped it all up with dimensionals over the masked area.
As a side comment... When you mask an area to stamp over it, always use a lightweight mask (like copy paper) rather than cardstock. This makes it easier to get the stamped ink right up to the edge of the mask and you don't have to worry about leaving a narrow white border.
Now back to the card... The sentiment from the Christmas to Remember stamp set was stamped with Rich Razzleberry ink on Very Vanilla and then die cut with a Tasteful Labels Die. The Rich Razzleberry mat behind the sentiment was also made with a die from Tasteful Labels Dies.
A couple of pinecones, an Old Olive double bow and a few Rhinestone Basic Jewels finished the card front.

But wait, a card is definitely NOT finished until the inside is also decorated.
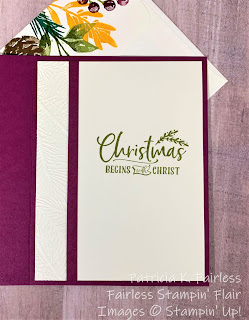
I kept the inside clean. I embossed approximately 1" the left edge of the Very Vanilla mat with the same Wintery 3D Embossing Folder that was used for the front diagonal strip. For a finished look, a narrow strip of Rich Razzleberry was added where the embossed and non-embossed surfaces meet. The sentiment from the For Unto Us Stamp Set, stamped with Old Olive Ink, perfectly summarizes the true meaning of Christmas!
I hope you enjoyed today's card, and I'd love to hear your thoughts. I think as I was writing this post, I have motivated myself to CASE my own card and use this Christmas Season stamp set to make some additional cards for other seasons. My mind is spinning with ideas!
For a complete detailed tutorial with all cutting dimensions for this card, click here. The Product List below summarize all the products I used to create the card.
")
")


WOW!!! I LOVE this card! The design, the colors, it's fabulous!!! Great job! :)
ReplyDeleteThanks Tiffany! Does it have a "Fairless Faves" class in its future?
ReplyDelete