Showing posts with label Frightfully Cute Bundle. Show all posts

Friday, October 15, 2021

HALLOWEEN PENWHEEL CARD

Today is my first attempt at making a Pin-Wheel card!  I was a little nervous about trying this fancy fold as it looked complicated!  Do you ever build up things in your mind to be a "bigger deal" than they actually turn out to be?  Well, that was definitely the case with this Pin-Wheel card.  It was so much easier than I thought it was going to be!
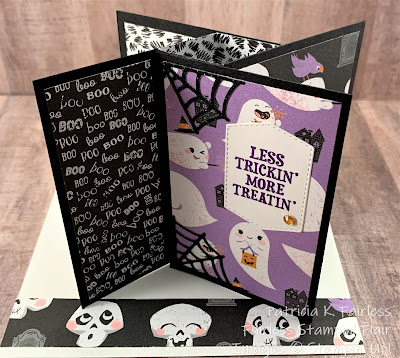

Once the basic "box" in the center of the card was created and the four pieces of cardstock were added to create the Pin-Wheel, it was all about decorating each panel.  That's when the fun began!

Using the Cute Halloween Designer Series Paper, made the decorating super easy.  I just covered each panel with a different pattern of the paper, and then started using the Frightfully Cute Stamps and Dies to "decorate".  

Below is what I call the "front" of the card.
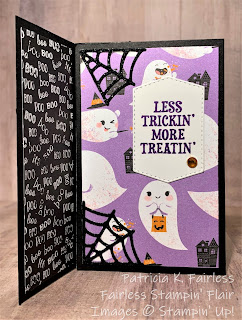

In reality any of the panels could be the "front" because you just rotate through each of the four panels until you return to this one.

These cute little ghosts are sending the message "LESS TRICKIN' MORE TREATIN' as they fly through the black glitter spider webs.

On panel number two, below, we find some "FRIGHTFULLY CUTE" skeletons hanging around the grave stones.  The cute little ghost is keeping an eye on them from behind the tree on the left.
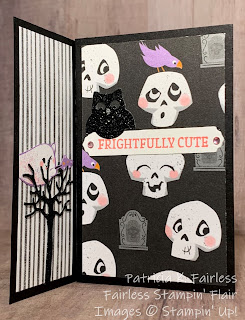

He's making sure those skeletons stay where they belong, and he's also getting a little help from his friend the glittery black owl!


As we move to Pin-Wheel panel number three, we find the bats have stopped by to tell you that they are "batty for you".  Their friend the spider in her web is making sure that she doesn't become their lunch!
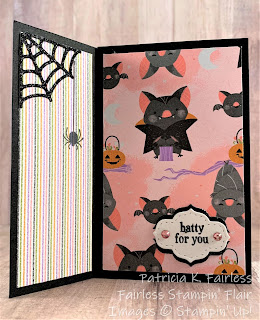


As we continue to spin our Pin-Wheel, we arrive at the colorful candy.  It looks like the Ghost and the Witch may have arrived at the same time.  But all I see of the witch is her hat, so maybe the ghost scared her away, and she left in such a hurry that she lost her hat!  At least she left the candy!
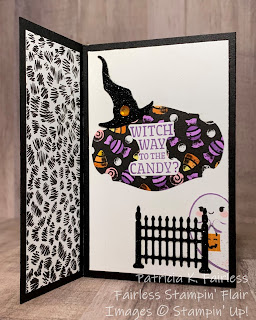

The next turn of the Pin-Wheel will bring you back to the "front" of the card.  A great thing about this Pin-Wheel card is that it folds nice and flat so is very mailable!

Actually, making this card is much easier than it is to "explain" how to make it.  I'm sorry that I fretted over trying it before!  It's a great design to show off that pretty designer series paper we have, so I will definitely try it again!  I think it could make a fun Christmas card.

If you would like to try it, I have a FREE TUTORIAL available with dimensions and scoring details.  I shared my "decorating" details on the tutorial, but really, the fun part of this card is creating your own little picture story as your spin your own Pin-Wheel Card.

If you have any questions or would like to sign-up to receive my Bi-Weekly Fairless Stampin' Flair Newsletter, please contact me through the Contact Tab above.  

A complete Product List for today's card is shown below:


Product List

Monday, October 11, 2021

A TAILORED TAG HALLOWEEN

Happy Monday Stamping Friends!  It a new week and so that means it is time for a new featured bundle of the week.  I will be using the Frightfully Cute bundle this week, along with the Cute Halloween Designer Series Paper.

As Halloween draws near, I decided this was probably my last "best chance" to provide some  Halloween inspiration.  I want to make sure you have enough time to actually try and USE the ideas before Halloween arrives.  


Since Halloween will be here in a couple of weeks, you probably fall into one of two groups.  You either have all your projects already completed or you are scrambling to finish them in the next couple of weeks.  If you are already finished, just sit back, enjoy and file the ideas away for next year

But for those of you that are still scrambling, you will love today's card!  It is a fun and simple card -- that doesn't really look "simple".  You can create multiples of this card quickly!

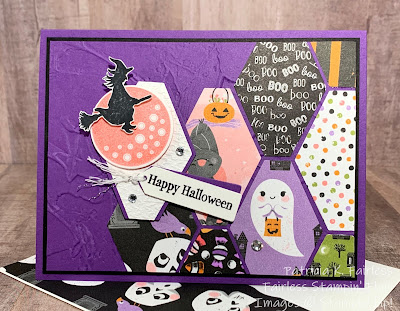
For today's card, I used the Cute Halloween 6" x 6" designer series paper (DSP) and started by punching out several pieces with the Tailored Tag Punch.  I used scraps from the various patterns and you can see in the picture that you don't even need large scraps because some of these punches only need to be partial punches.

One little thing in particular that I want to point out is the DSP pattern in the bottom center?  If you have this Cute Halloween DSP you may be wondering, "where is that paper from".  Well, it's "in there".  You just need to do the coloring.  It's a black and white candy design, and I just colored the candy with various color Stampin' Blends.  You could just as easily use Stampin' Write Markers, Watercolor Pencil, or whatever you prefer to use for coloring.

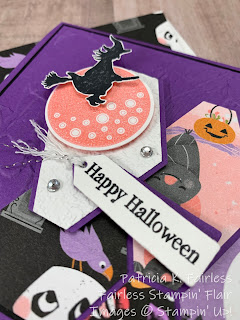
I stayed with the Tailored Tag punch to create my front "sentiment" focal point.  I stamped a Moon from the Frightfully Cute Stamp Set in Flirty Flamingo (I stamped off first) and then die cut it with the coordinating Frightful Tags Die.  The cute little Witch on Her Broom, from the same Frightfully Cute set, was stamped with Black Memento ink on Basic White cardstock and then fussy cut (sorry, no die, but she's pretty easy to cut out).  I partially inked one of the sentiments from the Frightfully Cute Stamp Set and die cut it with another die from Frightful Tags.  Since it is the "focal point", it is all popped with dimensional layers.

If you have been following me for even a brief period of time, then you know I always try to make the inside of my cards and the envelopes special also.


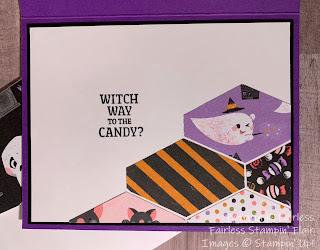
For the inside, I punched some more Tailored Tags from more scraps of Cute Halloween paper.  This paper is so fun, and you can selectively punch it to capture one of the special images like this little Ghost.  With cute images like this, it makes it quick and easy to create cute cards.  This little guy in particular just makes me smile.  He's busy spreading his magic dust in front of him as he floats by.

If you are wondering what I did for the envelope, I went to an old tried and true technique and covered the envelop flap with another cute pattern from Cute Halloween DSP.  


You can see the little skulls on the envelop flap peeking out from behind the card.

If you would like to try this card, a FREE TUTORIAL is available at this link.  I'd also love to hear your comments!  If you have any questions, please just ask!  I'm here to help.

All products used for the card are listed below.

Product List

Friday, September 24, 2021

SPIDER FRIENDS FOR HALLOWEEN

I do NOT like spiders, particularly when they are on my windows or traveling across my walls or floor like they own the place!  But when you live on the water, there isn't a lot you can do but learn to deal with them.  So, today I decided I would just let this spider and his giant web take the front and center focal point on my card!  


This spider web was die cut from Black Glitter paper with another of the Frightful Tags Dies so at least it is sparkly!  I hesitate to call it sparkly and pretty because I just don't think I can make myself call a spider web pretty.  But it is sparkly!  And I do like sparkles.

I do like the background that the little guy chose though!  What do you think?  Do you like the swirls and twirls on the background?  Do you know how I made it?  With shaving cream!  This is such a fun technique that we used in my Technique Class a few weeks ago.  It is a bit messy, but it is fun.  Everyone loved it, and you can guarantee no two cards will look alike!

I added a piece of the black and orange striped designer series paper from the Cute Halloween pack on the bottom of the card and then wrapped some Black Glittered Organdy Ribbon around the card and tied it in a bow.  I like this ribbon not only because it has lots of sparkles, but it is also easy to tie.  I can be a bit bow-challenged so I like when a ribbon is easy to work with!

I stamped the cute Less Trickin' More Treatin' sentiment from the Frightfully Cute stamp set and then die cut it with one of the dies from Stitched So Sweetly.  With the same die I cut a second piece from black glitter paper, cut it in half with my paper snips and separated the pieces a little to create a background for the sentiment.

And as I always say... never leave the inside of your card naked.


The spider on the front called some of his friends to help him make another strip of Basic White cardstock created with the shaving cream technique to decorate the inside of the card.  They all wish you an early Happy Halloween.

I hope you like today's card.  I had a lot of fun making it, and I'd love to hear your comments.  There is a free tutorial available at this link.

Just a quick reminder!  Sale-A-Bration ends 6 days!  If you haven't yet taken advantage of the FREE Sale-A-Bration products that you can earn with each $50 merchandise order, time is quickly running out.  

Below is a complete product list of all products used in today's card.  All week I have featured the Frightfully Cute Bundle and the Cute Halloween Designer Series Paper.  If you liked the cards this week Sale-A-Bration is the time to get the products so you can recreate these cute cards!

If you have any questions, please feel free to contact me.  I'm here to help!


Product List