
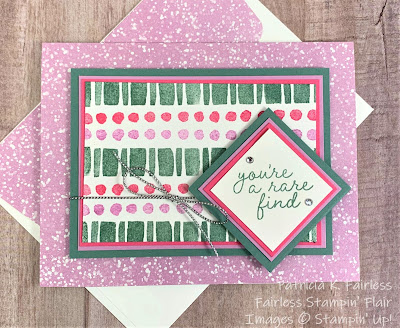
This week I decided to use the unique Addressed to You stamp set. I'm always looking for interesting ways to decorate my envelopes and the inside of my cards, and this stamp set seemed like the perfect solution. I suspect it was actually designed for that purpose.
But can it also be used to make the total card? Let's try!

I'll admit, at first, I was a bit stymied. So, I went to my typical places for inspiration (Pinterest & Google) but didn't find a lot. It is a new stamp set in the Spring Mini, so there weren't a lot of ideas out there, yet. Many times, when I have a creative block, I grab my Designer Series Paper (DSP) and see if I can find inspiration there. My search led me to the Beautiful Bokeh DSP.


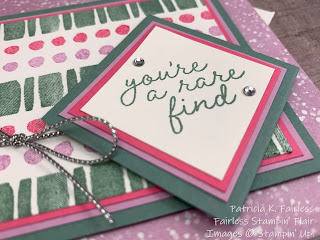
I used the colors in the DSP, Fresh Freesia and Balmy Blue, to create my double mat for the focal point. Then as I was digging through my ribbon stash, I came across this gorgeous Iridescent Petunia Pop Ribbon. Can you believe I TOTALLY forgot that I had it?
When I found that ribbon and realized that it coordinates beautifully with Fresh Freesia, I decided to color the flowers with Fresh Freesia and Petunia Pop Stampin' Blends. A few Basic Rhinestones on the flower centers add some additional sparkle. (There is a lot of sparkle in that ribbon!)
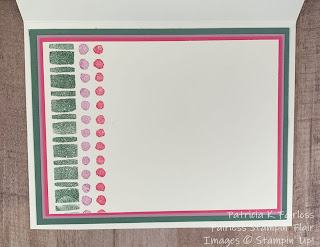
I used the same rectangle border and flower stamps to decorate the inside of my card and the front of the envelope.

It makes a really nice coordinated stationary set, don't you think?
The sentiments on the card front are from the Addressed to You stamp set and the inside sentiment is from The Right Words stamp set.
Use this link to download a FREE TUTORIAL. It provides all the dimensions, step-by-step directions and a list of the products used.
Product List![Addressed To You Photopolymer Stamp Set (English) [ 167010 ]](https://assets1.tamsnetwork.com/images/EC042017NF/167010s.jpg "Addressed To You Photopolymer Stamp Set (English) [ 167010 ]")
![Banner Sayings Photopolymer Stamp Set (English) [ 167044 ]](https://assets1.tamsnetwork.com/images/EC042017NF/167044s.jpg "Banner Sayings Photopolymer Stamp Set (English) [ 167044 ]")
![Fresh Freesia 8 1/2" X 11" Cardstock [ 155613 ]](https://assets1.tamsnetwork.com/images/EC042017NF/155613s.jpg "Fresh Freesia 8 1/2\" X 11\" Cardstock [ 155613 ]")
![Basic White 8 1/2" X 11" Cardstock [ 166780 ]](https://assets1.tamsnetwork.com/images/EC042017NF/166780s.jpg "Basic White 8 1/2\" X 11\" Cardstock [ 166780 ]")
![Balmy Blue 8-1/2" X 11" Cardstock [ 146982 ]](https://assets1.tamsnetwork.com/images/EC042017NF/146982s.jpg "Balmy Blue 8-1/2\" X 11\" Cardstock [ 146982 ]")
![Beautiful Bokeh 6" X 6" (15.2 X 15.2 Cm) Designer Series Paper [ 164607 ]](https://assets1.tamsnetwork.com/images/EC042017NF/164607s.jpg "Beautiful Bokeh 6\" X 6\" (15.2 X 15.2 Cm) Designer Series Paper [ 164607 ]")
![Tuxedo Black Memento Ink Pad [ 132708 ]](https://assets1.tamsnetwork.com/images/EC042017NF/132708s.jpg "Tuxedo Black Memento Ink Pad [ 132708 ]")
![Fresh Freesia Classic Stampin' Pad [ 155611 ]](https://assets1.tamsnetwork.com/images/EC042017NF/155611s.jpg "Fresh Freesia Classic Stampin' Pad [ 155611 ]")
![Petunia Pop Classic Stampin Pad [ 163811 ]](https://assets1.tamsnetwork.com/images/EC042017NF/163811s.jpg "Petunia Pop Classic Stampin Pad [ 163811 ]")
![Balmy Blue Stampin' Blends Combo Pack [ 154830 ]](https://assets1.tamsnetwork.com/images/EC042017NF/154830s.jpg "Balmy Blue Stampin' Blends Combo Pack [ 154830 ]")
![Fresh Freesia Stampin' Blends Combo Pack [ 155518 ]](https://assets1.tamsnetwork.com/images/EC042017NF/155518s.jpg "Fresh Freesia Stampin' Blends Combo Pack [ 155518 ]")
![Petunia Pop Stampin’ Blends Combo Pack [ 163828 ]](https://assets1.tamsnetwork.com/images/EC042017NF/163828s.jpg "Petunia Pop Stampin’ Blends Combo Pack [ 163828 ]")
![Granny Apple Green Stampin' Blends Combo Pack [ 154885 ]](https://assets1.tamsnetwork.com/images/EC042017NF/154885s.jpg "Granny Apple Green Stampin' Blends Combo Pack [ 154885 ]")
![Petunia Pop 1/4" (6.4 Mm) Iridescent Ribbon [ 166203 ]](https://assets1.tamsnetwork.com/images/EC042017NF/166203s.jpg "Petunia Pop 1/4\" (6.4 Mm) Iridescent Ribbon [ 166203 ]")
![Rhinestone Basic Jewels [ 144220 ]](https://assets1.tamsnetwork.com/images/EC042017NF/144220s.jpg "Rhinestone Basic Jewels [ 144220 ]")


")


