Showing posts with label Art in Bloom Bundle. Show all posts

Friday, March 4, 2022

EMBOSSED VELLUM ART IN BLOOM

If it were not for the dry embossing and the die cut sentiment mat, I think this card could certainly be considered a "simple stamping" card.  I know it doesn't meet the criteria of "stamps, ink & paper", but it is probably the easiest of the 6 cards I shared this week.
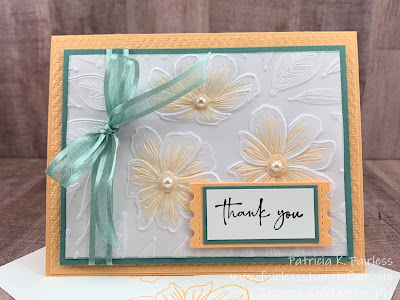

The front panel of the card is made of Vellum.  I simply ran it through the Stampin' Cut & Emboss Machine with the Bloom Hybrid embossing folder -- without the die.  Isn't Vellum pretty when it is embossed?  The embossed areas become "whiter" than the rest of the vellum.
I added a little color to the 3 flowers by coloring the back side of the vellum with my Pale Papaya Stampin' Blends.  Coloring the back of the vellum makes the colors very soft.
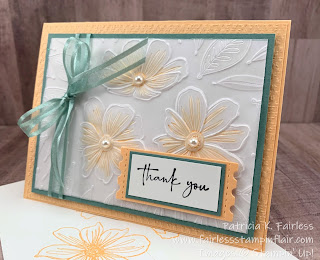

After you emboss and add some color with your Stampin' Blends, the vellum is adhered to a Basic White Panel of the same size.  Now, we all know that "gluing" vellum can be a little tricky because the adhesive can show through the vellum.

The best way I have found to adhere a larger piece of Vellum like this is by applying Tombow Mono Adhesive to the Vellum with a sponge.  Just make a puddle of glue on your Silicone Craft Mat, pick a little up with the sponge and start blotting on the back of the vellum.  The sponge helps to keep the amount of glue even on the surface and the layer thin - both of which are critical.  Once you adhere the vellum over the Basic White and the glue dries it becomes invisible.  For this card I did avoid applying glue in the colored areas as I wasn't sure how it would interact with the Stampin' Blends, and I didn't want it to smudge the ink.
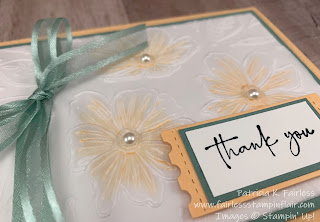

I needed a thank you card, and since the Art in Bloom only includes a large thank you sentiment, I used the simple "Thank You" from the Happy & Heartfelt Stamp Set.  I love the fonts in the Happy & Heartfelt set!

For the inside of the card, I stamped a portion of the trio flower with Pale Papaya ink in the lower corner and added the sentiment stamped in Black Memento.  This long thank you sentiment is from Art in Bloom.


What do you think?  Do you like this quick & simple card?  Do you think you will give it a try?  If you do, let me know.


The products I used are shown below.

Product List

Thursday, March 3, 2022

OMBRÉ Art IN BLOOM

Let's have some fun creating a little Ombré today!


The first thing I did to start this card was grab my Blending Brush, some Basic White Cardstock and Polished Pink ink.  Working from the bottom I swirled and swirled my Blending Brush until I was happy with the 
Ombré background.

Next, I stamped the flowers with VersaMark ink on Vellum and heat embossed them with White Embossing Powder.  Vellum heat embosses fine.  You just need to make sure you don't overheat the Vellum, or it can curl.  I then put the die in the Hybrid Embossing Folder, aligned the heat embossed vellum flowers and die cut and dry embossed all in one pass through the Stampin' Cut & Emboss Machine.  

The more I use the Hybrid Embossing Folder, the more I like it.  If you haven't tried one, you should.  All my fears of destroying the embossing folder were for nothing!

Before I adhered the Vellum flowers and leaves on my Ombré background I laid them in the approximate location that I wanted them so that I could see where to stamp some leaves and little flowers with the Polished Pink ink.


Where I wanted to stamp the little flowers on the lighter Ombré area, I stamped-off first before I stamped on the card.  

Once I completed my stamping, I adhered the vellum flowers and leaves.  Each flower was adhered with one dimensional in the center of each flower.  For the leaves, I added a little liquid glue to the tips of the leaves that would be under the flower, and then tucked them under the flower and held them in place until the glue dried.


I also wanted to scatter a few of the tiny die-cut flowers on the card front.  I used my blending brush to lightly tint a Basic White scrap with Polished Pink ink as the pure Basic White looked too stark.  I then die-cut three tiny flowers from the tinted cardstock and three from Vellum.  I scattered these in pairs on the front of the card.

To complete the card, I Stamped the sentiment on Basic Black with VersaMark and heat embossed with White embossing powder.


The sentiment was added to the card front with dimensionals, and Basic Pearls were added to the center of each flower.

For the inside of the card, I simply stamped the trio of flowers with Polished Pink on the lower corner and added a sentiment stamped with Black Memento.  The Basic Black Mat adds the finishing touch.


If you would like a detailed tutorial for today's card, you can use this link to download a copy.

Products used are listed below.

If you have any questions about the card, please leave me a comment or contact me using the Subscribe link on the right of the blog.  I'm here to help!

Product List

Wednesday, March 2, 2022

TONAL ART IN BLOOM

The card I'm sharing today is an all-white card with some silver accents.  

I personally love all-white or all-Very Vanilla cards.  I think they look very opulent and are great for Wedding or other occasions where you want to exude elegance.  The key to creating a beautiful card made with only one color is lots of texture.  And what better way to add texture than using various embossing folders.  

I used the Bloom Hybrid embossing folder to create the flowers and front panel, and then added some additional texture variation by embossing the background panel with the Tasteful Textile 3D embossing folder.

The silver mats are courtesy of the silver side of Mercury Glass acetate specialty "paper".  You could also substitute silver foil for the Mercury Glass.


The leaves were die-cut using the two open-work leaf dies in the Bloom Dies set.  I was so happy that there were two of these dies because then I only needed to run it through the Stampin' Cut & Emboss machine three times to get my six leaves.

Two of the flowers were adhered directly to the card front and one was popped up with dimensionals.  Because these flowers are also embossed by the Bloom Hybrid die and not just die cut, they have lots of texture and dimension.

To add to the elegance of the card the sentiment was heat embossed with silver embossing powder.


The inside of the card was kept simple yet elegant with the silver heat embossing and the silver mercury glass acetate mat.

What do you think of this card?  I'd love to hear your comments.

A FREE TUTORIAL is available to download by using this link.

A list of the products I used is shown below.


Product List

Tuesday, March 1, 2022

COLOR ME IN

I'm excited!  Today I get to share with you a card made with the Bloom Hybrid Embossing Folder.

I'll be honest.  I had my doubts about a Hybrid folder.  I know what my die cutting plates look like after a few uses, and I could not imagine what an embossing folder would look like when it was run through the Stampin' Cut & Emboss machine with a die inside.  But I was amazed.  I've used it several times now and the folder is just fine!  I'm thinking maybe they should make cutting plates out of the material they use for the embossing folder!

For this card I first embossed the Basic White cardstock in the background with just the Hybrid folder - no die.  I used my Blender Pens and Soft Succulent ink to add shading to some of the leaves on the embossed background. 

Next, I stamped the three flowers with Black Memento Ink on another piece of Basic White cardstock.  The three outline flowers are all on one stamp which ensures that they align correctly in the embossing folder and die. 

After stamping them. I used the three separate "watercolor" stamps to add color to each of the flowers.  I then laid the die in the Hybrid folder (there is a groove that positions it) and lined up the flowers with the die and ran it through the Stampin' Cut & Emboss Machine.  This embosses and die-cuts the flowers into three separate flowers.  It's like magic!


Next, using dimensionals, I adhered the three separate flowers over the same flowers on the first layer.  Because the flowers on the background are also embossed this gives a little additional lift to the flowers.  If you are concerned about the card becoming too thick, you could also adhere them directly to the embossed background.

The Soft Succulent sentiment mat was cut with another die from the Bloom Dies.


The two leaves were stamped with Soft Succulent ink on Soft Succulent cardstock and die cut with a coordinating die.  The three little flowers were die cut from scraps in each of the colors of the flowers.

For the single flower on the inside of the card, I chose the flower I wanted and then masked off the other two with a Post-it Note before I inked the stamp.


I used the "watercolor" stamp to add the Pale Papaya color, matted the basic white to Fresh Freesia, and then adhered to the inside of the card base.

This card looks more difficult than it is.  The Hybrid Embossing Folder and the "watercolor" stamps make it very surprisingly easy.  If you would like to try it, I have a FREE TUTORIAL available for download using this link.

The Products that I used are shown below.

Product List