Showing posts with label Vellum. Show all posts

Wednesday, August 16, 2023

CHRISTMAS SNOW

On Monday, we were hunting for Seashells along the beach.  Today we are walking through a gentle snowfall.  It kind of sounds like Michigan weather!

I belong to a Coffee Club and each month we have a card making challenge.  This month our challenge was to use Vellum on our card.

Vellum is something I often forget about using, so I really enjoyed this challenge as it reminded me how versatile Vellum can be.  You can stamp images on it and color them in various ways.  You can use it as an accent piece to soften the appearance of a card.  You can dry emboss it, and the embossed areas turn white.  Or you can do what I did today, and heat emboss on it.


Several weeks ago, my Demonstrator Development Manager, Shannon West, filled in for Sara, our CEO, on her Tuesday Facebook LIVE.  She was demonstrating the Enchanted Butterfly Reversible stamp set, but what I really found so eye-opening was the tip she gave about how to create evenly spaced stamped backgrounds.  She was making a background with polka dots and explained how to evenly space the dots. She said to start in the center and work outward. Stamp your first image in the center, and then stamp two more images to create a triangle.  Once you have your first triangle, use two of the stamped images from your triangle and stamp another image to create a 3rd triangle!  It was a lightbulb moment for me!  No one had ever told me this, and it works!  I used to start at the top or one side of my card and work one way or another just trying to eye-ball it.  But I never ended up with equally spaced images.  I always ended up having some too close together and some too far apart.  


This was my first attempt at using her triangle tip, and it works!   I am actually really happy how my first attempt worked on the top half of the card.  My spacing on the bottom isn't as good, but there is still a huge improvement from what I normally have!  

My snowflakes are heat embossed on Vellum Cardstock with White Embossing Powder.  The vellum was then layered over Boho Blue.  I love how Vellum "softens" the appearance of whatever you layer it over.  The Boho Blue actually looks darker in the photograph than it does in real life.


Boho Blue is not an intense blue, but with the Vellum layered over it, it is even softer in color.

The sentiment is from the Brightest Glow Stamp Set.  It was embossed with Silver Embossing Powder and die cut with a Nested Essentials Die.  The Boho Blue die cut behind the sentiment was made with a Chic Die. Three different size snowflakes were also cut from Basic White cardstock using Chic dies.  After die cutting, I used a sponge dauber to add a little Boho Blue ink to the center of each snowflake.  Then they were layered together with dimensionals and added to the card front.  


A Balmy Blue In-Color dot was added to the center snowflake assembly and then a couple more were added on the card front.
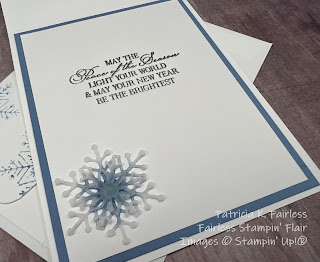
See the Product List below to see all the products used on this card.

Since this card was made for a Vellum Challenge, I was originally going to make the snowflake on the front of the card with Vellum, but when I laid it in place it got sort of over-powered by the background.  So, set it aside -- just in case...


After I heat embossed my silver sentiment on the inside, I decided to lay my vellum snowflake in the corner.  It looked so much better on the inside than on the front -- so it had a new home and avoided the trash!

Product List

Friday, March 4, 2022

EMBOSSED VELLUM ART IN BLOOM

If it were not for the dry embossing and the die cut sentiment mat, I think this card could certainly be considered a "simple stamping" card.  I know it doesn't meet the criteria of "stamps, ink & paper", but it is probably the easiest of the 6 cards I shared this week.


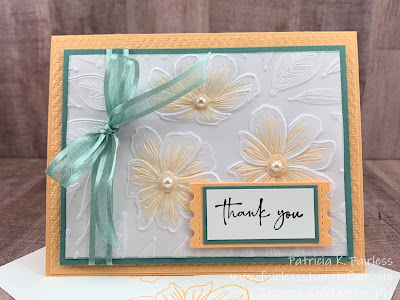
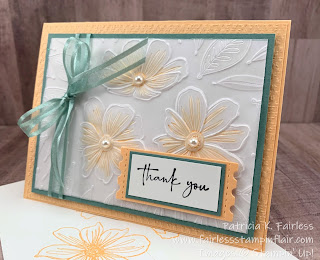
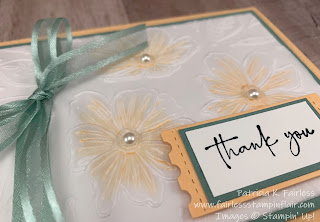
The front panel of the card is made of Vellum.  I simply ran it through the Stampin' Cut & Emboss Machine with the Bloom Hybrid embossing folder -- without the die.  Isn't Vellum pretty when it is embossed?  The embossed areas become "whiter" than the rest of the vellum.
I added a little color to the 3 flowers by coloring the back side of the vellum with my Pale Papaya Stampin' Blends.  Coloring the back of the vellum makes the colors very soft.


After you emboss and add some color with your Stampin' Blends, the vellum is adhered to a Basic White Panel of the same size.  Now, we all know that "gluing" vellum can be a little tricky because the adhesive can show through the vellum.

The best way I have found to adhere a larger piece of Vellum like this is by applying Tombow Mono Adhesive to the Vellum with a sponge.  Just make a puddle of glue on your Silicone Craft Mat, pick a little up with the sponge and start blotting on the back of the vellum.  The sponge helps to keep the amount of glue even on the surface and the layer thin - both of which are critical.  Once you adhere the vellum over the Basic White and the glue dries it becomes invisible.  For this card I did avoid applying glue in the colored areas as I wasn't sure how it would interact with the Stampin' Blends, and I didn't want it to smudge the ink.


I needed a thank you card, and since the Art in Bloom only includes a large thank you sentiment, I used the simple "Thank You" from the Happy & Heartfelt Stamp Set.  I love the fonts in the Happy & Heartfelt set!

For the inside of the card, I stamped a portion of the trio flower with Pale Papaya ink in the lower corner and added the sentiment stamped in Black Memento.  This long thank you sentiment is from Art in Bloom.


What do you think?  Do you like this quick & simple card?  Do you think you will give it a try?  If you do, let me know.


The products I used are shown below.

Product List

Thursday, March 3, 2022

OMBRÉ Art IN BLOOM

Let's have some fun creating a little Ombré today!


The first thing I did to start this card was grab my Blending Brush, some Basic White Cardstock and Polished Pink ink.  Working from the bottom I swirled and swirled my Blending Brush until I was happy with the 
Ombré background.

Next, I stamped the flowers with VersaMark ink on Vellum and heat embossed them with White Embossing Powder.  Vellum heat embosses fine.  You just need to make sure you don't overheat the Vellum, or it can curl.  I then put the die in the Hybrid Embossing Folder, aligned the heat embossed vellum flowers and die cut and dry embossed all in one pass through the Stampin' Cut & Emboss Machine.  

The more I use the Hybrid Embossing Folder, the more I like it.  If you haven't tried one, you should.  All my fears of destroying the embossing folder were for nothing!

Before I adhered the Vellum flowers and leaves on my Ombré background I laid them in the approximate location that I wanted them so that I could see where to stamp some leaves and little flowers with the Polished Pink ink.


Where I wanted to stamp the little flowers on the lighter Ombré area, I stamped-off first before I stamped on the card.  

Once I completed my stamping, I adhered the vellum flowers and leaves.  Each flower was adhered with one dimensional in the center of each flower.  For the leaves, I added a little liquid glue to the tips of the leaves that would be under the flower, and then tucked them under the flower and held them in place until the glue dried.


I also wanted to scatter a few of the tiny die-cut flowers on the card front.  I used my blending brush to lightly tint a Basic White scrap with Polished Pink ink as the pure Basic White looked too stark.  I then die-cut three tiny flowers from the tinted cardstock and three from Vellum.  I scattered these in pairs on the front of the card.

To complete the card, I Stamped the sentiment on Basic Black with VersaMark and heat embossed with White embossing powder.


The sentiment was added to the card front with dimensionals, and Basic Pearls were added to the center of each flower.

For the inside of the card, I simply stamped the trio of flowers with Polished Pink on the lower corner and added a sentiment stamped with Black Memento.  The Basic Black Mat adds the finishing touch.


If you would like a detailed tutorial for today's card, you can use this link to download a copy.

Products used are listed below.

If you have any questions about the card, please leave me a comment or contact me using the Subscribe link on the right of the blog.  I'm here to help!

Product List