Wednesday, December 22, 2021

BLOOMS OF THANKS FUN FOLD

Today's card is another fun fold that uses the Bloom Where You're Planted Designer Series Paper Collection.


I'm not sure what this particular fun fold is called but it certainly has a lot of folds.  Few pieces, but a lot of folds!  Because of all the folds it was challenging to photograph because it did not want to lay flat.

The above photo give you a better idea of the number of folds on the base card.  I count four!  it's a great way to show off your designer series paper because you can use as many different designs as you like.  I used a different design from the Bloom Where You're Planted collection for each panel.  One of my favorite things about Stampin' Up! is the coordinating of products that they provide.  It's makes it easy to figure out what goes together.   Even the various designs in a designer series paper collection are color coordinated.  So, I choose 5 different designs from the same pack and adhered a different one to each of the panels.


Here you see the Cinnamon Cider brick, a woodgrain panel, a panel with lots of pots, a foliage panel and the potted plants panel for the largest area.

This fun fold also includes a small separate 3" x 3" card (6" x 3" scored at 3") that folds in the opposite direction over the four narrow panels.  The matted Basic White panel on the right provides additional space for a handwritten note, and I just added a little strip of the brick designer paper to tie it all in.


The potted plant on the front was fussy cut from a scrap of the potted plant design paper.


I am running low on Thank You cards so used the Thank You sentiment from Love of Leaves. It was small and fit perfectly.  That is the only stamping on this card!  

What do you think?  I know I am always looking for designs that will showcase my designer series paper, and this one is a winner in my book.  It allows me to show off a lot of it!

The other great thing about this card is that the supply list is short.  So, if you are a new stamper and don't have a lot of "stuff", this is a great way to start paper crafting.  I've listed the list of products below, and you can see how little is required.


Product List

Monday, December 20, 2021

DOUBLE BOX VALENTINE

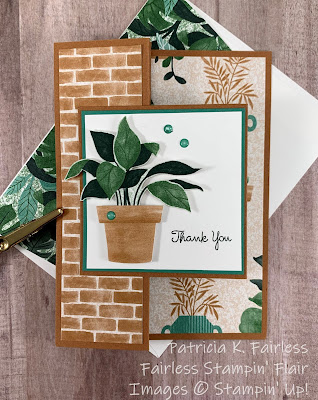
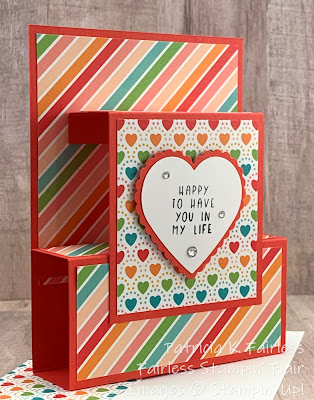
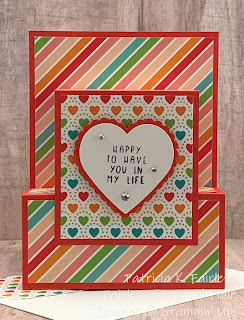
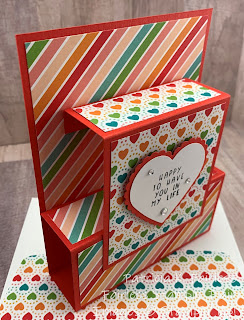
It's not two boxes of Valentine chocolates, but today's card is a double box fancy fold.  This is a fun-fold that I first saw Sharon Armstrong share on TX Stampin'.  When I saw her card, my first thought was, "Oh, that looks difficult"!  But guess what, it is super simple.  I just love these kind of fancy folds!  They give a lot of WOW without a lot of work!

As I indicated yesterday, I'm sharing some cards this week that will give you ideas on how to start using up that Designer Series Paper you have.  If you are a paper crafter, I know you have a stash!  I also know how difficult it can be to cut up some of those favorites.  But if you leave it in a drawer, NO ONE gets to enjoy it.  So, let's start using it!  Make a card and share it with someone to bring a smile to their day.

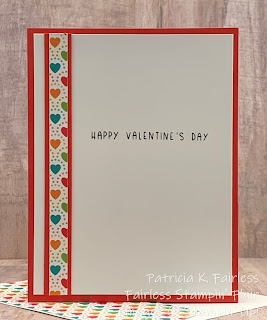
For today's card, I used some of the colorful paper from the Pattern Party Collection.  This paper is available as a host choice, and WOW, is it ever a great deal!  You get 48 sheets of 12" x 12" paper -- 4 each of 12 double sided designs.

I chose of couple of the very colorful patterns for my Valentine's Day Card.   Now that my Christmas Cards are finished, I need to start creating a treasure trove of Valentine Cards!  

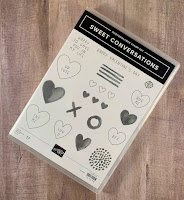
The sentiment I used is a sneak peek from the Sweet Conversations stamp set that will be available starting June 4 in the new 2022 Spring Mini catalog.  The heart was created with the current Heart Punch Pack.  Stampin' Up! has so many beautiful Die Sets, that I tend to forget about my punches, but if you need a quick and simple solution for a sentiment, a great punch is your answer.


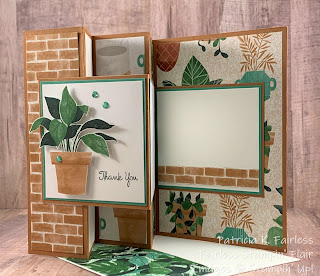
One of my favorite features of this fancy fold card is that it stands easily on its own, so it's great to leave out on display.  Do you display the cards you receive?  I always leave cards I receive out on display for way longer than I probably should, but they make me smile -- so why not?

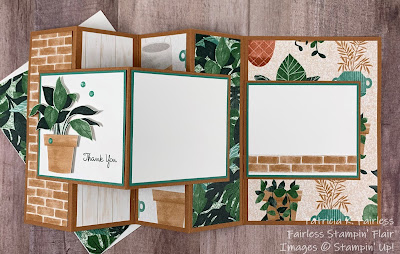
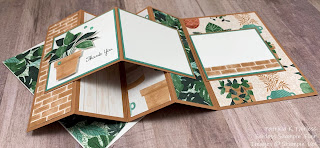
Since there is no "inside" on this card, the back is used for your message.

I made sure I decorated it with a little more of the heart designer series paper, so it didn't feel left out.

If you would like the details on how to make this double fold card, I have a tutorial with all the cutting and scoring dimensions available here, as well as step-by-step instructions on how to assemble it.

A list of the products used to create the card are shown below:

Sneak Peak Stamp Set:  Sweet Conversations - Item # 157618


Product List

Sunday, December 19, 2021

LET'S USE SOME OF THAT DSP STASH!

This week, I will be sharing projects that use Designer Series Paper as the focal point. 


Each month I hold a "virtual" Stamp Camp-to-Go (SCTG) event and the above photo shows the cards that were part of December's camp.

For the rest of this week, I will have additional projects that use mainly Designer Series Paper. So, if you participated in the class, you will get a few more ideas to use.  If you did not participate in the class but would like ideas on using up some of that pretty paper you have been hoarding, I hope you will come back and check out the cards.

Are you wondering?  What is a Stamp Camp, and how does Stamp Camp-to-Go work?

Normally, I feature one Stampin' Up! bundle each month, and all projects are made with that bundle.  Participants purchase the bundle, and I provide a kit that includes all consumables--pre-cut cardstock, ribbon, embellishments--and detailed PDF tutorials for each project.  The participants need to have the featured Stampin' Up! bundle, and also provide their own ink and adhesives.

Since December can be a more "expensive" month for many of us as we purchase gifts and entertain, I decided to minimize the SCTG cost this month by not requiring a specific bundle be required to complete the projects.  All cards used designer series paper as the focal point, and participants could just use any sentiment stamps that they already have.

If you would like to know which Designer Series Paper was used in the above cards, you can see the product list below.

If you would like more information on Stamp Camp-to-Go or would like to learn how to participate in future classes, please send an email to fairlessflair@gmail.com.


Product List

Friday, December 17, 2021

TURTLE LOVE

The last card this week with the Turtle Friends Bundle is a Valentine's Day Card.  It also gives you a tiny sneak peak of a new Suite of Products that will be coming in the Spring Mini on January 4, 2022.


The new Suite is called Sweet Talk and it includes two of my favorite things in the new Mini.  This suite is where you will find the Gingham Embossing Folder that I used in one of my cards last week, and it is also where you will find the Iridescent Rhinestone Basic Jewels that are so pretty and sparkly!  They were used this card last week.  These jewels are wonderful because the iridescence makes them perfect to use on any color as they pick up the color of the card.  I really hope these are around for a long time to come.

The specific new sneak peaks on today's card are the Sweet Talk Designer Series Paper and the two little die cut hearts on the circle.  The hearts on the circles were cut with the new Sweet Hearts Dies.  This die set includes 16 dies with lots of hearts, a few cute little tags and an envelope!  It is shown below surrounded by all the beautiful pattern in the DSP.


The stamps in the suite remind me of those little heart candies with the messages on them.  Do you know which candy I'm talking about?


Today's card uses the same main three design elements that I've been using all week but are again rearranged differently.  What are you thinking about these card elements?  Are you seeing the layout versatility you can create with them?  I hope you are finding it helpful to see how some basic elements can be used in several different ways,

Today the two little turtles are looking at each other with love.  Their shells were stamped on two of the designs from Sweet Talk Designer Paper and fussy cut.  Those same patterns were used in the two die cut hearts layered on the circle.


The striped pattern on the left element is another of the designs from this pretty paper.  I love the paper because it coordinates with so many happy colors, Real Red, Petal Pink, So Saffron, Granny Apple Green, Pool Party and Highland Heather.  I'm looking forward to making lots of Valentine cards with this suite of products.  

Item #'s for today's sneak peaks which will be available on January 4, 2022, are:

Sweet Talk DSP: Item # 157616
Sweet Conversations Bundle: Item # 157624

To finish the inside, I added a strip of Granny Apple Green and the same striped pattern as was used on the front of the card.


If you would like a tutorial with all the cutting and assembly designs, click on this link.

A list of current products is shown below.  


Product List
Stampin Write Markers - Subtles Collection
[119700]

Wednesday, December 15, 2021

TIME TO SHELL-EBRATE 2022

How many of you agree that 2021 has flown by?  I can hardly believe that Christmas is only 9 days away. and 2022 will be here in 16 days!  My dad always said that life is like toilet paper.  The closer you get to the end of the roll the faster it goes, and except for 2020 he's been so right!


As I was planning my posts for this week, I didn't really want to do a lot of Christmas Cards.  I figured that by this time you, hopefully, have those all finished and in the mail.  So, I started thinking about the next holidays!  And what comes after Christmas?  Well, New Year's, of course!  

Now, I don't usually do a lot of New Year's cards, but I thought it might be fun to see what our Turtle Friends thought about that idea, and they loved it.  They said, look, we even have the perfect sentiment for you -- "It's time to Shell-ebrate"!


Can you see it in his shell?  I first stamped the turtle and the sentiment with VersaMark and then heat embossed with silver embossing powder.  Next, I over-stamped with Black Memento and lightly wiped it off so the silver pops through.  It's subtle, but it's there!  Mr. Turtle is all ready for his New Year's Eve partly with his red hat and tie!


As promised, I have again used the same 3 design elements in today's card.  They are just rearranged a little differently.  To bring in the New Year, I also used lots of glitter and shine.  All the black elements are made from Black Glitter Paper, and the Silver Foil Panel was embossed with the Hammered Metal embossing folder to really bring out its shine.  Both of these beautiful papers are from the Fall Mini. The Black Glitter paper is on the Last Chance List, but happily the Silver Foil is on the Carry Over List.  

I used the Word Wishes Dies to create the "Happy" and the Playful Alphabet Dies for "2022".  One layer was cut from Black Glitter Paper and two from Basic Black and then adhered together to give them a little more height on the card.


I found this Love & Joy sentiment in the Christmas to Remember Stamp Set and thought it worked perfectly as a sentiment for the New Year.  What do you think?  A narrow Black Glitter Strip added on the left adds a little sparkle to the inside of the card.

A FREE TUTORIAL is available at this link with all the cutting dimensions and step-by-step directions.

Below is a list of all supplies used:


Product List