Showing posts with label Whimsical Trees Bundle. Show all posts

Friday, November 19, 2021

SOME MINTY WHIMSY! IS IT TOO MUCH?

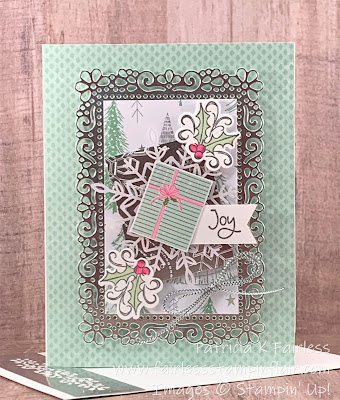
I need your help today to solve a personal dilemma!   Is today's card over-the top?  Is there too much going on or do you like it?


When I first finished the card I loved it.  When I look at it in person, I still love it, but when I look at it in the picture on the post, I'm having my doubts.  I always have trouble photographing shiny things and this card definitely has a lot of shine and glimmer going on.  Maybe it is just my photographic challenges that are messing with me on this card.


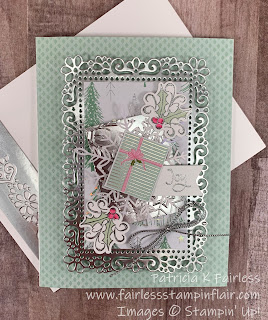
The face of the Thick Basic White card is covered with the Mint Macaron Paper from Whimsy & Wonder Designer Series Paper (DSP).  I used the medium size die from Ornate Layers Dies to cut the silver background layer for the Whimsical Trees designer series paper.


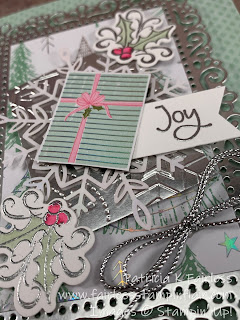
Another small layer of foil is laid on an angle over the Whimsical Trees.  That layer is embossed with the snowflake embossing folder from the Wintry 3D embossing folder pack and then an iridescent Wonderful Snowflake is adhered on top of it.  A package was fussy cut from the packages paper from the Whimsy & Wonder DSP and popped up on top of the snowflake with dimensionals.  Silver embossed and colored holly decorates two of corners.


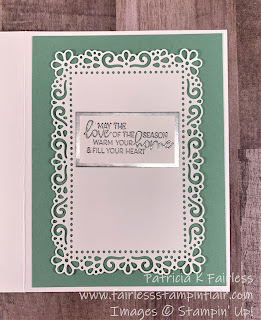
The inside of the card also has some unplanned shimmer going on.   After I silver heat embossed my sentiment on the die cut Ornate Layer, I somehow managed to get a smudge on it that had nothing to do with any of the inks I used on the card.  It must have been one of those "inky fingers" issues.  Rather than throw the ornate layer away and start over I decided to emboss a separate sentiment on basic white and mat it with silver foil.  You have to admit that the over-the-top inside is in keeping with the front of the card.

I suppose that sometimes we can have too much of a good thing.  I'm thinking this card may be one of those times.  But honestly, it does look much prettier in person.  So, it is definitely getting mailed to someone this Christmas.  Would you like to be that someone?  

You can access a free tutorial by using this link, and a full product list is provided below.


Product List

Wednesday, November 10, 2021

SANTA PAWS IS COMING TO TOWN

Today's card showcases a new "Smooshing" Technique that I learned at a retreat I participated in back in October.


Doesn't it make a pretty background?  I wasn't sure how it would turn out when I chose the colors, but it sort of reminds me of the Northern Lights, so I decided to just put a couple of simple Christmas trees made with the Whimsical Trees Bundle on the front.  Whimsy and cute pups go well together don't they?

If you look closely, you can see that the front tree has Bumblebee lights on it.  The little pup from Sweet Little Stockings is sporting a cute Santa Hat trimmed with holly, as he holds up a Stitched Rectangle sign to remind us that Santa Paws is on his way!  I scattered a few stars in the sky which were quick and easy to make with a die from Christmas Tree Dies.

If you want to learn how to do this Smooshing Technique using a Window Sheet and Stampin' Write Markers you can check out the FREE tutorial for this card.  It is super simple, and I love it much more than some other "smooshing" techniques I've tried.


I wanted to leave as much of the background showing as possible.  I mentioned above that it reminded me of the Northern Lights.  Does it remind you of something?   

I have a funny story about the last time I saw the Northern Lights.  It was many years ago and we were in Northern Lower Michigan for a weekend of fun with family and friends.  A group of us were by a lake when we saw the Northern Lights, so we started to walk out on a dock to get a better look.  The lights were just beautiful!  The prettiest I have ever seen here in Michigan.  We were all oohing and aahing when all of a sudden there was a huge splash.  One of the friends had been so engrossed in looking up at the beautiful sky that he had walked right off the dock and landed in the lake.  Fortunately, it was summer, warm, and not very deep.  So, it all ended with a lot of laughter!  A good night that I'll always remember.

I have digressed...  back to the card.


I kept the inside of the card very simple.  I stamped another tree with the Whimsical Trees Stamp and over stamped it with the Bumblebee lights.  Using Misty Moonlight Ink I stamped a couple of sentiments from Sweet Little Stockings and in keeping with the front of the card, added a Misty Moonlight mat.

A complete Product List is shown below.

If you have questions on any of the techniques used on this card, please leave me a comment.  I would love to help you with any of your stamping needs or questions you may have.

Product List

Watercolor Paper
Watercolor Paper
[122959]

Friday, October 1, 2021

WHIMSY & WONDER

Today's card uses a layout that I learned through Sharon Armstrong's mystery stamping.  I first shared this layout a few weeks ago and predicted that you would be seeing it again.  If you missed that post, you can check it out here!

I love the versatility of this layout, and it works so well to showcase beautiful designer series paper.  And there is nothing not to love about this Whimsy and Wonder Specialty Designer Series Paper.  Look at these two beautiful patterns--one with Mint Macaron trees and one with beautiful holly.  The designs in this paper have beautiful iridescent highlights!  I just can't get over how pretty it is in real life!  The photos just don't do it justice.

Rather than focusing on the trees from the Whimsical Trees Bundle, today I decided to use the ornaments stamp.  I stamped two sets with VersaMark on Basic White cardstock and then heat embossed them with silver embossing powder.  I colored them with Mint Macaron and Polished Pink Stampin' Blends and die cut with the coordinating die from Trees Dies.  The sentiment on the front of the card is from the For Unto Us Stamp Set and was stamped on Basic White and then die cut with a die from Tasteful Labels.

In keeping with my mantra of "no naked card insides", I added another set of silver heat embossed ornaments colored with Stampin' Blends on the top left of the inside of the card.  The sentiment is from the Christmas to Remember stamp set and is stamped in Black Memento.  

I'm addicted to sentiment stamps and have a difficult time passing one up.  This awesome new Christmas to Remember Stamp Set from the Fall Mini was no exception.  It has great fonts and some new and unique sentiments different from those I already own.  Check it out in the Product List below!

Usually I just give you little sneak peaks of the envelops that I make for each of my cards, but today I thought I would share the whole envelop.  I am really happy how it turned out and thought it was too special not to share.  I hope it inspires you to also decorate your envelopes. 

Maybe a pretty envelop will also bring a smile to the person that delivers it and not just the person that receives it!  I hope it at least made you smile today!

As always, there is a detailed tutorial available for today's card.  Just click on this link for all the cutting dimensions and step-by-step directions.

All the products I used to create the card are listed below, and if you have any questions on the cards I share, please leave a comment and I'll do my best to answer them.  I'm here to help!


Product List