Showing posts with label Stitched Rectangle Dies. Show all posts

Tuesday, April 4, 2023

TECHNIQUE TUESDAY - RAINBOW FOR A FRIEND

Today, I am excited to participate in the Technique Tuesday Blog Hop at Crafty Collaborations.  


Our theme this month is water coloring, and I have a really fun technique to share with you that uses water coloring in a little different way. 


The Technique used on today's card is called Watercolor Emboss Resist, and I used my featured stamp set of the week, Covered in Sunshine.  This stamp set has such beautiful sentiments, and they are large in size which works perfectly with different background techniques.


I first stamped the sentiment on watercolor paper with VersaMark ink and then embossed it with Black Embossing Powder.  For this technique, any color of embossing powder can be used, but because of my bright rainbow of colors, I wanted to make sure that my sentiment popped, so I used black.  I recommend that you use a Stamparatus (or similar tool) to stamp the sentiment.  Watercolor Paper has some texture, and you want to make sure you get good coverage of your VersaMark ink to obtain a crisp embossed sentiment.

After heat embossing, I then used Water Painters to watercolor over the embossed image and create a free-hand rainbow.  Colors from top to bottom are:  Real Red, Calypso Coral, So Saffron, Pear Pizzaz, Balmy Blue and Highland Heather.


If you would like to learn more about the Watercolor Emboss Resist Technique, please watch the following video that I shared on Connect to Create a few weeks ago.  This video demonstrates two different methods for the technique.  Today's card uses Method 1.


Once the water coloring was dry, I die cut the sentiment with a Stitched Rectangle die and popped it up on dimensionals.

The bottom of the Calypso Coral cardstock was covered with a piece of designer series paper (DSP) from Fancy Flora DSP.  This DSP has so many different colors in it that it is easy to find something that coordinates with almost any color.


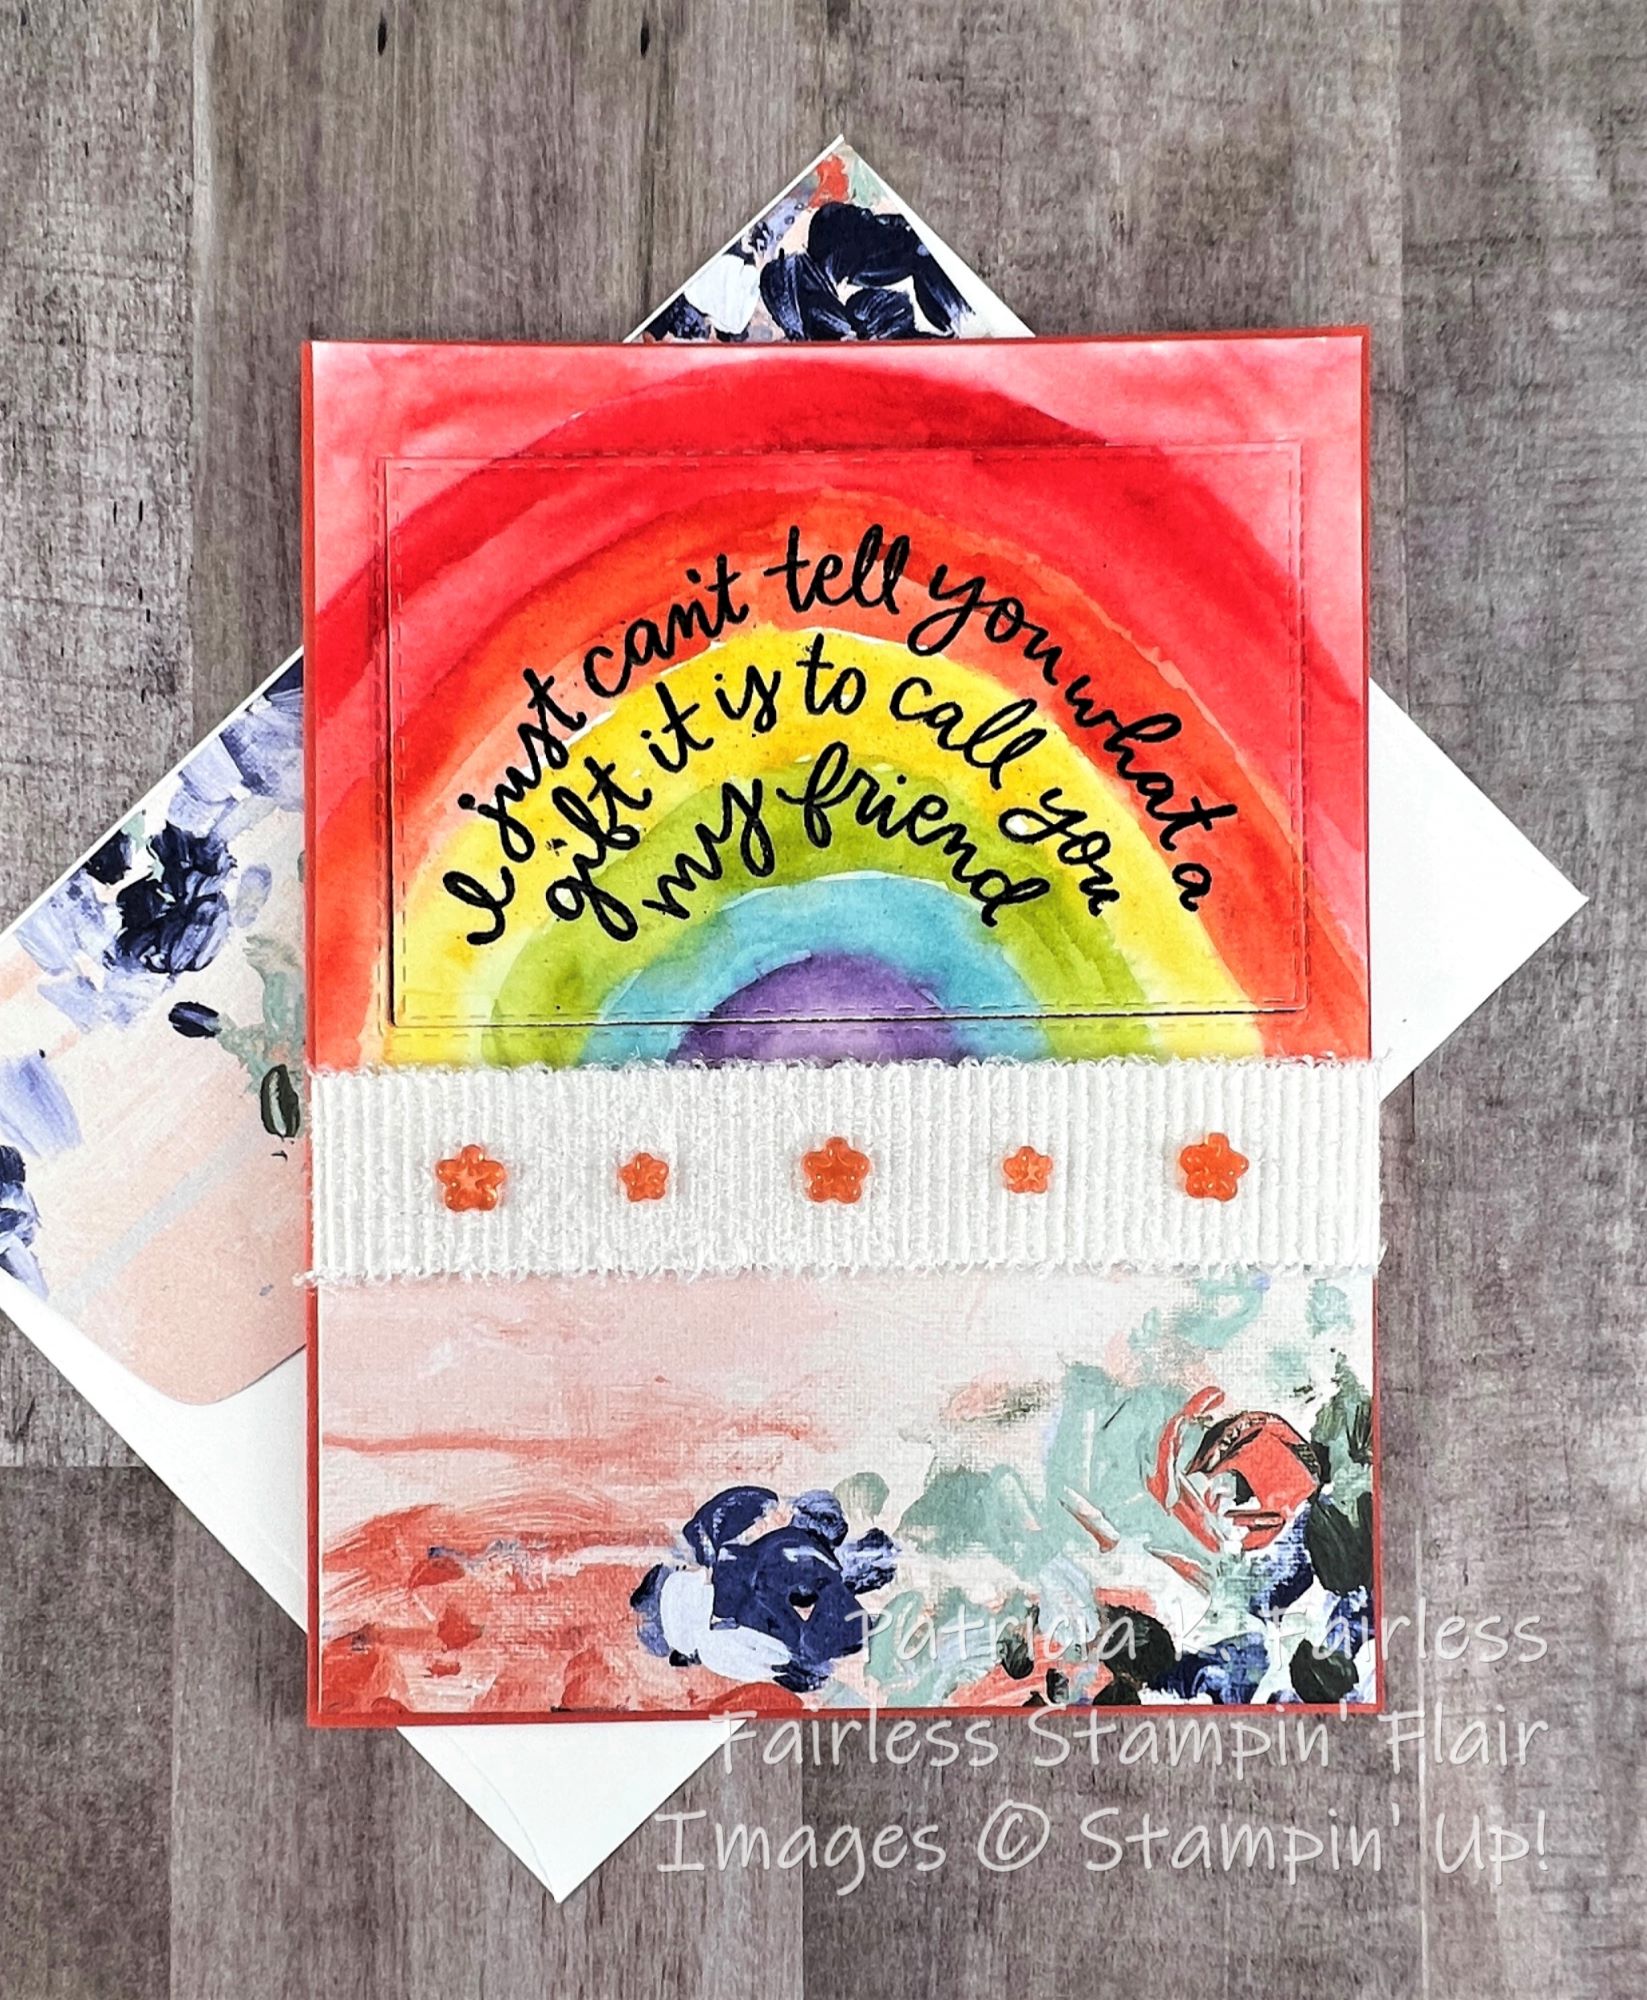
I wrapped the "seam" with Frayed Ribbon and added a few Fun Flower Resin Shapes to add a bit of sparkle.

The inside of the card was trimmed with another piece of the designer series paper matted to a strip of Calypso Coral cardstock.

If you would like a tutorial for today's card, you can download a free copy at this link.

I hope you will now take a few minutes to relax and hop through the Technique Tuesday Blog Hop.  You will enjoy the inspiration of all these wonderful stampers!

Blog Hop Index


Below is a list of Products used on this card.  For more information on any item, please click on the image and it will take you to my Stampin' Up! store.

Product List

Wednesday, March 8, 2023

PLAYING IN THE RAIN FOR EASTER

I have a cute Fun-Fold Easter card for you today made with the Rain or Shine Suite of Products.


This is a very simple fun fold card.  The front of the card is just trimmed to half of its normal width and then a matted focal point cut with Stitched Rectangle dies is added.

The Rain or Shine Designer Series Paper includes one design that is a field of daisies.  I used this DSP to cover both the inside of the card and the front flap, and it makes such a pretty background for my Rabbit Friend, Skip.  Does Skip look happy?  He looks like he is hopping and skipping through the flowers across the front of our card, doesn't he?

This Rain or Shine Designer Series Paper (DSP) collection also includes sheets of various images that are sized to coordinate with the Playing in the Rain Dies that come with this bundle.  All I had to do was die cut Skip from the DSP.  Isn't he cute?  He just makes me smile!


I added a small grassy area of color wash on my Basic White cardstock using my Water Painter and some Old Olive ink.  Then I stamped the daisies on the grass and colored the petals with my Mango Melody and Cajun Craze Stampin' Blends.

It was easy to add Skip to the scene with a few dimensionals.

The God's Blessings sentiment is from the Hope and Peace stamp set which has carried over from the July - December Mini Catalog -- so YES, it is still available!  YAY!


The Happy Easter sentiment on the inside of the card is from the retired Welcome Easter stamp set.  But, if you need a Happy Easter stamp, the adorable Easter Bunny stamp set in the current mini catalog has basically the same sentiment.  My Easter Bunny stamp set is on its way to me and is someplace between Utah and here.  In the meantime, this retired stamp worked just fine!  Just like the Easter Bunny "Happy Easter" sentiment, the two words are all on one line, so to make it work on this narrow front flap, I needed to first mask "Easter" and stamp "Happy", and then do the same with "Easter" and stamp it below the "Happy".  It's a simple trick to turn one-line sentiments into two-line sentiments.  Sometimes we need to do that when we don't have enough space for a long single-line sentiment.

This is the first Easter Card I've made this year, so I need to get busy, or I'm going to be really scrambling.  Easter is only a month away!  I can see me using this bundle to make some more Easter Cards, and once my Easter Bunny stamp set arrives, I'll need to get busy!

I hope you liked today's card.  Skip the bunny makes me smile so I hope he made you smile, too!

If you would like directions for today's card, please use this link to download a free tutorial.

A list of the current products I used is shown below for your reference.

Product List

Friday, January 20, 2023

FRIENDS FOREVER - INK BLOWING

Today's card shows two friends who are vastly different having a wonderful time together.  Ellie the Elephant is one of the largest in the animal kingdom, and Pipsqueak the Mouse is just a tiny little guy, but they like hanging out together -- so long as Ellie watches where she steps!  Pipsqueak even brought Ellie a Daffodil Delight flower today, and you can see that Ellie is taking a closer look as Pipsqueak hands it to her.


Their colorful and interesting background on the large circle was made using the Ink Blowing Technique.  I shared this technique recently on a Connect to Create video.  If you missed it, you should check it out.  It is a lot of fun, so simple, and you never know just how it is going to turn out!  This one, if you use your imagination, sort of looks like trees behind Ellie with the sun peeking through, doesn't it?


The three circles on today's card were die cut with the Stylish Shapes dies.  The Bermuda Bay background was die cut with a Stitched Rectangles die and if you are wondering, yes, I did push it off to the left side -- on purpose!


The two circles behind Ellie and Pipsqueak are embossed with the Splatters Embossing Folder from the Strips & Splatters Embossing Folders set of two.

The colors I used for the card were all selected based on the colors I used for the Ink Blowing-- Bermuda Bay, Rich Razzleberry, Smokey Slate, and Daffodil Delight,

Yes, I probably did my color selection a little backwards this time, but as I was making the Ink Blowing background for the Technique Video, I used my Color Coach for recommendations on color combinations.  Figuring out colors is not my strength, so I use the Color Coach a lot!  Once I had the technique sheet completed, I just used those colors for the card.  I'm not sure I ever would have put Rich Razzleberry and Bermuda Bay together, but I think the Color Coach knows what she is talking about.

For a FREE Tutorial with all the details on how to make this card, please use this link to download a copy.

A list of products used is included in the tutorial but is also shown below with clickable links to learn more about any product.

Product List