Showing posts with label Bouquet of Love Hybrid Embossing Folder & Dies. Show all posts

Friday, January 28, 2022

BRAYER THE BOUQUET OF LOVE

Today is the last card this week with the Bouquet of Love Embossing Folder and Dies, and I thought I would try a technique that I haven't used in a while.  This technique uses a brayer to ink up one side of the embossing folder before embossing your cardstock.  Depending on the side you choose to ink, you will get a completely different appearance.


For this card I inked up the side of the folder that would color the "depressed" portion of the design.  If I had inked the other side of the folder, the flowers would have been Flirty Flamingo and the background would have been white.  Does that make sense?

For the background on this card, I used Shimmery White cardstock, but you can do this technique with any type of cardstock.  

If you look closely at the small heart, you will see that I used the same technique for this piece.  I again inked the folder with Flirty Flaming, but this time I used Flirty Flamingo cardstock.  


This gives a very tonal effect which is also stunning.

It is a simple and fun technique.  The main thing to be aware of is that when you place your cardstock on the inked embossing folder don't move it around or you will smear the ink--so place it carefully.

If you haven't done this technique before, I challenge you to try it.  Experiment with various colors and inking each side of the embossing folder. I think you'll have fun.

The large heart was created from the darkest foil in the Silver Foil Specialty Pack.  It was embossed and cut in the Bouquet of Love Embossing Folder, and WOW, embossing that foil sure makes it shine.  The picture does not do it justice.  I did create a second heart out of Night of Navy and adhered it to the back of the foil heart.  I felt it needed a little extra support so that I could pop it up on dimensionals.


I wanted to keep the sentiment tiny, so that I could use the small label die in the Bouquet of Love dies.  To find a sentiment with the message I wanted, I needed to go to an old, retired favorite set, Itty Bitty Greetings.  If you can't find the sentiment you want in that set, it probably doesn't exist.  


As I was making this card, I ended up with lots of embossed scraps, so to decorate the inside of my card, I just punched a bunch of little hearts from those scraps and let them cascade down the left side of the Basic White Panel.  I love it when I can use scraps -- especially scraps as pretty as these!

Have I tempted you this week to try a Hybrid Embossing Folder?  I'll admit, when I saw the first one in the 2021-2022 Annual Catalog, I had my doubts.  Putting a die inside an embossing folder just didn't seem like a great idea.  We all see the scars on our cutting plates, right?  And I was very skeptical and concerned that the die would cause similar "damage" to the folder.  But I have now used both the Art in Bloom Hybrid Folder from the Annual Catalog and this Bouquet of Love Hybrid Folder from the Spring Mini many times, and I see minimal scaring on the folder. 

If you would like a tutorial for today's card, you can download one at this link.

A list of all current products used for this card is shown below.

Note: For the Brayering Technique used on this card, I would recommend using a firm rubber brayer for the best results.  A sponge brayer may have a tendency to ink recessed areas of the embossing folder rather than just staying on the top of the raised surfaces.


Product List

Wednesday, January 26, 2022

HELP, I CAN'T MAKE UP MY MIND!

I am going to share two cards today.  They are both made with the same colors and a the same 5-1/4" x 5-1/4" format.

I'll be honest, I struggled with these cards.  I wasn't crazy about the first one I made, so made another and tried something a little different.  I'm not sure how I feel about that one either, so I just decided to share them both -- in no particular order.


The colors on both cards are Poppy Parade, Daffodil Delight and Granny Apple Green.

The background for the first card shown above was created with Blending Brushes and then embossed with the Bouquet of Love Embossing folder and dies.  The second card was created using the Poppin Pastel technique.  It was embossed first and then VersaMark Ink was added to the raised surfaces.  The flowers and leaves were then individually colored with powder scraped from the Pastels.  A small eye make-up sponge was used to do the coloring as my sponge daubers were too large for the detail required.


They are both very bright and cheerful cards, and in-person the hearts have plenty of sparkle, thanks to a generous application of Wink of Stella.  

The sentiment is from Celebrating You, an awesome new versatile sentiment stamp set in the Spring Mini. 

For the floral card I used some of the additional dies in the Bouquet of Love Dies to create a small floral bouquet on the left edge of the sentiment.  The center of each flower is accented with a black Classic Matte Dots.

For the blending brush background card, I left it with what I would call a more contemporary clean look.  I added three Opal Rounds to the front of the card for a little added bling.

Both cards use the Crinkled Seam Binding White Ribbon applied in slightly different ways.

Here is one more look at each of the cards.


I'm curious which one you like best.  Truthfully, I'm not so sure that I'm crazy about either one, but I do definitely have a preference.  I'd love to have you leave me a comment with your preference.  Floral?  Contemporary?

In case you are wondering, the inside is exactly the same for both, except for the fact that one card opens right to left and the other opens vertically.  That's one nice thing about a square card -- you can make the inside exactly the same no matter which way it opens!


Tutorials are available for both cards using the links below:


The Product List below shows all supplies used for both cards.  The tutorials list supplies specific to that card.

Product List

Monday, January 24, 2022

A BOUQUET OF LOVE

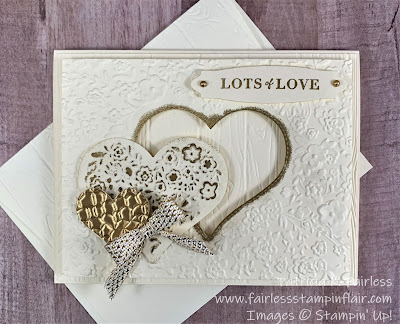
It's Monday and time for a new featured Product of the Week.  This week I am featuring the Bouquet of Love Hybrid Embossing Folder.  This embossing folder includes nine dies, and the folder is designed to be used with the largest of the dies, a heart.

Today's card is a "single color" card with a slight touch-of-gold exception.

It's been a while since I created a single-color card.  I used to frequently make all-White or all-Very Vanilla cards for my monthly Stamp Camps, and the class participants always loved them.  The key to an all-one-color card is using several different textures to provide interest.

So, as I was planning the cards for this week with the Bouquet of Love Hybrid embossing folder, I thought it was the perfect time to revive an old-favorite technique.

The Bouquet of Love Embossing Folder certainly provides lots of texture!

Now, you may be looking at this card and saying, "but it's not all one color!"  You are correct.  I did add some gold heat embossing and a gold embossed heart, but everything else is Very Vanilla cardstock.

I started with an 8-1/2" x 5-1/2" Thick Very Vanilla Card base.  The next layer, cut at 5-3/8" x 4-1/8", is embossed with the retired Pinewood Planks 3D embossing folder.  Yes, it is retired, and I usually try to avoid using retired products, but you could just as easily use the Timber 3D Embossing Folder which is still available as a carry-over product from the Holiday Mini.  In actuality, you could use any embossing folder you have because it is really just all about adding texture.


The third layer was made with the Bouquet of Love Hybrid Embossing Folder and the coordinating large heart die.  The fun part of a hybrid embossing folder is that you emboss and die cut all in one step!  And if you are wondering, like I did, is this going to damage the embossing folder?  Nope, it hasn't yet!

Before attaching this layer, I used my sponge dauber to add some VersaMark ink around the edges of the heart cutout.  
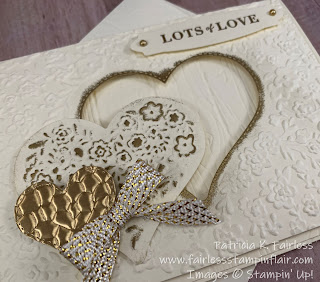
The edge was then heat embossed with Gold Embossing Powder.  I popped the layer up on dimensionals because I thought it better accented the wood texture showing through the raised, open heart.

I tapped my VersaMark pad on the top of the embossed large heart that was made at the same time as the panel.  I then added some gold embossing powder and heat embossed.


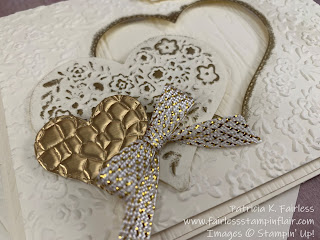
The small heart was die cut from gold foil with another die in the Bouquet of Love Dies and embossed with the Hammered Metal 3D embossing folder.

I found this gold and very vanilla ribbon in my stash and even though it is retired, I thought it was a perfect accent, so decided to use it to add a small bow.

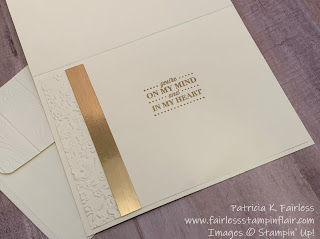
As you know, I don't like to ever leave the inside of my card naked.


I embossed the left edge of the inside Very Vanilla panel with an edge of the Bouquet of Love embossing folder and then added a narrow gold strip to cover the intersection of the embossing and the plain cardstock. 

The sentiments for the front and inside of the card are also gold embossed.  Both are from the Celebrating You Stamp Set.  Celebrating You is a new stamp set in the Spring Mini and it includes a nice variety of sentiments.  You should check it with the link in the Product List below.  It is an awesome all-purpose sentiment set!

If you would like a Free Tutorial for this card, one is available to download using this link.


Just a quick reminder.  We are almost halfway through Sale-a-Bration.   Have you taken advantage of the FREEBIES yet?  For each $50 of merchandise that you purchase you may select a free item from the Sale-A-Bration Brochure.  Don't miss out!

Sale-A-Bration is also one of the best times to join Stampin' Up! as a demonstrator.  Not only can you choose $125 worth of merchandise for only $99 but you also get to select two free stamp sets of your choice.  And don't forget, once you join, you will also receive a 20% discount on future purchases as long as you remain a demonstrator.

If you would like any additional information on how to take full advantage of Sale-a-Bration I would love to help.  Please feel free to email me at fairlessflair@gmail.com.  I would love to have you join my team!


Product List