Showing posts with label Poinsettia Dies. Show all posts

Friday, October 22, 2021

A PURPLE POINSETTIA CHRISTMAS

I wanted to try a more unique color for today’s Poinsettias.  
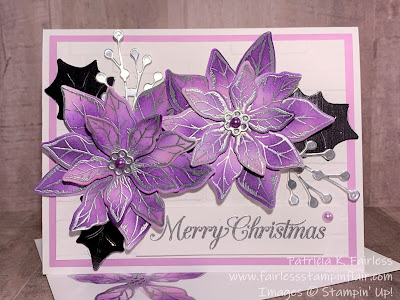


If you saw Monday’s post you know that I did a bit of Google research on the history and symbolism of Poinsettias.  One of the posts I found said there are over 100 varieties of poinsettias, blooming in shades of red, pink, white, yellow, purple, and multicolored.  I also saw a different post that said blue poinsettias are "real," but they are blue because they have been dyed.  

After my research, I decided I could use my designer liberties and make my flowers whatever color I wanted.  So today, I’ve decided to have Fresh Freesia and Gorgeous Grape flowers.  If you believe this isn't a "real" Poinsettia, just think of it as dyed!  It's real paper!  

To make today's flowers, I inked up my Poinsettia Petals stamps again with VersaMark and then heat embossed them with silver embossing powder.  After embossing, but before die cutting, I used my blending brushes to color them with Fresh Freesia and Gorgeous Grape ink.


Once coloring was completed to my satisfaction I die cut them with the coordinating Poinsettia Dies.
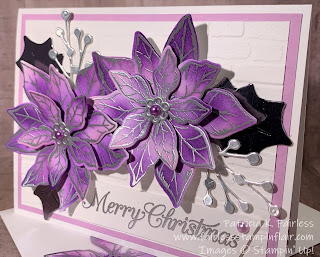

I layered the two flowers on a Brick & Motor 3D embossed Basic White background panel.  The leaves are die cut from the darkest of the three foil colors from the Silver Foil Specialty Pack in the Fall Mini Catalog.  This is a beautiful purply-silver brushed foil and was the inspiration for my flower color choice.  The sprigs are die cut from the lightest silver foil from the same specialty paper pack.
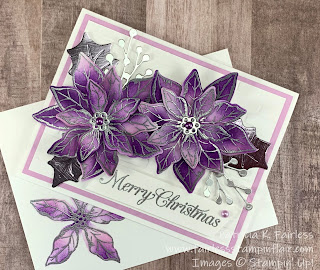

A Merry Christmas sentiment from Poinsettia Petals was heat embossed with Silver Embossing powder on a Basic White Strip.  After adding a Pastel Pearl to the center of each flower and in the corner of the sentiment, the card front was complete.

The only remaining question was how to complete the inside.  I like to have the inside complement the front of the card, but not outshine it.


So, I kept it simple and just added a Fresh Freesia mat and decorated the Basic White panel with another strip of Fresh Freesia and silver foil.  The sentiment is heat embossed with silver.

What do you think?  Would you like a "purple" poinsettia for Christmas?  Or would you prefer to stick with the traditional red, pink, or white?

Will you let me know in the comments below?

Before we set aside the Poinsettia Petals stamp set and coordinating Poinsettia Dies, I have one last piece of trivia to share with you about Poinsettias.  Are they poisonous?  There has been a lot of rumors and myths out there surrounding this question.  What I learned is that the family of plants to which Poinsettias belong does contain some highly toxic plants, but the popular Poinsettia itself is not toxic.  MedicineNet says that ingestion of Poinsettia leaves will not damage your body or kill you, but in some cases it may lead to nausea and vomiting.  My recommendation...  STICK WITH THE CHRISTMAS COOKIES!

If you would like to make this card, there is a free tutorial available that includes all the cutting dimensions and step-by-step instructions.  So how about grabbing some cookies and making a card!

A complete product list is also included below.


Product List

Wednesday, October 20, 2021

A COUNTRY PLAID POINSETTIA CHRISTMAS

On Monday I shared the SIMPLY ELEGANT POINSETTIA card with you.  Today, we are traveling to the country.  When I see plaids, checks or gingham, I think about sitting around a warm cozy campfire somewhere in the country, and that's how this card makes me feel. 

Since I was trying to go for a warm and cozy card today, I decided to die cut the poinsettia from the red and black check Peaceful Prints designer series paper.  I just die cut three different size flowers and layered them together.  It doesn't get much easier than that, does it?  No stamping, no aligning dies with stamped images, just lay the die on the paper and run it through the machine! 

The Peaceful Prints designer series paper was a Sale-A-Bration reward and is no longer available, but I thought you might still appreciate ideas on how to use something you may already have.

The black and white lined "plaid" paper on the left flap of this card is one of the designs from the Pattern Party Designer Series Paper (DSP) which is one of the special rewards that hosts can select.  I just love the Pattern Party DSP pack as it includes 48 sheets of awesomeness!  It also includes a black and white check pattern so if you did not get the Peaceful Prints DSP you could also color the black and white check with Real Red Ink and a Blending Brush or Sponge Dauber to turn it into a red and black check. 

I do think it makes an interesting Poinsettia to die cut its layers from DSP.  You could obviously do this with any designer series paper, so use your imagination.  Pick your favorite DSP pattern and turn it into a Poinsettia!  Some of the foiled specialty papers we have would make beautiful flowers, wouldn't they?

The sentiment, from Christmas to Remember Stamp Set, was stamped in Real Red on a Basic White scrap and then die cut with the smallest Stitched Rectangle Die.  It was still a little long, so I snipped off the end that is hidden under the flower.  I colored a few Rhinestone Basic Jewels with my Mango Melody Stampin' Blends and turned them into the center for the flower.

Today's card is also a fancy fold -- well, I'm not sure how fancy it is, but it is different than our standard 5-1/2" x 4-1/4" folded card.  I made a card a few weeks ago that used this same fold.  I didn't know the name of it then and still don't, but I called it a Dual Flap Fun Fold, so I will stay with that name.   


The flap on the Poinsettia opens as does the narrow black and white flap.  When opened it reveals a coordinating inside decor.


If you would like to try to make this fun fold, I have a FREE TUTORIAL with all the step-by-step directions and the cutting dimensions.

A complete product list is shown below.


Product List

Monday, October 18, 2021

SIMPLY ELEGANT POINSETTIA

This week I am going to feature the Poinsettia Petals stamp set and its coordinating Poinsettia Dies.  This set has been around since 2020, but it is still one of my favorite Christmas stamp sets.

Poinsettias are the traditional flower of Christmas, but did you know that they are indigenous to Mexico and Centra America and date back to the early 1800s?  It's common English name, Poinsettia, is derived from Joel Roberts Poinsett, the first United States Minister to Mexico who is credited with introducing the plant to the US in the 1820s.  Every year in the US, approximately 70 million poinsettias are sold in a six-week period.  It is considered a shrub or small tree and reaches heights of 2 to 13 feet!  I've never seen a 13 foot Poinsettia Tree, but I would love to!  Wouldn't that be a beautiful sight?  If you had one of those in your front yard, you'd always be decorated for Christmas!

OK, well that's probably enough Wikipedia Poinsettia information for today, so let's take a look at today's SIMPLY ELEGANT POINSETTIA card.


With tools and dies from Stampin' Up!, this was a very quick and simple card to make!  While "quick and simple" cards are not usually my style, I do love a beautiful, elegant card, and this one certainly qualifies as one of those.

The brushed gold background from the Brushed Metallics Specialty Paper was embossed with the Evergreen Forest 3D embossing folder.  Isn't it beautiful?  

Three different size flowers from the Poinsettia Petals stamp set were stamped with VersaMark Ink on Very Vanilla Cardstock and then heat embossed with gold embossing powder.  Using the coordinating dies from Poinsettia Dies made cutting out the flowers quick and simple.  After layering them on top of each other with dimensionals and adding a gold Gilded Gem to the center, the flower was complete.

The Very Vanilla gold-edge ribbon is a left-over that I had in my stash.  I have to admit--I was sad when this ribbon was retired, but this card just screamed for the added elegance this ribbon provides.


I added the little "MERRY" sentiment from Christmas to Remember stamp set, also heat embossed with gold and quickly cut out with a die from Seasonal Labels Dies.


Keeping it elegant and quick, for the inside of the card, I added a strip of the brushed gold foil and heat embossed my favorite sentiment from the Poinsettia Petals stamp set.

One more little interesting bit of information about the Poinsettia is that in today's language of flowers, the December birth flower symbolizes good cheer and success and are said to bring wishes of mirth and celebration.  My wish for everyone that reads this post is that you experience this not only at Christmas but every day of the year!

A FREE TUTORIAL with all the cutting dimensions and step-by-step directions is available. Shown below is a list of all products used to make this card.

I hope you enjoyed the Simple Elegance of today's card.  If you did, would you leave me a note in the comments.  I would also love to send you my bi-weekly newsletter which keeps you up to date on Stampin' Up! events and promotions and the happenings at Fairless Stampin' Flair.  If you would like to receive my newsletter, please contact me through the Contact Tab at the top of this blog to sign-up.


Product List