Which card is your favorite?
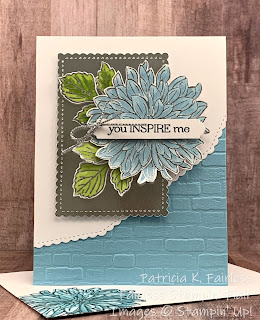
I had not played with my Basic Border Dies in a while so I wanted to see what I could do with them to create some interesting angles on a card--something a little different than a basic border. This is the first card that I created.
It uses the scalloped edge border die that looks sort of like a squared-off envelop flap. I used it to die cut the Basic White Cardstock at an angle.
Since I had a few "leftover" silver foil scalloped rectangles that had been cut with the Stitched so Sweetly Dies from, I also decided to use one of those.
You may be wondering why I would have a "few" of these leftover silver foil die cuts. When I create a larger mat from any foil, I never want to waste any! Did I mention the other day when I was talking about some "bad" painter's tape that I'm "cheap"? Anyway, if the center of the foil mat is going to be covered with other cardstock, I always die cut a shape from the center of the larger mat to use later so I can maximize the use of the foil. So for today's card, I decided to use one of those valuable "leftovers".
To stay with the mood of silver elegance, I heat embossed the dahlia flower and two of the triple leaves from the Delicate Dahlias stamp set with silver embossing powder. I then colored the flower with Balmy Blue Stampin' Blends and the leaves with Granny Apple Green Stampin' Blends. After coloring, they were fussy cut and assembled on to the silver foil.
I added a sentiment stamped with Black Memento and die cut it with one of the dies from the new Frightful Tags Dies. Although the Frightfully Cute Bundle is a Halloween themed bundle, the dies have some great shapes perfect for sentiments.
I had intended to cover the lower portion of the Balmy Blue card base with a designer series paper, but after searching through my stash I did not find a Balmy Blue design that I liked. So my next thought was to emboss that portion of the card. I decided to try the Brick & Motor 3D embossing folder. I wasn't sure how it would look because the Brick & Motor is sort of the opposite of "elegant". But once I assembled the white scalloped die cut piece and the silver foil and flower assembly over it, I loved the juxtaposition it created. Elegance with a little rough and tumble! I'd love to hear your thoughts about this combination.
I kept the inside of the card clean and simple, but it is definitely not naked! I added a sentiment from In Your Words stamp set, and trimmed the Basic White cardstock with a Balmy Blue strip and a little narrow scrap of silver foil placed beside it. Now I'm ready to send the card to a friend and hopefully make them smile!
As I mentioned above, my initial vision for this card had designer series paper (DSP) on the lower front. Since I was having fun playing with the Basic Border Dies, and I had another "leftover" valuable scrap of silver die cut foil, I decided to see if I could come up with another card using this same layout. Here's what I came up with.
There are a few differences between the two cards. Some are obvious. Some are less obvious. Which card do you like best?
Do you ever do those puzzles where you compare two pictures that at first appear to be the same, but the challenge is to find all the differences? How many differences can you find between my two cards? Leave me a note in the comments!
There is a free tutorial available for the Balmy Blue card. That tutorial also can easily be used to also create the second card.
If you would like to receive my Fairless
Stampin' Flair Newsletter, please complete the information on the Contact Me
tab.
It is my goal to help you any way I can. If you have questions, please leave a comment or contact me through the Contact Me tab,
and I will do my best to answer your questions.
A complete list of products used to create the card is shown
below.


No comments:
Post a Comment