Showing posts with label Delicate Dahlias. Show all posts

Friday, September 17, 2021

PICTURE THIS! FRAMED DAHLIAS

Happy Friday my Stamping Friends!

Today I wanted to try something a little different – an experiment really.


Stampin’ Up! has a couple of new dies in the current Annual Catalog called Picture This.  They cut out either rectangular or circular “windows” in a piece of cardstock.  I saw a card on Pinterest that used the rectangle version of the Picture This Die, and these Dahlias were peeking out through the windows.


Well, these dies are on my wish list, but I don’t own them yet, so I started going through the dies I do have.  My first thought was the Stitched Rectangles dies I have, but the sizes just weren’t working for me, so I started digging further.  Next, I looked at the Stitched so Sweetly Dies (one of my favorites by the way), but again the sizes just weren’t working.  Same problem with the Scalloped Contours dies—the sizes just weren’t working.  

At this point I had used up all my obvious alternative ideas, and I was a about ready to throw in the towel, when I happened to look at my Christmas Season Bundle from the current Mini Catalog.   As I mentioned in my post on Monday, these dies are definitely worth a second look.  When I purchased the bundle, I didn’t even notice all the great label dies that it includes.  All I had “seen” were the dies that coordinated with the stamps. Now, I was looking at them with a different set of eyes and a different purpose in mind!  For the first time, I saw several dies with similar “shapes”, but in different sizes.

So, I decided to experiment and see if I could make a “Picture This” card using these dies.  This is my result!


What do you think? 

The most difficult issues I incurred were two different things. 

Issue 1)  Keeping the 3 separate dies aligned as I ran them through the Die Cutting machine.  Solution:  After 3 unsuccessful attempts to keep them straight and spaced correctly (even with Washi tape holding them in place), I ran each one through separately--so 3 times through the machine. 

Issue 2) When you stamp the flowers on the cardstock behind the openings, you need to make sure your stamping doesn’t appear someplace you don’t want it to appear – like along the border around the basic white piece, or in the opening next to the one you are stamping.  Solution: Use copy paper (or any lightweight paper) to mask the areas where you don’t want ink.

After I had run my Basic White cardstock through the Die Cutting machine 3 times to create the 3 windows there were some markings from my “well-used” cutting plates on the Basic White.  Solution:  I used the Tasteful Textile 3D Embossing Folder and voila – all marks are gone (or if they are there, you can’t see them).  This was actually a "happy fix”, because the card was looking a little stark and the embossing added some texture that was greatly needed.

After completing the stamping on the Highland Heather cardstock, the Basic White Window card was adhered on top with lots of dimensionals.  The flowers (with a Basic Pearl adorning each center) and the leaf were added with dimensionals.

Lastly, some Wink of Stella was added on all the flowers to give a little shimmer and shine.  In my world, you can never have too much shimmer & shine!

I’m happy with my experiment, but would love to hear what you think?

If you would like to make this card, you can avoid my “issues” and follow the FREE TUTORIAL available at this link.

A complete Product List is below for today's card.

If you missed my August Posts using the Delicate Dahlia Stamp Set, you can visit them using the following links:

Dahlia on the DIAG

Delicate Dahlia Inspired by Pat's Garden

Juxtaposition Dahlia Card

There are only 13 days left of Sale-A-Bration, so don't miss out on getting this awesome Delicate Dahlia Stamp Set for FREE with a qualifying order.


Product List

Wednesday, September 15, 2021

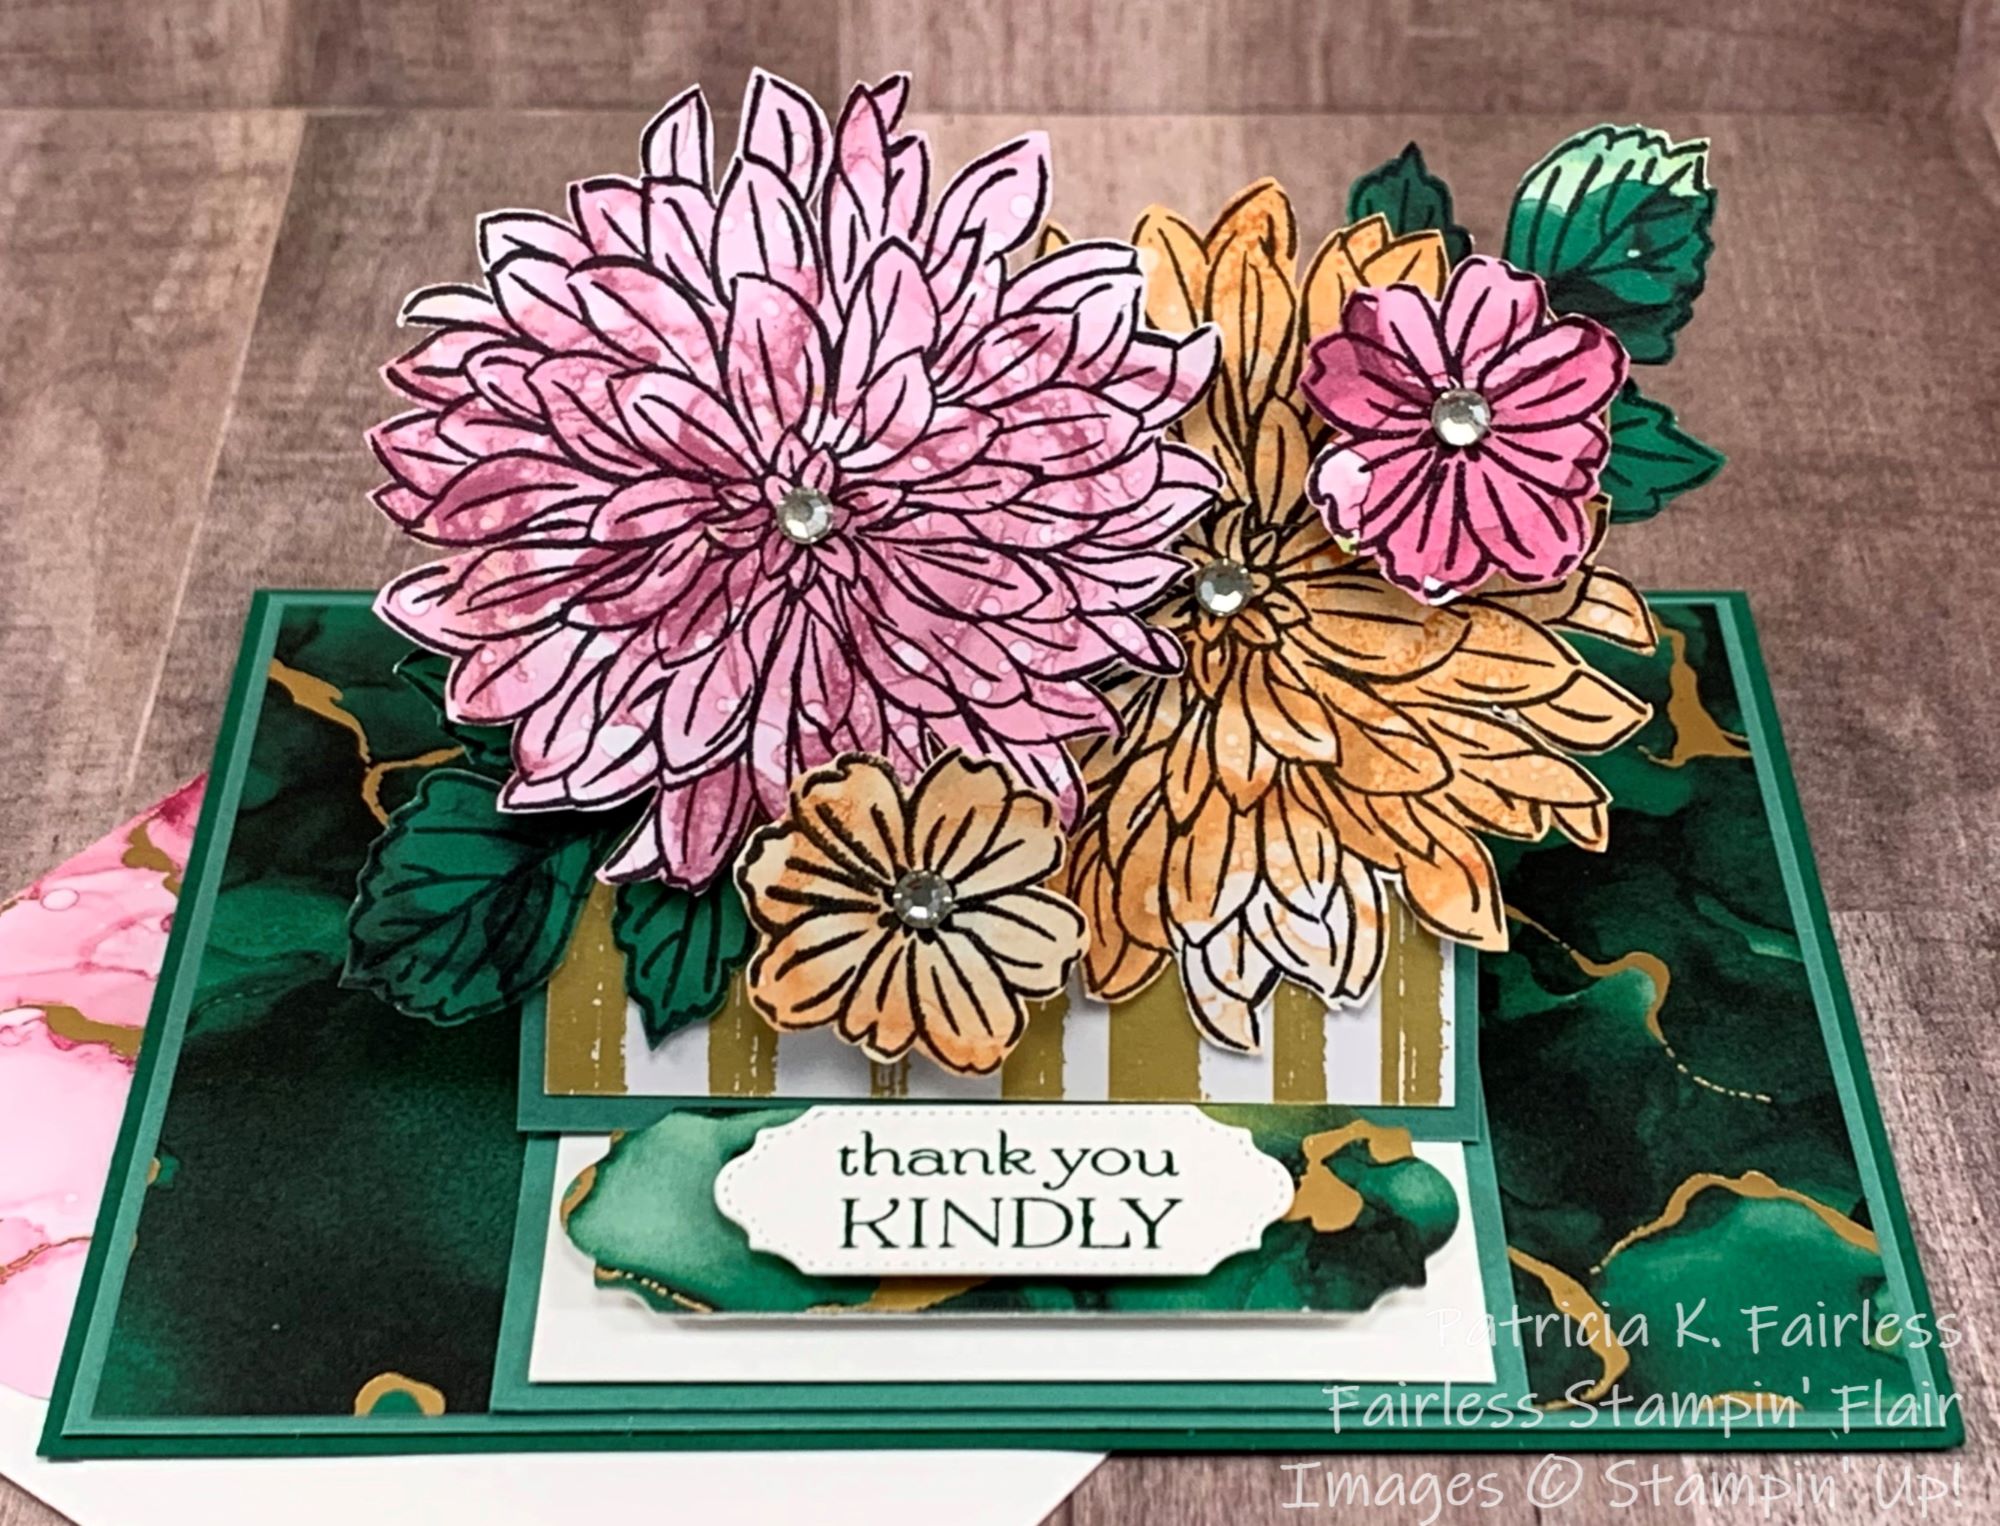
FUN FOLD DAHLIA EASEL CARD

I’m back today with another fun FUN-FOLD card featuring my Stamp Set of the week, Delicate Dahlias.

Now it doesn’t look like much of a Fun-Fold in the above picture, does it?  But look what happens when you open it into its Easel form.

Is it still not real clear what is going on?  How about from this angle?


Now is it starting to make a little more sense why I called it an Easel card?  If you would like to give making one of these a try, I have a Free Tutorial available for you with all the dimensions and directions. 

To make my Dahlias today, rather than stamping them or stamping and coloring them, I used the gorgeous Expressions in Ink Specialty Designer Series Paper to create my flowers.  I simply stamped the outline image stamp on some various scraps of paper from Expressions in Ink and then fussy cut them.

For the card base I used another design from this beautiful paper and the Easel “tent” was covered with the gold stripe pattern from the same paper package. 

The flowers and leaves are adhered to the lower part of the Easel “Tent” with either liquid glue or dimensionals.  The only thing to be careful of is that you attach the flowers to the lower part of the “tent” only – otherwise your tent won’t open, and you will be camping under the stars! 

Here is a little look at the inside of the “tent”.


I stamped one more, small Dahlia on another scrap of Expressions in Ink DSP, fussy cut it and adhered it to the top corner of the inside basic white mat.

The sentiment labels (or stake in the ground that holds your tent in place) were die cut from two dies from the Ornate Frames Dies.  The sentiment is from the Delicate Dahlias stamp set and the mat is from another scrap of Expressions in Ink and matches the paper on the card base.


What do you think of this card?  I’d love to hear your thoughts.

Don’t forget to check out the tutorial and if you have questions, I’m here to help.

A complete Product List is below.

We are down to 15 days and counting left in Sale-A-Bration, so don’t miss out on your chance to earn some FREEBIES including this beautiful Delicate Dahlia Stamp set!

If you missed the Delicate Dahlia cards that I shared the week of August 15 you can use the following links to see them.

Dahlia on the DIAG

Delicate Dahlia Inspired by Pat's Garden

Juxtaposition Dahlia Card


Product List

Monday, September 13, 2021

Triple Stamped Delicate Dahlias

Since we have less than 3 weeks left of Sale-A-Bration, I have decided to use the Delicate Dahlia Stamp Set again this week.  I featured this set the week of August 15, so if you missed those cards, you can check them out using the following links.

Dahlia on the DIAG

Delicate Dahlia Inspired by Pat's Garden

Juxtaposition Dahlia Card

Delicate Dahlias is such a pretty stamp set and is so much fun to play with, so I decided to show case it again this week. During Sale-A-Bration you can get the stamp set for FREE with a $100 merchandise order. 


Today’s card uses the Triple Stamping Technique.  This technique has been around for a long time, but it is a great technique to utilize with stamps like those in the Delicate Dahlias set.  The quick and short description of the technique is you first layer 3 different size pieces of cardstock on top of each other and then you randomly stamp whatever you want to cover the layers.  I stamped the large Dahlia in Bumblebee, Flirty Flamingo, and Merry Merlot.  Then I filled in some of the remaining white space with Blackberry Bliss small flowers and Old Olive leaves.  Since my card base and mats were Blackberry Bliss, I used a very light touch of Blackberry Bliss ink with my Blending Brush to tone down the starkness of the remaining white against the bright colors.

Once all stamping is finished, you then separate the pieces and adhere them to their coordinating sized mats.  Now you just reassemble them.  I used dimensionals between each layer as I’m a bit of a dimensional-aholic.  (I’m not sure there is such a word, but I bet you know what I mean).

I added the Heartfelt Sympathy sentiment from the Delicate Dahlias stamp set and then die cut it with one of the dies from the Seasonal Labels Dies.  If you haven’t checked out those dies, you need to!  At first glance you assume they are Christmas Dies (probably because they are called “Seasonal”), but there are several awesome labels dies in that set.  You can check them out in my Product List below.

On the inside of the card, I had more fun randomly stamping flowers and leaves, and if that wasn’t enough, I continued stamping to cover the flap of my envelop with pretty flowers, too.  You can see a little peak of the envelop flap in both of my pictures.


If you would like a complete tutorial with all cutting directions and steps to create the card you can access one using this link.

A complete Product List is below.  And don’t forget, there are only 17 days left of Sale-A-Bration.  For each $50 you spend, you can earn some great freebies.  For a $100 order you can get this beautiful Delicate Dahlias Stamp Set for free.

If you have any questions, don’t hesitate to contact me.  I’m here to help.


Product List
Flirty Flamingo Classic Stampin' Pad
[141397]

Friday, August 20, 2021

Juxtaposition Dahlia Card

Which card is your favorite?

I had not played with my Basic Border Dies in a while so I wanted to see what I could do with them to create some interesting angles on a card--something a little different than a basic border.  This is the first card that I created.


It uses the scalloped edge border die that looks sort of like a squared-off envelop flap.  I used it to die cut the Basic White Cardstock at an angle.

Since I had a few  "leftover" silver foil scalloped rectangles that had been cut with the Stitched so Sweetly Dies from, I also decided to use one of those.

You may be wondering why I would have a "few" of these leftover silver foil die cuts.  When I create a larger mat from any foil, I never want to waste any!  Did I mention the other day when I was talking about some "bad" painter's tape that I'm "cheap"?  Anyway, if the center of the foil mat is going to be covered with other cardstock, I always die cut a shape from the center of the larger mat to use later so I can maximize the use of the foil.  So for today's card, I decided to use one of those valuable "leftovers".

To stay with the mood of silver elegance, I heat embossed the dahlia flower and two of the triple leaves from the Delicate Dahlias stamp set with silver embossing powder.  I then colored the flower with Balmy Blue Stampin' Blends and the leaves with Granny Apple Green Stampin' Blends.  After coloring, they were fussy cut and assembled on to the silver foil.

I added a sentiment stamped with Black Memento and die cut it with one of the dies from the new Frightful Tags Dies.  Although the Frightfully Cute Bundle is a Halloween themed bundle, the dies have some great shapes perfect for sentiments.

I had intended to cover the lower portion of the Balmy Blue card base with a designer series paper, but after searching through my stash I did not find a Balmy Blue design that I liked.  So my next thought was to emboss that portion of the card.  I decided to try the Brick & Motor 3D embossing folder.  I wasn't sure how it would look because the Brick & Motor is sort of the opposite of "elegant".  But once I assembled the white scalloped die cut piece and the silver foil and flower assembly over it, I loved the juxtaposition it created.  Elegance with a little rough and tumble!  I'd love to hear your thoughts about this combination.  

I kept the inside of the card clean and simple, but it is definitely not naked!  I added a sentiment from In Your Words stamp set, and trimmed the Basic White cardstock with a Balmy Blue strip and a little narrow scrap of silver foil placed beside it.  Now I'm ready to send the card to a friend and hopefully make them smile!


As I mentioned above, my initial vision for this card had designer series paper (DSP) on the lower front.  Since I was having fun playing with the Basic Border Dies, and I had another "leftover" valuable scrap of silver die cut foil,  I decided to see if I could come up with another card using this same layout.  Here's what I came up with.


There are a few differences between the two cards.  Some are obvious.  Some are less obvious.  Which card do you like best?

Do you ever do those puzzles where you compare two pictures that at first appear to be the same, but the challenge is to find all the differences?  How many differences can you find between my two cards?  Leave me a note in the comments! 

There is a free tutorial available for the Balmy Blue card.  That tutorial also can easily be used to also create the second card.  

If you would like to receive my Fairless Stampin' Flair Newsletter, please complete the information on the Contact Me tab.  

It is my goal to help you any way I can.  If you have questions, please leave a comment or contact me through the Contact Me tab, and I will do my best to answer your questions.

A complete list of products used to create the card is shown below.


Product List