Showing posts with label Flowering Fields Designer Series Paper. Show all posts

Friday, June 10, 2022

TOTALLY AWESOME WAVE

Let's ride the wave!  Do I have any surfers out there?  This looks like a wave to ride, doesn't it?


Today I've used some of the Last Chance Designer Series Paper from the January - June Mini Catalog.  The background is made from the Flowering Fields Designer Series Paper.  This is one of my favorites from the collection to use for beautiful backgrounds.  I wish I could make backgrounds like this with my Blender Brushes!

I used my Stamparatus to stamp the wave multiple times with Pool Party Ink.  Since I was stamping on Designer Series Paper (DSP), I wanted to increase the depth of color so that it would show better on the DSP, and the Stamparatus makes it super easy to stamp multiple times in the exact same spot.  I'd never be able to do that without this handy tool.

The White Mat around the Designer Series Paper is another Last Chance product, Mother of Pearl Specialty Paper.  It is absolutely gorgeous!

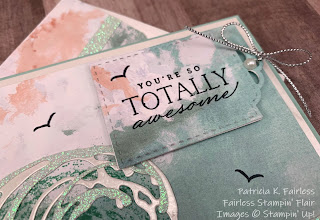
You can see the shimmer on the Mother of Pearl paper better in the above photo.  I also used it for one of the wave layers.

The third Last Chance Product is the Supple Shimmer Paper.  I used it for another die cut layer of the wave and in my opinion, it is really more of a glitter paper than a shimmer paper.  If you love sparkle, you will love this paper.  This Supple Shimmer collection includes this blue color paper, which is very close to Pool Party, but it also has other iridescent colors in it.  The other color in the collection is Pink and close to Blushing Bride.  Both are very pretty, but if you like them, don't wait too long.  They are on the Last Chance List and are only available while supplies last.

I thought about stamping my sentiment directly on the Designer Series Paper, but I felt like the card needed a little dimension.  However, that Flowering Fields Paper is so pretty, that I didn't want to cover up any of it.  So, I used another scrap of the Flowering Fields Paper to create the sentiment tag.  This is another tag die from the Designer Tags Dies.  On Monday I used a different die from the set.  As a reminder, check it out here.

To finish off the sentiment I added a small bow made with the silver Simply Elegant Trim and added one Basic Pearl.


I hope you have enjoyed our visit to the Ocean this week.  As I've mentioned many times, I love all things water, so these are some of my favorite types of cards to make.  I'd love to hear your thoughts and comments.

If you would like a Tutorial for today's card, one is available at this link.

Product List

Friday, March 25, 2022

CANALS OF THE NETHRLANDS

Several years ago, I was fortunate to visit the Netherlands for work.  While work trips rarely provide time for sightseeing, we did have to travel by car from Amsterdam to Eindhoven-- about an hour and a half drive.  So, this provided an opportunity to see some of the countryside.  We know the Netherlands is known for their canals, windmills, and tulips.  And while I don't remember seeing a lot of tulips, we did see canals and windmills.

For today's card, I wanted to try to capture that bit of the Netherlands, so I started searching pictures for inspiration.

This is the card I came up with.


Here is the photo I used as my inspiration.


Today's card uses the two interesting V-shaped stamps from the Tulip Fields Stamp Set to create the field of tulips.


I started at the horizon with the double-V stamp and Mango Melody ink.  I then worked my way down each side towards the center, Flirty Flamingo bed of tulips.  

There was a fair amount of masking required to create the canal and the left riverbank.  To make the mask, I sketched my scene on a piece of scrap paper and then tore it to make each mask section.

The water in the canal and the grassy bank were created using Blending Brushes.  Little ripples in the water were created with a white gel pen and Wink of Stella.

The sky was created with designer series paper from the Flowering Fields Collection.  Using DSP for the sky also helped to create a nice straight horizon line for the cute little fence.

The two windmills were colored with Crumb Cake and Real Red Stampin' Blends and two trees were added on the left bank.

A third windmill was stamped on the inside of the card and colored to match the front.  A little hill of Daffodil Delight flowers was added using one of the "V" stamps.  The flowers ground the windmill, so it doesn't look like it is floating in air and also provide a pop of color.


Since the Tulip Fields Stamp Set does not include sentiments, I used the birthday sentiment from the Flowering Tulips Stamp Set.

I hope you have enjoyed the Tulip Fields cards this week and that you have been inspired to give this bundle a try.  The wedges of Tulips stamps looked a bit daunting before I started, but I have to say that the designer and the engineer that sized and created these stamps did an awesome job.  It was much easier than I expected to align the images and create beautiful fields of flowers.

If you would like a tutorial for today's card that includes the cutting dimensions and step-by-step directions, please use this link to download your copy.

A list of the supplies I used is also shown below.

Product List

Wednesday, March 23, 2022

TULIPS ON THE WALL

Last month I was asked to present three cards using the Tulip Field Bundle at a stamping retreat.  This is one of the cards that I shared with the group. 


When I envisioned this card, I thought I would use the die that creates a border of tulips.  However, when I started making the card, I realized that the die I wanted to use was from the Flowering Tulips Bundle and not the Tulip Fields bundle.  Oops!

I had already created my brick walls, and didn't want to scrap the whole idea, so I decided to use one of the designer series paper designs from the Flowering Fields Designer Series Paper (DSP) Collection.

I laid a piece of the Tulip paper behind the brick wall and plotted out a plan on how to fussy cut the paper so that it would follow the steps of the wall.  Tedious?  Yes, a bit, but I was really happy with the outcome.


To make the brick wall I used my brayer and inked up the logo side of the Brick & Mortar 3D Embossing Folder with Gray Granite ink.  Note: You will want to use a hard rubber brayer, not a sponge brayer.  I then added Basic White Cardstock to the folder and ran it through the Stampin' Cut & Emboss Machine.  Voila, I had brick with gray grout.  I then cut the paper along the grout lines to create the steps on the retaining wall.  The lower wall is the top piece that I had cut off.  I just rotated it 180 degrees to make a second flower box "retaining wall".

The beautiful sky is another of the designs from Flowering Fields DSP.   I could have used Basic White for the sentiment, but I didn't want it to become the focal point.  I wanted it to sort of blend in with the sky, so I stamped it on the same DSP as I had used for the sky.  I could have stamped it directly on the sky, but I thought the added dimension I got by popping it up on dimensionals added a bit of interest.   The sentiment is from the Flowering Tulips Stamp set.


To create the bicycle, I die cut the bike three times with three different colors of cardstock, Basic Black, Poppy Parade and Mango Melody.  I kept the Basic Black bicycle intact but cut the Poppy Parade and Mango Melody bikes into pieces.  I then used liquid adhesive to add the different colors to the Basic Black bike.  That way I still had black tires, but I was able to get a red bike with a Mango Melody basket.  I added a couple of Rhinestone Basic Jewels as hubcaps -- plus they hide the Mini Dimensional that fits behind the wheel hub.


When I created the brick wall, I had three rows of bricks leftover, so I used these to create a flowerbox for the inside of the card.  A little more fussy-cutting, and the flower box was filled with tulips!


What do you think of this card?  Would you like to make it?  I have a FREE tutorial available for download.  Use this link to access it.  If you have any questions, or if I can be of help, please leave a comment, and I will do my best to answer your questions.

The products I used for this card are listed below.


Product List