Sunday, May 26, 2024

SHARE-IT-SUNDAY DRIZZLING DAISIES

It is Share-it-Sunday, and I am hopping along with the Creative Collaborations Team on their blog hop today.

Since it is also the start of a new week, I have a new stamp set to start sharing with you.  I will be sharing projects made with the Cheerful Daisies stamp set and dies all this week.


Cheerful Daisies has been around for a while, but since daisies make me think of summer, and Memorial Day is sort of the official "kick-off" of summer here in Michigan, I thought I would share this stamp set again.  

I checked back through my blog to see when the last time I shared this bundle and it was the week of April 30, 2023 -- so it is definitely time to use it again.  If you want to check out projects that I share over a year ago, use this link to get you to the April 30, 2023 post.  Once there you can also see the other cards that were shared that week.

For today's card, I combined my daisies with the Drizzling Droplets background stamp.  This is an ONLINE EXCLUSIVE stamp that I haven't gotten around to using until today! 

When I first started stamping almost 20 years ago, I think I purchased every background stamp that came out.  I loved them, but in recent years, for some reason I haven't purchased many.  But when I first saw this one introduced recently as an ONLINE EXCLUSIVE, I saw lots of potential ways to use it.

I stamped it today in Old Olive ink as I pictured it as greenery hanging over a wall or on a trellis.

My daises are all die cuts only -- no stamping.  Each of the 3 layers uses a different paper.  The bottom layer is Basic White, the middle layer is Petunia Pop Glimmer Specialty and the top layer is Petunia Pop DSP from the 24-26 In-Color DSP collection.  Each flower uses a different pattern.  Can you make them out?  Floral, dots and tile.

I will say that this card is much prettier in person than in the photos.  My skills of photographing sparkly and shiny things has not improved!

I kept the inside of the card simple, but not forgotten!


If you would like a tutorial with all the details to make this card you can use this link to download a FREE PDF.

A list of the products use is also shown below.  To learn more about any product or to purchase, just click on the image that you are interested in.

USE THE LINKS BELOW TO HOP ALONG TO SEE WHAT OTHER CRAFTY COLLABORATIONS STAMPERS ARE SHARING TODAY!


Product List

Friday, May 24, 2024

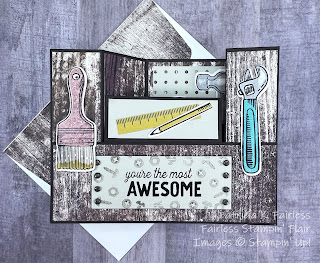
A TRUSTY WORKBENCH

I have a really unique Fun-Fold to wrap up our week with the Trusty Tools.  What do you need when you have lots of tools?  A place to store them, right?  So today's fun fold is in the form of a workbench.


How cute is this?  Would a special person in your life like to receive this card? 

I first saw it on stampwithtammy.  She used embossed cardstock to decorate her workbench, but since I had just received the Country Woods Designer Series Paper (DSP), I decided to make my workbench from some rough looking lumber.  


I have pegboard behind my home workbench, and it works very well to store tools and "other stuff".  So, I decided my card workbench also needed some pegboard behind it to hang some tools.

The pegboard and sentiment are made from our new Basic Beige cardstock.  This is a wonderful new neutral color.

The ruler on the top of the workbench was cut from a scrap of the Sale-A-Bration Paper that coordinates with the Trusty Tools bundle  If you didn't get that DSP, no worries.  Just leave the ruler off the bench.  Our workspaces tend to get too cluttered anyway, don't they?  At least my stamping "workbench" does!

You may be wondering how you can mail this card.  Just push the top of the workbench up and move the fun fold to the right or left and the card folds flat for mailing!

Even though my dad is no longer here for me to send him a card, I know he would have loved receiving this card.  My dad was very mechanically inclined and could build anything!  I know he would have like the mechanics of this card.

My dad was also the most AWESOME dad, so, Dad, even though I can't mail it to you in heaven this card is for you!  I love you and miss you!


Don't let the Fun-Fold portion of this card scare you.  It is so much easier than it looks.  Download the tutorial with diagrams and just take it a step at a time.  I know you can do it!

A complete list of products used is shown below.

Product List

Wednesday, May 22, 2024

LOVE TRUSTY TOOLS

I saw a card on Pinterest where they used various tools from Trusty Tools to spell the word LOVE.  I thought it was a really cute idea so decided to make my own version of the card.

The Designer Series Paper (DSP) on the background is from the Country Woods Collection.  My order with this DSP just arrived, and I'm in LOVE!  Come back on Friday to see another card that uses this DSP.


For the pegboard that is holding the tools, I used the largest Nested Essentials Hexagon and die cut it from Basic White cardstock.  I then used the pegboard die from Trusty Tools die to turn it into pegboard.  I did need to die cut it twice, but the second time through, it was extremely easy to align the die with the first die cut.  I just put the die in the last row of "holes" and voila, it was perfectly aligned.


The letters were made with one hammer, one tape measure, two crescent wrenches and four pencils.

I thought this was such a clever idea from Stampwithmelissa.  I admire those that come up with such unique ways to use our stamps in an unexpected way!


I left the inside of the card sentiment free for now as I'm not sure who will receive this card or what the occasion will be.  I added a finishing touch to the inside by adding a strip of the same Country Woods DSP to the bottom edge.

Use this link to download a free PDF tutorial for today's card.

Below is a complete list of the supplies I used.


Product List