Showing posts with label Layering Circles. Show all posts

Wednesday, August 11, 2021

Love a Good Gingham

 My Peaceful Gingham Deer


What do you think?  Isn't he handsome?  This little gingham deer was made by punching him from one of the patterns in the Peaceful Prints Designer Series Paper.  It a FREE Sale-A-Bration choice with a qualifying order.  

I don't know about you, but I have always loved a good gingham designer paper pattern -- in any color. There is something about gingham that exudes a nostalgic and cozy feeling while looking crisp and fresh at the same time. 

On the opposite side of the paper with the "punchable" gingham deer is the awesome black and red gingham check that I used on the lower panel of this card.  I love how Stampin' Up! provides so many products that coordinate.  It makes the creative process a little easier.  

The beautiful Red foil is available in the new Fall Mini Catalog and the pack includes both Red and Green foil--perfect for Christmas Cards.  I embossed the foil with the snowflake pattern- which is one of two patterns in the Wintery 3D Embossing Folders pack.


The gingham deer was layered on one of two circles created with the Layering Circles dies.  To finish the card front I added the White Glittered Organdy Ribbon from the Peaceful Place Suite in the Mini and then sprinkled a few Red Rhinestones on the card.  If you have missed this ribbon, you should go check it out.  It is beautiful and sparkly, but because of the organdy material it remains transparent so it takes nothing away from what is behind it!

Sticking with my mantra "no naked card insides" I trimmed the inside with black and red layered mats and a narrow strip of the gingham ribbon.


I hope you like today's card and I'd love to hear your comments.  If you have questions about how to recreate this card, there is a free tutorial available which provides step by step instructions and all the cutting dimensions.

If you would like to receive my Happenings Newsletter, please complete the information on the Contact Me tab above.

A list of items I used to create today's project is shown below.


Product List

Wednesday, August 4, 2021

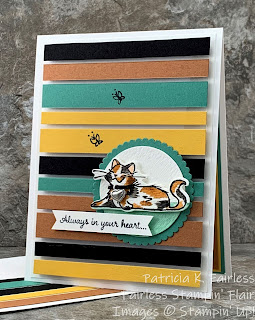
Meet Callie the Calico Kitty

Today I'm back with another card made with the Pampered Pets Stamp Set and Pets Dies.  

Peabody had so much fun on Monday telling you about his new house that today he wanted to introduce you to Callie, his calico kitty friend.  Callie is definitely a Pampered Pet!  

Peabody  reminded me to tell you that he really just tolerates her, and Callie wants me to make sure I tell you that she's the real boss.


Callie is a bit bossy and she decided she needed a card that is a little different and compliments her Calico colors.  She saw a tutorial on Splitcoaststampers by Melissa Stout that she liked, so in her "bossy" way, she convinced me that I needed to try it.  

The technique is called Floating Strips, and it was a new one for me.  You can see a great tutorial at the link above, but the short story is that you glue strips of different color cardstock to an acetate sheet and then adhere it to a piece of white card stock with adhesive foam strips.  It gives the appearance that the colored strips are floating.  I liked it, and because Callie was being pretty "bossy" I acquiesced and told her I would try. 

Next, Callie had to make sure that I matched the colors on the card to her, so I used this little picture of her to do my best to make a match.  Doesn't she look sweat?  It's hard to believe that she can be so bossy!


The black and white was obvious, and after studying her picture further, I decided that Cinnamon Cider was a good match for her 3rd color.  I asked her if I could use Bumblebee and Just Jade as colors to compliment her complexion and she said, "It will do, but make sure the Bumblebees don't bite!" 

Callie insisted that I add a couple of little playmates she could chase, so she choose butterflies.  So far, she hasn't caught them, but I'm sure she'll keep working on it.

She wanted me to create a watercolor painting of her so you would all know that she was the boss of this card.  So, I got out my Watercolor paper and Water Painters, and did as she asked.  I used a Classic Ink Pad with a reinker for the Cinnamon Cider, and a Watercolor Pencil for the black.  Callie made me practice a few times, but after the 3rd time, she said it was "OK" and I could quit.  She was probably just tired of listening to my grumbling, but I didn't ask any questions in case she changed her mind.

For the inside of the card, Callie said that since I was so stressed about the whole watercolor painting thing, that I better just keep it simple.  So I did.  I didn't show her the inside because I didn't want her to be upset that she was the star of a pet sympathy card.  Maybe she would be OK with that, but I wasn't going to take a chance.


I hope you liked Callie's card today.  If you would be so kind as to leave a comment below, I'll be sure to pass them on to Callie.

If you would like detailed information to make this card you can see a free tutorial here.

Below is a complete list of the products I used to make the card.

Product List


If you would like to receive my bi-weekly Fairless Stampin' Flair Newsletter, please complete the information on the Contact Me tab above and submit.  If you don't already have a demonstrator, I'd love to be yours.  Let me know how I can help you.