Sunday, November 26, 2023
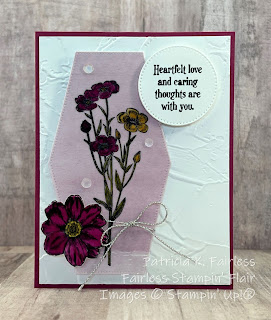
SKETCH WEEK - THINKING OF YOU
Wednesday, September 6, 2023
LOVE IN THE MEADOW
I totally CASEd (Copy And Share Everything) the 23-24 Annual Stampin' Up! Catalog for today's card. If you ever experience a personal lack-of-inspiration moment (or week), just flip open any of Stampin' Up!'s catalogs and you will probably find a project that inspires you. My inspiration came from one of the images shown for the Quiet Meadow stamp set on page 66 of the Annual Catalog.
I loved the layout of the green card but wasn't crazy about the colors, so I just changed up the colors. I replaced greens, yellows and pinks on Basic White with Copper Clay, Pretty Peacock, and Copper on Very Vanilla.
It took me a bit of trial and error to figure out how they made the Countryside Corner die cut background. I could see there was what appeared to be a border on the die cut, and I really liked that bit of detail. But the flower appeared to be stamped on both the border and the inside piece, so I wasn't sure how they did that. I fretted over it for a bit and then just decided to go with a single larger piece. However, once I had the flower stamped and colored with my Blended Pen and Stampin' Blends on Very Vanilla and was ready to die cut it, I had a lightbulb moment. I thought, "maybe they just die cut this same piece twice and then just used both pieces." I can't be 100% sure that is what the Stampin' Up! artist did, but I thought my result certainly gave the same "look" as what I saw in the catalog. I had never thought of doing this before, but now that I have discovered it, I think I will be doing it again -- assuming I remember.
For my Pretty Peacock twine, I used White Bakers Twine and colored it with a Stampin' Write Marker. It worked OK, but if you try it, just make sure you let the ink on the twine dry well before wrapping it around your cardstock -- because if it is NOT dry it does tend to leave color on the Very Vanilla.
The little "side flags" behind the focal point and the butterfly were cut from Oxidized Copper Paper. This is a new Specialty Paper in the Fall Mini which you can order from TODAY! This paper includes two sheets that are a mixture of Pretty Peacock and Copper and two sheets that are tonal copper metallics. It is beautiful, and I really like how the butterfly turned out.
For the inside of the card, I stamped another of the flower bouquets. To color the bouquet, I used the same method as I used for the card front which was to stamp the image with Old Olive ink and then use a blender pen on the stems, leaves and buds to blend a little of the stamped color to fill in the image. The flower centers were shaded with Pretty Peacock Stampin' Blends and the Color Lifter.
I had die cut two butterflies for the card front as I couldn't decide which one I wanted to use. So, I used the leftover one for the inside of the card. I thought it drew attention to the sentiment.
What do you think? How did I do "casing the catty?"
If you would like a detailed tutorial with cutting dimensions and step-by-step directions, you can use this link to download a copy.
Refer to the product list below for the products I used.
Newly available today from the Fall Mini: Oxidized Copper Specialty Paper - Item 162190.
Product List
Monday, September 4, 2023
QUIET MEADOW THIS OR THAT
It's Monday, and time for a new bundle of the week. This week I will be featuring the Quiet Meadow Stamp set and the coordinating Meadow Dies. This bundle (which is no longer sold as a bundle) has been available for a while, but it is new to me as I just recently purchased it.
Honestly, I don't know what took me so long. The stamp images and sentiments are awesome in this stamp set. And while no Meadow Dies were used on today's cards, I know I am going to get a lot of use out of these dies. For more information refer to my Product List at the bottom of the post.
Today I am actually sharing two cards which are "similar" but "different," and I would like to know which one you like best. THIS one? or THAT one?
Both cards use a coloring on Vellum Technique, and I first shared these cards on my Learning with Friends video series.
On both cards the floral images were stamped on Vellum Cardstock with Black Stazon ink. "THIS" card was colored with Stampin' Write Markers on the front of the Vellum. "THAT" card was colored with Stampin Blends on the back of the Vellum.
To learn tips about coloring on Vellum as well as a couple of additional ways to use vellum cardstock watch my Learning with Friends video.


