Monday, August 23, 2021

A Traditional Christmas

 Painting a Traditional Christmas

This week I'm getting into the Christmas spirit -- and besides, it is really time for me to get moving on making Christmas cards if I am going to get them finished on time!

I have decided to use the Painted Christmas Suite of products this week.  
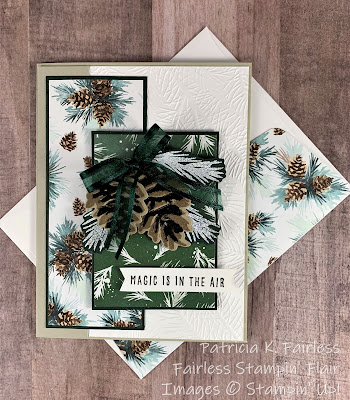

Today's card features the Painted Christmas Designer Series Paper.  The pine cone design is one of my favorites in this paper pack.  I combined it with the more "simple" Evening Evergreen paper with the white pine branches.

In keeping with this design I used one of the Wintery 3D Embossing Folders with the pretty pine branches to emboss the white background.  Since this embossing folder 2-pack includes two narrower embossing folders which are not wide enough to emboss a full card front, I added a strip of Sahara sand, which is the same color as the card base, on the left side of the card front.  This was my "Band-Aid" to cover the portion of the white cardstock that was not embossed, but I actually like how it turned out.  If I hadn't told you, you probably would have thought it was part of the plan, right?
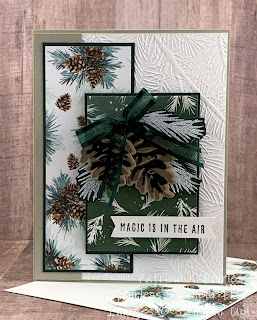

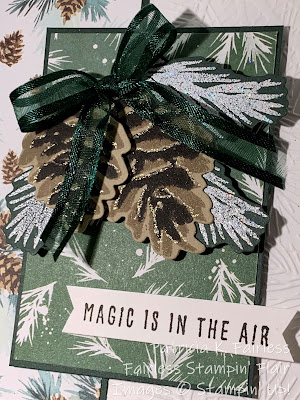
The two pine cones and the pine branches were made with stamps from the Christmas Season stamp set, and then die cut with coordinating dies from Seasonal Labels Dies.  The pinecones are stamped with Crumb Cake and Early Espresso, and the pine boughs are heat embossed with white embossing powder.

The sentiment is from the Christmas to Remember stamp set.

I did add a little sparkle by using a white sparkly gel pen to outline the top edges of the Early Espresso ink on the pine cones.  In person, this adds exactly what the card needed.

And of course, we couldn't forget to decorate the inside and the envelop.  I added a narrow strip of the Painted Christmas designer paper edged with Evening Evergreen, and the two pinecones were made with the same process used for those on the card front.  The sentiment is also from the Christmas to Remember stamp set.  

One of my favorite ways to add a finishing touch to an envelope is to cover the flap with designer series paper.  It's so quick, easy & pretty!


If you would like a free tutorial for this card, you can find one at this link.

I hope you enjoyed today's card and are motivated to start making your Christmas Cards.  I realize it is only August, but if we want to save ourselves stress later, it's never too early to start!

A complete product list for today's card is included below.


Product List

Friday, August 20, 2021

Juxtaposition Dahlia Card

Which card is your favorite?

I had not played with my Basic Border Dies in a while so I wanted to see what I could do with them to create some interesting angles on a card--something a little different than a basic border.  This is the first card that I created.


It uses the scalloped edge border die that looks sort of like a squared-off envelop flap.  I used it to die cut the Basic White Cardstock at an angle.

Since I had a few  "leftover" silver foil scalloped rectangles that had been cut with the Stitched so Sweetly Dies from, I also decided to use one of those.

You may be wondering why I would have a "few" of these leftover silver foil die cuts.  When I create a larger mat from any foil, I never want to waste any!  Did I mention the other day when I was talking about some "bad" painter's tape that I'm "cheap"?  Anyway, if the center of the foil mat is going to be covered with other cardstock, I always die cut a shape from the center of the larger mat to use later so I can maximize the use of the foil.  So for today's card, I decided to use one of those valuable "leftovers".

To stay with the mood of silver elegance, I heat embossed the dahlia flower and two of the triple leaves from the Delicate Dahlias stamp set with silver embossing powder.  I then colored the flower with Balmy Blue Stampin' Blends and the leaves with Granny Apple Green Stampin' Blends.  After coloring, they were fussy cut and assembled on to the silver foil.

I added a sentiment stamped with Black Memento and die cut it with one of the dies from the new Frightful Tags Dies.  Although the Frightfully Cute Bundle is a Halloween themed bundle, the dies have some great shapes perfect for sentiments.

I had intended to cover the lower portion of the Balmy Blue card base with a designer series paper, but after searching through my stash I did not find a Balmy Blue design that I liked.  So my next thought was to emboss that portion of the card.  I decided to try the Brick & Motor 3D embossing folder.  I wasn't sure how it would look because the Brick & Motor is sort of the opposite of "elegant".  But once I assembled the white scalloped die cut piece and the silver foil and flower assembly over it, I loved the juxtaposition it created.  Elegance with a little rough and tumble!  I'd love to hear your thoughts about this combination.  

I kept the inside of the card clean and simple, but it is definitely not naked!  I added a sentiment from In Your Words stamp set, and trimmed the Basic White cardstock with a Balmy Blue strip and a little narrow scrap of silver foil placed beside it.  Now I'm ready to send the card to a friend and hopefully make them smile!


As I mentioned above, my initial vision for this card had designer series paper (DSP) on the lower front.  Since I was having fun playing with the Basic Border Dies, and I had another "leftover" valuable scrap of silver die cut foil,  I decided to see if I could come up with another card using this same layout.  Here's what I came up with.


There are a few differences between the two cards.  Some are obvious.  Some are less obvious.  Which card do you like best?

Do you ever do those puzzles where you compare two pictures that at first appear to be the same, but the challenge is to find all the differences?  How many differences can you find between my two cards?  Leave me a note in the comments! 

There is a free tutorial available for the Balmy Blue card.  That tutorial also can easily be used to also create the second card.  

If you would like to receive my Fairless Stampin' Flair Newsletter, please complete the information on the Contact Me tab.  

It is my goal to help you any way I can.  If you have questions, please leave a comment or contact me through the Contact Me tab, and I will do my best to answer your questions.

A complete list of products used to create the card is shown below.


Product List

Wednesday, August 18, 2021

Delicate Dahlia Inspired by Pat's Garden

 MY GARDEN INSPIRED DAHLIA

Today's card was inspired by a dahlia plant that I have next to my deck.  Going by memory I attempted to replicate the color of my live plant when I colored the flower.  Now you might wonder why I didn't go look at the flower first before coloring.  Well I was lazy and didn't feel like making the long walk to the deck (probably about 20 feet!).  Besides I was feeling pretty confident that I knew what color it was.  After all, it took me a long time debating between a couple of different colors at the nursery back in May when I bought it.  (There were so many colors and they were all so pretty!)


After I finished coloring the flower, I got the bright idea that I should take a picture of my live flower (yes it is still alive) to share on my blog.  Well, once again I proved to myself that my memory isn't quite as good as I think it is.  In retrospect the smart thing to do would have been to walk the twenty feet out to my deck and look at it before I colored it because when I went out the next day to take the picture and studied the flowers more closely (actually I was picking off dead ones and shooing the bumble bee away), it didn't look quite like my memory thought it did.  LOL


There is more yellow in the "real" flower than the one I colored for the card.  But, after stamping and coloring three of the flowers and fussy cutting them into different size layers so I could create a 3D flower, I wasn't about to start over.  I decided it was "close enough".   After all, the real flower was for "inspiration"; it wasn't mean to be copied exactly, right?   What do you think?  Close enough?

Other than all the fussy cutting, the rest of the card came together fairly easily.  The designer series papers I used are from Pansy Petals and the '21-'23 In-Color paper packs.  They were both layered on Evening Evergreen cardstock.  The card base and Painted Texture background are in Soft Sea Foam.

I added a double bow with the gold cord from Simply Elegant Trim (love these gold and silver cords) and attached a little retired sympathy sentiment which I die cut with a die from the Ornate Frames Dies.

To finish the card I covered the flower with a light layer of Wink of Stella.  It's difficult to see in the photo, but it adds a beautiful bit of shimmer to the in-person card.


I kept the inside of the card very simple.  I added a sentiment and a strip of Evening Evergreen layered with the same diagonal plaid designer series paper that was used on the front of the card.  


I have a weakness for great sentiments, and I love this one from the In Your Words stamp set.  This stamp set is available as a hostess Stampin' Reward during Sale-A-Bration, and it has 10 versatile sentiments in a really nice variety of fonts.

If you would like more information on making this card, there is a free tutorial available.

A complete list of products used to create the card is shown below.

If you would like to receive my Fairless Stampin' Flair Newsletter, please complete the information on the Contact Me tab.  I would love to help you any way I can.  If you have questions, please leave a comment, and I will do my best to answer your questions.


Product List